Showing posts with label embossing powders. Show all posts

Thursday, 1 October 2020

Brave Little Robot - Tag - for SanDee&amelie's Steampunk Challenges

Hi, servus and welcome to the start of our October challenge over at SanDee&amelie's Steampunk Challenges! Once more it is time for a little steampunk crafting fun - and who knows...maybe it is you who will win one of the two prizes we're giving away each month! Please, check out the rules and details - alongside the teamies' fantastically inspiring makes - over at SASPC! 


I've created a fun tag this time - playing around with DecoArt media fluid acrylics and Crackle Paint, Seth Apter's Wow embossing powders, some steampunk and industrial themed dies, background papers, Calico Craft Parts and the cute "Robot" stamp from Aall & Create. 


Using stamps with sketchy images is a bit tricky as you cannot fussy cut the stamped images without losing a lot of character from the design - so I decided to stamp the image onto some acetate with StazOn ink and paint the back white - using an acrylic paint marker. 


In a final step the acetate got fixed to the finished tag background using small black sticky foam pads that I covered on the top with some Calico Craft Parts screw heads. 


The background was done first of course - using a designer paper from my holy paper stash (yes, I am trying to use up my long hoarded stuff....lol). That was glued to a sturdy Calico Craft Parts MDF tag with matte Decou-Page glue, trimmed and finally inked around the edges with black archival stamping ink. 


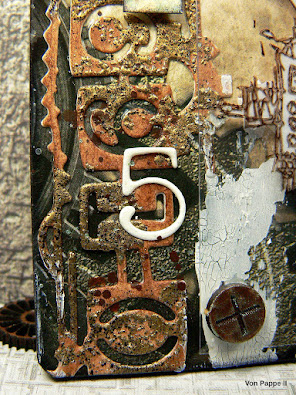
The die cuts were cut from sturdy white cardstock and then got painted using DecoArt media fluid acrylic paints in a watercolour-y way. I layered Burnt Umber, Quinacridone Gold and English Red Oxide quite randomly. Afterwards I partially heat embossed one of them using Seth Apter's Weathered Gold embossing powder. 


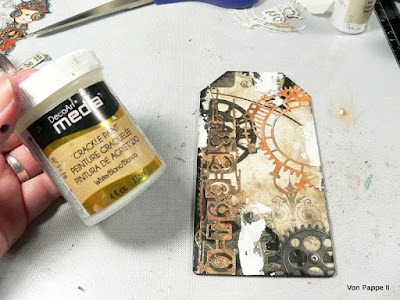
In addition to that I spread a little white DecoArt media Crackle Paint here and there on the tag with the very tip of a palette knife. 


To repeat the white from the stamped image and crackle paint I then also used the left overs from one of the die cuts - the white numbers - and added them to the background with DecoArt matte Decou-Page. 

The acetate got fixed to the tag - done! 


I hope my little "brave robot"-tag has put you in the right mood for some steampunk crafting! I promise; the makes of my teamies over at our challenge blog will add even more fantastic inspiration! I hope to see you play along!

Hugs and happy crafting!
Claudia
xxx


Thursday, 17 September 2020

StencilGirl® and Seth Apter - Wow! - Blog Hop

Hi, servus and welcome to an especially exciting blog post today!


As the banner indicates, it's time for another blog hop - this time "WOW!" and StencilGirl Products have teamed up to showcase the new fabulous embossing powders (and Mixed Media Embossing Brush) designed by wonderful Seth Apter and to demonstrate how well these can be used together with StencilGirl stencils to create the most amazing projects with the special wow-factor (sorry, couldn't resist the pun).


Designers from the WOW! and StencilGirl Products design teams are sharing their projects (WOW!'s designers have shared theirs already yesterday...today it's StencilGirl's turn) to inspire you and introduce several ways on how to use Seth's cool WOW! embossing powder Trios and - my favourite - the Mixed Media Embossing Brush (I will tell you why I love it so much a little later in this post in the tutorial section).

At the bottom of this post you will find the links to the other teamies' blogs and projects and learn how to participate in the blog hop and about the great  GIVE AWAY that is waiting for three lucky persons...


But first let's take a close look on Seth Apter's new WoW! embossing powders and how they go together with StencilGirl stencils!
This is the project I have created for this blog hop:


It was all done using - of course - Seth Apter Wow! embossing powders, StencilGirl stencils...and DecoArt Americana acrylic paints.
The panel my altered brush sits on is an old bamboo chop board that I created a background on using Seth's "monoprinting-with-paper" technique (one of my favs).

And as I love to use found objects and left over snippets of previous projects in my work (that I keep in a little wooden box on my desk for inspiration), there is also a left over piece of self made Dresden trim (done with one of the 3D Impresslits folders designed by Tim Holtz), a frozen charlotte, some dictionary scraps and a small piece of linen ribbon to find.


Here are the products and substrates I've used...I always love to have quite a stash of stencils at hand when I start a project so I can pick the ones that fit best while the project evolves and takes me on its own journey (so some of the ones shown here weren't used in the end).


 I've used these StencilGirl stencils to create my altered brush panel: 


- ATC Mixup Apter stencil by Seth Apter
- medium sized stencil from the October 2016 Stencil Club Set by Mary Beth Shaw


The two WOW! embossing powder Trios designed by Seth hold six amazing powders that go by the intriguing names of Blue Moon, Sea of Tranquility and Space Dust (from the "Cosmic" Trio) and Etched Platinum, Weathered Gold and Crusty Copper (from the "Metalz" Trio). The thin bottle with the yellow liquid to the left holds Seth's "Mixed Media Embossing Brush" and an embossing liquid that can be applied to almost any surface by using the brush that is included in the lid.

On my project I went wild and tried the powders and the Mixed Media Brush on as many different substrates as I could - on wood, on paper, on top of acrylic paint, on the brush's bristles and also the metal part, on left overs from chipboard tokens from some board games and on some linen ribbon...and it all worked like a dream!


What I especially love about the Mixed Media Brush is that the liquid has an extremely long open time (compared to other embossing liquids from embossing dabbers) and you can vary the thickness and amount of liquid applied by spreading some of it with the brush on a palette first and using a cosmetic sponge for dabbing only a really thin coat of that onto a surface (which also works extremely well with stencils).
A little of the liquid goes a long, long way and applying too much of it can cause your embossing powders to kind of swim on top and drift away during the melting process. So less is more in most cases, but on certain substrates - like the brush's bristles or fabric for example - you need a thicker coat than a dabber would provide. So the Mixed Media Brush is really versatile and opens up a lot of new possibilities (which makes my mixed media heart sing).

My bamboo board and the ugly red brush were primed using DecoArt Chalky Finish paint "primitive". 


Then I picked some DecoArt Americana acrylic paints and put together one of my go-to colour schemes. I applied layers of paint by first brushing it onto a piece of card stock and then pressing that onto the board - a kind of mono printing technique that is perfect for layering and creating depth and that I've picked up with one of Seth Apter's great online classes.


Voilà - the base for my altered brush and for the next layer that was to be done with stencils and embossing powders was finished!


To tone down my brush I dry brushed it with some dark brown acrylic paint. Then I used the Text and Texture Transform stencil and orange acrylic paint to add the focal word to the brush's handle. I applied the paint through the stencil using a very small stencil brush.


I added more orange words from the stencil to the bamboo panel. Before the paint was completely dry I sprinkled some Sea of Tranquility embossing powder on top, tipped off the excess and heat embossed the traces left on the stencilled words. This added a kind of patina look as it didn't adhere to the whole design.


To create a kind of metal rivets I used two different sizes of left over circles from board game chipboard tokens and heat embossed these with Weathered Gold and Crusty Copper.


The label was heat embossed using Space Dust embossing powder.

Then I fused the smaller "metal" bits with the larger ones by simply putting them together and re-heating. This way the bits on top sank into the molten embossing powder below and once everything had cooled down it was beautifully fused without the use of any glue.


Two stripes of embossing powders (Space Dust and Sea of Tranquility) got added to the very ends of the brush's bristles.


More heat embossing on the panel was to follow! I used Sea of Tranquility again together with a stencil to create the beautiful drip lines. You can see the cosmetic sponge to the very right. Right left to it I had spread some embossing liquid from the Mixed Media Brush flask on my palette (but that doesn't show in the picture). From there I picked some up with the sponge and applied it thinly through the stencil. It gave perfectly crisp outlines!
(I used the left overs on the palette about half an hour later and it still worked smoothly - that's what I really call a long open time!!!)


You can also see the crisp lines from the design from Seth's Urban Insiders Bar stencil - this time done in "Blue Moon" embossing powder.  I had again used the cosmetic sponge through the stencil to apply the Mixed Media Brush liquid from my palette.


Etched Platinum went to the widest section of the metal wrap of the brush and was also used to fix the frozen charlotte in place.


I added some more heat embossing here and there - trying to repeat all the colours used in at least three different spots to fuse everything visually.

Using a fine tip Faber Castell PITT artist pen I outlined some of the designs for better visibility and more interest.


I finally found I needed a kind of frame for my frozen charlotte, so I die cut a circular label holder from heavy cardstock and heat embossed that with Weathered Gold (using the still not dried out left overs from the Mixed Media Brush liquid on my palette!). The label holder looks almost like the real metal thing, doesn't it?!


Three more tiny circle chipboard left overs were heat embossed with Crusty Copper for two nail heads for the label holder and one nail head that was to go on the end of the brush handle.


The piece got finished off by adding some text from the dictionary page scraps and gluing everything in place. Before that I had also added thin stripes of Weathered Gold and Blue Moon the the brush - the latter was applied to the linen ribbon (to the right). With the Mixed Media Brush that was no problem at all.

The brush got fixed to the panel by using thick heavy duty sticky foam pads. The other bits were glued in place using tacky glue and matte DecoArt Decou-Page.


Some close ups: 


My panel tells about stories lost, stories within, stories that are yet incomplete (the stories of our lives), the acceptance of incompleteness in general, it tells about the "principles of trusting" - that come into play when we take a "leap" and put our art (and soul) out there and only dare to do so because we are able to "lean" on our faith in the quality of our own art.


And now let's finally talk about the ...


There's a $35 Gift Certificate to StencilGirl® Products,
a $35 Gift Certificate to Seth Apter’s Shop
AND a $25 Gift Certificate to Wow!

Enter to win by leaving a comment below.
Then be sure to visit the other blogs in the hop and comment to win.


Tina Walker
Debi Adams
Mary C. Nasser
Claudia Neubacher (you are here now)
Kate Yetter


The more blogs you comment on, the more chances you have to WIN!
Three winners will be chosen at random from all blog comments!
(Only one comment per blog please.)

You have until Tuesday, September 22nd at 11:59PM Central Time to leave your comments.
Winners will be announced on Wednesday, September 23rd.


Good luck, everyone,

and as always

hugs and happy crafting!

Claudia 
xxx


Tuesday, 28 January 2020

New Design Team - New Creative Adventure!

Hi, servus and welcome to a quite special blog post today - my first appearance as a design team member creating for MarteLAB - the blog of lovely Marcella's Marte store (an Italian online and  bricks and mortar shop situated in Savona, Italy)!

I was so honoured when they invited me to design for them in 2020 and I was generously given a wonderful collection of fabulous AALL & CREATE stamps and stencils to play with. So my first project (and detailed step by step) can be found over on their MarteLAB blog today and I would like to invite you to check it out (by clicking HERE for example).


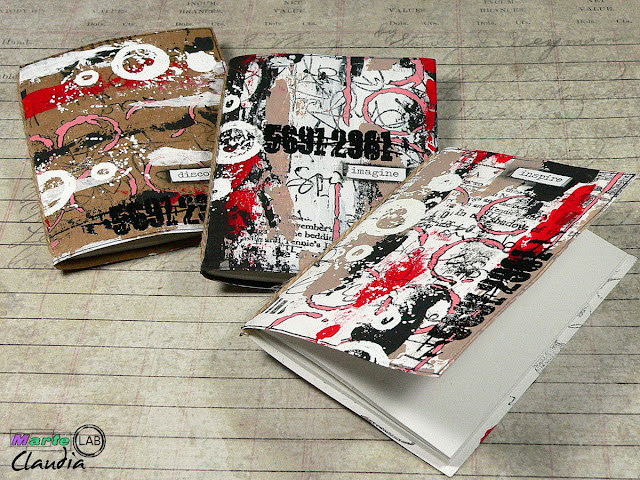
I've created a set of three small note books and the detailed tutorial shows how to create beautifully layered covers that fit any size of notebooks - so you can use any kind of cheap thin notebooks and customise them to turn them into a beautiful set (which makes for a perfect little self made gift by the way).


I've used some of my favourite techniques, media and tools to create a lot of depth and interest on some of my favourite substrates. ;)


I hope to see you over at the MarteLAB blog soon!

Hugs and happy crafting!
Claudia
xxx


Monday, 13 January 2020

Rust it Up - for SimonSaysStamp Monday Challenges

Hi, servus and welcome to my second post and project as a spotlighted guest at SimonSaysStamp's Monday Challenges this January!


I am so honoured to be invited to guest with them this month and this week's theme definitely was just right up my alley:


Rust it Up

is the theme for this week's challenge and as the beauty of rust of all kinds is one of my favourite themes in general, I found it quite difficult for me to limit myself down to just a few products and items from my stash - but finally I made my choice and this is the result:


I have altered a cardboard box I once bought at a well known Swedish furniture store. It is part of a four piece desk organiser and the other three containers still sit on one of my shelves, waiting to be turned into something more pleasing to look at ;)


I've used the cool Voltage Sizzix die designed by my favourite dies designer - Tim Holtz! As it is a BigZ die it cuts through really heavy grey board - so my panel looks awesomely dimensional and turning it into a rusted and forgotten looking piece of tech gear was great fun! Here's what I did to create this panel:


I started with die cutting all the pieces on the Voltage BigZ die twice from thick greyboard. I stacked the base and circle shaped elements, but only used a single layer for the hand and the screws and washers.

I also cut a piece of acetate to size so it fit between the two circle shaped panels and coloured it using Ranger Caramel Alcohol ink and a piece of alcohol ink blending felt with the blending tool.
I had also stamped a scale - using the stamp from Tim's "The Professor" stamp set - onto some white card stock that I had cut to size using one of the die cut window shapes as a mask to trace around so I could cut it to according size to insert it after blending its edges with vintage photo Distress Ink using the ink blending tool.


This image shows how thick the two layers of greyboard are. The alcohol inked acetate was glued between the two upper layers.


Using Distress Paint antiqued bronze by dipping a soft flat brush into the bottle I painted the voltage indicating device and then sprinkled Emerald Creek Baked Texture Chunky Rust and Patina Oxide here and there on the still wet paint. This way I didn't need any embossing ink to make the embossing powders stick to the project's surface.


I added more heat embossing - this time using Ranger Verdigris embossing powder. Afterwards I dry brushed all the edges using black soot Distress Paint and a flat small bristle brush.


To do so I dabbed a bit of Distress paint on my palette on my glass media mat, then only loaded the very tip of my brush with paint most of which I wiped off on a piece of kitchen roll before I used the left overs on the brush to gently brush that to the edges.


The index hand was given a coat of barn door Distress Paint before I dry brushed its edges too and once that had dried I added a thin coat of Ranger Clear Embossing Powder.


One of the bent shaped panels I had die cut was primed with a layer of black soot Distress Paint and then heat embossed using the Aged Silver embossing enamel from the Stampendous Frantage Embossing Enameling Kit. 
Two small sticky half pearls were used as rivets and given a quick brushing over with black soot Distress paint.

Time to glue everything in place! Yep - that looked quite cool so far ;)


This is a before image of the cardboard container I was going to alter. I took my finished voltage indicating device and rummaged my paper stash for a matching designer paper...


...which was a sheet from Tim's Lost and Found paper stash. It was cut to size and I used the container to measure the height and length of the strip I needed. I also added a finger's width to have an overlap where the paper edges would meet.


Using Tacky Glue - as I had been using before - I glued the paper in place, making sure all the edges were neatly stuck to the box surface. To tone in the paper so it matched my voltage index even better I applied a layer of vintage photo Distress Ink around all sides.


Afterwards I blended the edges of my box using a piece of Ranger Cut-n-Dry Foam and jet black archival ink.


I had decided to add some affirmative quote to my desk organiser and picked one of the beautifully dimensional Tim Holtz idea-ology Quote Chips. It was toned in too using vintage photo Distress Ink and jet black archival ink around the edges.


And because the quote chip tells me to use my wings, I also stamped the order "fly" onto the Aged Silver panel using StazOn black stamping ink and some Hero Arts letter stamps.


Done!

My new desk tidy for my pokey tools, bone folders and drills was ready to use! Yay! 


What is it that you are going to rust up to play along in this week's 
Monday Challenge at SimonSaysStamp? 


Don't forget - there's a fantastic 


to be won by one lucky randomly drawn winner! 

All the products I have used to create my project can be found in their online store (just click on the product names in my write-up to get taken to the product on their shop site). 


Good luck and 
hugs and happy crafting!

Claudia
xxx