Saturday 24 March 2018

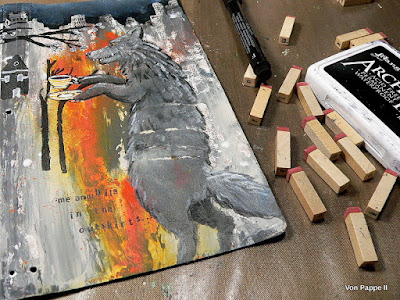
Meet Miss Maisie Greyfur!

Hi, servus and thanks for stopping by today!
It's still quite fresh outside, but at least the snow has gone and I am optimistic that spring has finally arrived by now!

The last weeks with snowstorms and icy temperatures were well spent indoors at my studio desk which I am - to my own surprise - still managing to keep organized and tidied up most of the time. ;)

I recently was very lucky to get some of the fab StencilGirl® stencils to play with and this is the result of my first happy stencilling session using their designs:


It's a journal I made using Eileen Hull's "Journal" die and left overs from packagings. The back and front covers show a single scene:


Please, meet Miss Maisie Greyfur, who is enjoying her first cup of tea (I'm sure it is a strong tasty Yorkshire blend!) of this year in her outskirts garden plot while admiring the first buds on the still bare trees.


I used the Wolf, City Stories and City Scape StencilGirl® stencils alongside some DecoArt media products to create my little romantic early Spring garden scene.


As I always feel quite uneasy with starting from the plain page, I love to create a patterned background by scraping on paints with a palette knife. Some wet on wet, others on top of already dried layers. This time I've used DecoArt Chalky Finish paints alongside some white premium Gesso. 


Once that had dried I sprayed on some Orange DecoArt Mister and spritzed that with water to let the paint run down my cover. Spritzes of white Shimmer Mister were added too. 


I then started with adding the skyline, dabbing on premium paints Carbon Black and Prussian Blue Hue wet on wet with a cosmetic sponge. I also went in with a bit of white and let that mix with the wet paint on the cover to create an ombre effect.


Miss Maisie was stencilled on using white premium Gesso and Carbon Black - mixing them on my palette first before sponging them on.


That was followed by adding the houses and tree shapes in Carbon Black.
Later I also added raindrops and parts of the flowery border from the City Stories stencil to form a part of the garden fence at the very bottom of the back cover. 


Using a detail brush and white DecoArt media Gesso, I painted Miss Maisie's fur and the cup she's holding. I also went in with a dark grey that I mixed from white Gesso and Carbon Black premium paint to paint some shades to the hind legs and the fur. 


Black archival stamping ink was used to stamp my quotes to the back and front covers.


I added some details with a white gel pen. 


The pages for the journal were made  by folding and cutting to size some sheets of heavy printer paper to form three signatures. These were literally "bound" to the cover's spine with some dark grey cord. I simply inserted each of the signatures and tied knots in their centre folds. What I like about this very simply binding, is that the pages can be removed and/or replaced quickly and easily without having to undo the binding. 


I hope you like Miss Maisie's garden and view as much as she does. She always loves to escape the noise and hectic of the city and enjoy some piece and quiet in the outskirts...

A huge THANK YOU to the kind ladies from StencilGirl® for letting me have some awesome fun with some of their stencils! 

Hugs and happy crafting!
Claudia
xxx


Wednesday 21 March 2018

Happy Easter at Emerald Creek Dares!

Servus, hi and thanks for stopping by my little creative spot today!

The latest challenge over at Emerald Creek Dares is in full swing and there is still a chance to play along to get the chance to win an amazing $50 voucher for the Emerald Creek Craft Supplies shop


or just by playing along and entering a project to their challenge will give you a 10% off code for shopping with Emerald Creek Craft Supplies! How cool is that!

Easter Delights


is the current challenge theme - so we hope to see loads of Easter themed projects being entered by you!


I wanted to create an Easter wall hanging that would fit with our dinette. As we have several different types (and therefor colours) of wood from the furniture there, I wanted to create something that would go with the various tones from my beloved Sheesham table and the spruce and birch wood benches and chairs. 


And of course I also wanted to showcase the gorgeous Bunney Key Charm alongside some of Emerald Creek's fab embossing powders - not just Seth Apter's and Kim's latest stroke of genius - the Baked Texture embossing powders, but also some of the others Kim creates and which are just as cool (like the Aroma embossing powders or her metal tones for example). 


Emerald Creek Products used: 

also available at Emerald Creek Craft Supplies:


Everything you see on this image has been created using Emerald Creek Craft Supplies! No designer papers were used!


I started out with cutting a larger panel plus a house shaped panel from thick paint board and I also added a layer of foam board to add more dimension to the house panel. 


Then I used Ranger jet black archival stamping ink and the Kimilese and Tiger Lily stamps to create my backgrounds. Especially the patterns from the Tiger Lily image were perfect for creating a kind of brush stroke like pattern on the house shape! 


The main background panel was toned down using one layer of Vintage Beeswax Baked Texture embossing powder...


....and the stamped house panel was glued to the foam board. Then both were covered with slightly crumpled tissue paper using DecoArt Antique glue and sealant.


Once that had dried I added Distress Stain tea dye to the house panel and made sure I added more of it around the edges so I had a bit of a shading effect for a visual frame.


As I wanted to customize the metal Bunny Key Charm, I first added some matte DecoArt Decou-Page to the key to build up a layer that would provide some tooth for paints to cling to. I simply dabbed on a layer using a soft flat brush.


While that was set aside to dry I added Ancient Amber Baked Texture embossing powder around the edges of my house panel. I simply dabbed on the clear embossing ink around the edges using an Emboss-it dabber. Sometimes I also prefer to use my fingertips for that as it creates more random patterns (to do so I simply dab a bit of the embossing ink on my craft mat and dip my finger in).


I used Paper Artsy Fresco Finish paint and DecoArt Gold Rush Metallic Lustre to customise the key charm.


I had some left overs from die cutting and one was a perfect match to form the background panel for the key charm! I heat embossed the edges with Dirty Sand Baked Texture embossing powder....


...and then used three layers of Clear Ultra Thick Enamel embossing powder in the centre to fix the key charm to the panel.


I still needed a visible edge on the main background panel, so I decided to add Just Java Emerald Creek Aroma embossing powder around the edges. (It really smells deliciously like coffee...yummy!!!).


Then I punched two holes in the top corners of the largest panel so I could later add some rough cord for my hanging device.


I also added a piece of roughly woven ribbon behind the panel with the key charm for additional texture and to make the focal piece pop from the background. A Heart Brad was inserted into the foam board panel before I mounted that onto the background panel.


I love how the different embossing powders created such different effects and surfaces! They're all just great for creating assemblage pieces with that bit of bling!


I hope you like my finished Easter Wall hanging as much as I do!  And I hope to see you play along with us at Emerald Creek Dares of course! Simply click HERE to get taken to the challenge blog.


If you haven't already noticed with the new challenge rules and possibilities over at Emerald Creek Dares - you can now also enter your YouTube, pinterest, facebook or Instagram - not just the usual way by linking to your blogs! Please, check out the instructions given in the challenge post on how to do so!

Hugs and happy crafting!
Claudia
xxx


Monday 19 March 2018

Layering paints on Calico Craft Parts

Hi, servus and thanks for stopping by today! It is once more time to invite you over to the Calico Craft Parts Blog to check out my latest project and tutorial.

This time I have layered acrylic paints of different kinds in different ways to create a lot of depth and - who would have guessed - different patterns. I have combined DecoArt Americana premium paints and media, DecoArt Chalky Finish paints and DecoArt media fluid acrylics on my project to vary in texture, translucency and finishes.


As you can see I have also added a bit of stamping with some of my favourite Seth Apter stamps for additional texture.

To find out about the finished project and the different techniques I have used to create this layered mixed media effect, simply click HERE to get taken to the post over at the Calico Craft Parts Blog.

I hope to see you over there!

Have a good start into the week!
Claudia
xxx


Thursday 15 March 2018

Her Steampunk Heart Beats in the Right Place

Servus, hi and welcome to my mid-month reminder project for our steampunk challenge over at SanDee&amelie's Steampunk Challenges! Again we have the "Anything Goes - Steampunk/Industrial" theme, so I was totally free to play with whatever I wanted to lay my hands on.

I still had some left over corrugated card blocs (like the ones I used in this project HERE - only larger) - and one of them had already been lying on my studio desk for quite a while now, waiting for the moment when inspiration would strike...and this is the result:


I have also photographed her in natural light in my living room so metal paint effects and metal from the embellishments became more visible (capturing these effects in artificial lighting is almost impossible...*sigh).


I just love the chunky-ness of the corrugated card blocs (they're left overs from packaging)...


...and I also love the gorgeous Octopode Factory "Lady Audrey" stamp!!!


I unearthed this stamp recently while tidying up a bit and especially sorting through different boxes of all kinds in which I use to quickly stuff bits and pieces (often because I am too lazy to put them back in their proper places...or when I have run out of storage space and first would have to re-organize my stash...lol).

The gears on the bamboo stick were finds of the same kind...


Some of them are left over die cut gears from projects from literally years ago (like the alcohol inked ones for example, which were made for probable use on this project HERE...oh, I am obviously feeling kind of nostalgic today...;). 


The corrugated card bloc got two layers of scraped on DecoArt Chalky Finish paints rustic and primitive (on top), then I stamped the image onto some tissue and glued that onto the bloc with diluted matte DecoArt Decou-Page (using a very soft brush).

The gears were put on the bamboo stick first and then sprayed with DecoArt media Carbon Back Mister from underneath.


To make Lady Audrey's silhouette stand out from the background I painted some DecoArt media Titanium White fluid acrylic around it with a fine tip soft brush and let the paint fade out into the background.I also used the white paint to form the skirt's outlines.


Lady Aubrey was painted using DecoArt media fluid acrylics Cobalt Teal Hue, Titanium White, Titan Buff, Diarylide Yellow, Phtalo Turquoise, Quinacridone Magenta and Cobalt Teal Hue (and mixes of some of these tones as with the different skin tones and the hair).


I cut out a mask to cover the finished lady, so I could sprinkle on DecoArt media Shimmer Misters Turquoise, White and Carbon Black Mister. I also scraped on DecoArt Extreme Sheen Vintage Brass (that I had also used on the screws that were to become her arms, on some of the gears and on the sides of the bloc) and a mix of Diarylide Yellow and Quinacridone Magenta. 


The bamboo stick with the gears, the painted screw chipboards, a metal heart gear embellishment and a metal flower embellishment from my stash were glued in place with matte Decou-Page. 


 Of course a beautiful steampunk lady needs a flower in her hair, doesn't she? I hope you like her and the finished project as much as I do! And I hope to see you play along with us over at SanDee&amelie's Steampunk Challenges soon!


I really enjoyed playing with all my (re)found bits and pieces and trying to fuse them into a fun, creative project. A huge part of the creative process this time was simply following what I had on my desk from the tidying up (the bloc, the stamp and the old gear die cuts and embellishments) and adding colour tones of my choice and in my favourite way...


Do you have any old stamps that you haven't taken out for way too long? I would love to see you using some of these in your next projects (be it on the challenge blog or on your blogs or facebook...). Oldies often are goodies - we just tend to forget about them because there's always something new that wants to be used and tried out...right?

To hop over to the challenge blog and check out my teamies' fabulous makes, simply click HERE!

Hugs and happy crafting!
Claudia
xxx