Showing posts with label rubber stamp. Show all posts

Tuesday, 20 October 2020

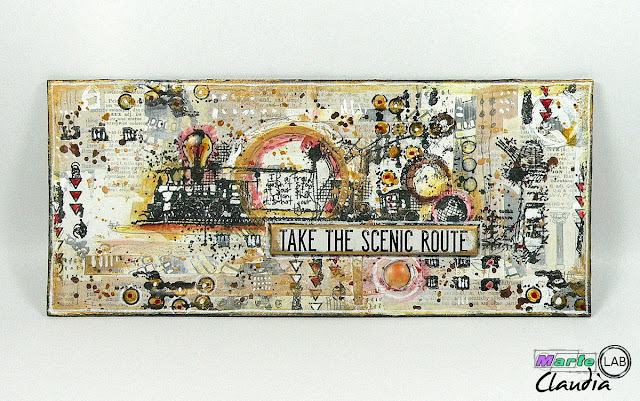
Take the Scenic Route - for Marte Savona

I love this time of the year!

And I love to travel by train - I can sit and look out of the window for hours! There's so much to see and each house I pass by is inhabited by people who have their very own stories. Each forest the train rushes through is inhabited by animals who have their own stories too. Each falcon I see standing midair above a huge field is looking for prey. How long has he already been looking out for food? What will it be this time? A tiny mouse or a common hamster?
And before I can continue to think of the falcon's possible story, we pass by some allotments - new stories start to unfold in my head...


When we go by car, my husband and I also sometimes love to take the scenic route instead of the motorway - just because this way the journey becomes the reward...


There is of course a step by step waiting for you over at the MarteLAB blog - as well as lots of steps images and the list of all products used (which are all available in the Marte Savona online store).

Hugs and happy travelling crafting!
Claudia
xxx


Tuesday, 11 August 2020

Free to Fly - Tag for Marte Savona

Servus! I hope you've been having a great summer so far!

Today's post is an invite over to the MarteLAB blog, where I am sharing my latest make for them - using Aall&Create stamps and stencils alongside some DecoArt paints and products.


As always there is a detailed step by step to be found over on their blog - together with loads of steps images and close ups. Simply check it out by clicking HERE. Everything you need to create this tag can be found in the Marte Savona online store - maybe not always the exact brand I've used, but it's all there.


Hope to see you over there
and
happy holidays!

Claudia
xxx


Monday, 10 August 2020

Heroes - a DecoArt Project

Servus, hi and thanks so much for taking the time to stop by my little (quite quiet) creative corner.

I haven't posted much lately as I am having to take a break from some of my already few design team commitments - due to health issues that I can no longer ignore.
I am in the middle of a struggle with a panic disorder that has obviously built up during the last fifteen months (being caused by menopause having hit hard last year) and has now struck me full blow.
Shaky hands and panic attacks caused by just sitting down at my craft desk and trying to tackle (even far away) deadlines are a nasty thing to have - especially when it concerns a hobby you think (or thought) you love. So obviously I will need to find new ways to go on with being a creative (which I have no doubt I am). Gladly I am in the very lucky position that some of my design team terms have just ended and that I am also on design teams where members are being cared about; so special agreements could be made. This way I didn't have to completely leave them all!

Sounds worse than it is actually (or maybe it doesn't) - but there's no need to feel sorry for me. I've already hit rock bottom and finally accepted my current situation - so the only way from now on can be upwards again. ;)

But there are of course also better days when my muse seems to be around and when I obviously manage to not be fixed too much on a deadline or the needed perfect (uh oh! Killer!) result of a project. So this week is going to bring you even two new projects and tutorials instead! Today's post is the invite over to the DecoArt Blog, where I am sharing a little altered mixed media tray that was a true pleasure to create.


It originated during my attempt to do a bit of tidying up in and around my craft space - which I find often sparks ideas for new projects (I guess because it is definitely more fun than a proper tidy up). I was right about to store away the little tray (the post on the DecoArt Blog reveals what it held in the first place), when I saw the drawer with my hoarded Tim Holtz paper dolls....and there it was!

The quote and melancholic feel to it were inspired by Peter Gabriel's fantastic cover version of David Bowie's wonderful "Heroes" - a song that never fails to deeply touch me. I have obviously heard it lately (I think it was used in a TV series or documentary or so) and it seems it was still spinning round in my head and needed to come to the surface.


As always there is a detailed tutorial with lots of steps images to find on the DecoArt Blog. Simply click HERE to get to the blog and check it all out. I hope to see you over there soon! And don't forget to pop by tomorrow for another project and tutorial!


Hugs and happy summer crafting!
Claudia
xxx


Monday, 28 October 2019

Welcome to the Laboratory!

Hi, servus and I hope you're having a good start into the week!

I would like to once more invite you to the Calico Craft Parts blog to check out my latest project there. Helen has added some awesome "Laboratory" designs to the shop and I fell in love with them at first sight (and as I have a dear friend who teaches Chemistry, I knew exactly what I wanted to use them for...Barbara, if you are reading this, stop here right now, do not read any further and do NOT follow the link to the Calico Craft Parts blog, okay? ;)

All the others are of course free to check out the whole project and with this little sneak peek I am not giving away too much I think...


To see the whole project and learn more about the how-to, simply click HERE to get taken to the Calico Craft Parts blog. I hope to see you there soon!


Hugs and happy crafting!
Claudia
xxx


Thursday, 4 October 2018

Vampires and Poor Dental Hygiene

Suddenly, just as he was about to carve his fangs deep into the screaming victim's neck, a strange thing happened...


The idea for my ATC was sparked during a die cutting session with the Tim Holtz Village Graveyard die set. There were these tiny left overs from the fence piece (visible in the black area on my glass mat)...


...and to me they looked like teeth lying there ( I guess I should mention at this point that I had a root extraction and two implants done last week and am still on recovery from that... ;).

Lost teeth....Halloween....that quote on the fab Monstrous stamp set...and there it was - my idea of what happens to Count Dracula, when he doesn't take good care of his teeth (you know...like brushing them twice a day night,  thorough flossing, using mouth rinse and having them looked at by a dentist at least once a year century). 


Can you imagine anything more horrible than loosing your teeth...I mean: several (or even all) of them at once ...out of the blue...just when your thinking your life is good and things are all going forward and you want to take a bite of that yummy bartender cupcake you've brought home...there simply IS nothing more horrible, right?


I created my toothless vampire by simply removing the stamping ink with a Q-tip from the fangs before I stamped the image onto white cardstock. See? They're gone!

I stamped and painted the image directly on the stamp platform. I used Distress Stains salty ocean and antique linen to mix a pale green for the vampire's skin. To create some shading for a more dimensional look I simply painted over the according areas (under the eyes, on one side of the nose, one cheek and one side of the forehead and neck) two or even three times with the same colour. It's like you're doing a watercolour painting: the more layers - the darker the tone.


Then I mixed fired brick and salty ocean to create a dark red and a pale violet.


The "teeth" were done by cutting the scraps from die cutting the metal fence into slightly different shapes with my fine detail scissors. This way I created two fangs, an incisor and several back teeth. I painted their roots with fired brick and added antique linen for a subtle shading.


Then I got fiddly and blended the edges with black archival ink (using the pointy end of a drop shaped cosmetic sponge). I messed up the molar to the outer right as you can see.


One is already showing first signs of caries. Uh oh!


I used the ATC & Corners Alterations die to cut an ATC blank from heavy grey cardstock and added shabby shutters and dusty concorde Distress ink using the blending tool. Then I stamped it with a background image from the Mini Halloween 5 stamp set.


The corners were blended in fired brick Distress Ink and glued in place. For shocked and toothless Count Dracula I used large sticky foam pads, for the falling teeth I cut tiny black sticky foam pads in halves. I had to use tweezers 'cos the foam pads were so small...


Done!
I must admit I feel sympathy for haughty Count Dracula. Having to feed on blood bottles instead of warm, living prey definitely is in bad style and very undignified, isn't it?


I hope my little fun Halloween ATC has made you smile a bit. ;)

Hugs and happy crafting!
Claudia
xxx

Tuesday, 5 June 2018

"The Voice of the Sea" Tag Duo

Servus, hi and welcome to my little creative spot!
Thanks for stopping by today!

Today I would like to share with you a tag duo I have made using some of the wonderful new stencils and rubber stamp sets by lovely Samantha Braund from Samantha Braund Arts.

Samantha recently messaged me on facebook and we had a lovely and inspiring chat. We talked about her doing all her demo projects for the selling shows on craft TV herself and she said she would love to see what someone else - for example I - would come up with using some of her new stencils and stamp sets. This was so very lovely of her and I feel very honoured by this and when she suggested that I could have some of them to play with, my answer was of course a loud and happy "Yes, please! I would LOVE to!"

Actually I remember using a lot more words than just these few, because I was so excited... ;)

I have been admiring Samantha's beautiful jewellery designs and drawings for quite a long time now. So being asked by her really is such an honour and I feel truly blessed. Thank you so much, Samantha! Mwah! XXX

I hope you like my "The Voice of the Sea" tag duo!


You know me - I love the sea and the magic of underwater worlds. So I had a lot of fun using Sam's stencils and stamps to bring some of my ideas to life.

I have used stamps from the Voice of the Sea, Starfish and Barnacles and Coral Reef Fish Medley stamp sets alongside the beautiful Fan Coral stencil (and mask) and the Curly Seaweed stencil.


I die cut two tags from heavy mixed media paper and used DecoArt Americana paints and DecoArt stencil brushes to create the backgrounds.


Then I stamped on the images from the stamp sets to create my scenes using black archival stamping ink. Once that was dry I painted them with watered down DecoArt media fluid acrylics using a detail brush. 


Final details (mainly highlights) in white were added with a white gel pen....


...before I finished off the tags by adding quotes and bits of text from the stamp sets.


The hints of blue in the backgrounds were done by first spreading water with a wet brush in the spots on the tags and then bringing only a little paint to these areas with the tip of the brush. This way the paint pigments spread beautifully and created lovely subtle shades.

I hope you like my two underwater tags as much as I do!

Hugs and happy crafting!
Claudia
xxx

Monday, 2 April 2018

Happy Easter Monday at Calico Craft Parts!

Happy Easter Monday, dear crafty friends and followers!

I hope you're enjoying the Easter holidays!
As usual on an "every other Monday" this means an invite over to the Calico Craft Parts Blog, where I am sharing my latest project and tutorial.

I almost had started thinking that Easter would pass me by without having done a single Easter themed project (really???!!!), but then inspiration finally stroke and here's a little sneak peek on the result:


To see the whole project and learn about the how-to, simply click HERE. 
The project is also a great one if you want to use up some of your hoarded designer papers...lol.


Slightly Belated Happy Easter (crafting)!
Claudia
xxx


Wednesday, 21 March 2018

Happy Easter at Emerald Creek Dares!

Servus, hi and thanks for stopping by my little creative spot today!

The latest challenge over at Emerald Creek Dares is in full swing and there is still a chance to play along to get the chance to win an amazing $50 voucher for the Emerald Creek Craft Supplies shop


or just by playing along and entering a project to their challenge will give you a 10% off code for shopping with Emerald Creek Craft Supplies! How cool is that!

Easter Delights


is the current challenge theme - so we hope to see loads of Easter themed projects being entered by you!


I wanted to create an Easter wall hanging that would fit with our dinette. As we have several different types (and therefor colours) of wood from the furniture there, I wanted to create something that would go with the various tones from my beloved Sheesham table and the spruce and birch wood benches and chairs. 


And of course I also wanted to showcase the gorgeous Bunney Key Charm alongside some of Emerald Creek's fab embossing powders - not just Seth Apter's and Kim's latest stroke of genius - the Baked Texture embossing powders, but also some of the others Kim creates and which are just as cool (like the Aroma embossing powders or her metal tones for example). 


Emerald Creek Products used: 

also available at Emerald Creek Craft Supplies:


Everything you see on this image has been created using Emerald Creek Craft Supplies! No designer papers were used!


I started out with cutting a larger panel plus a house shaped panel from thick paint board and I also added a layer of foam board to add more dimension to the house panel. 


Then I used Ranger jet black archival stamping ink and the Kimilese and Tiger Lily stamps to create my backgrounds. Especially the patterns from the Tiger Lily image were perfect for creating a kind of brush stroke like pattern on the house shape! 


The main background panel was toned down using one layer of Vintage Beeswax Baked Texture embossing powder...


....and the stamped house panel was glued to the foam board. Then both were covered with slightly crumpled tissue paper using DecoArt Antique glue and sealant.


Once that had dried I added Distress Stain tea dye to the house panel and made sure I added more of it around the edges so I had a bit of a shading effect for a visual frame.


As I wanted to customize the metal Bunny Key Charm, I first added some matte DecoArt Decou-Page to the key to build up a layer that would provide some tooth for paints to cling to. I simply dabbed on a layer using a soft flat brush.


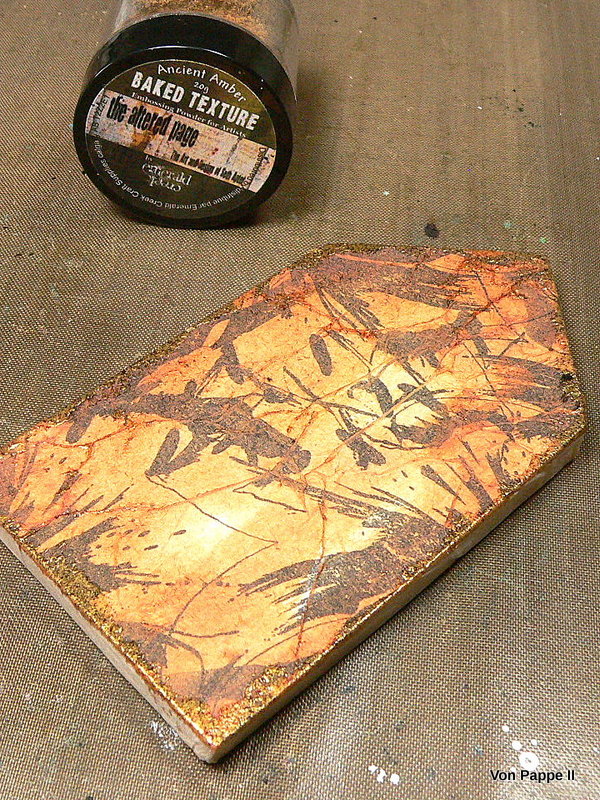
While that was set aside to dry I added Ancient Amber Baked Texture embossing powder around the edges of my house panel. I simply dabbed on the clear embossing ink around the edges using an Emboss-it dabber. Sometimes I also prefer to use my fingertips for that as it creates more random patterns (to do so I simply dab a bit of the embossing ink on my craft mat and dip my finger in).


I used Paper Artsy Fresco Finish paint and DecoArt Gold Rush Metallic Lustre to customise the key charm.


I had some left overs from die cutting and one was a perfect match to form the background panel for the key charm! I heat embossed the edges with Dirty Sand Baked Texture embossing powder....


...and then used three layers of Clear Ultra Thick Enamel embossing powder in the centre to fix the key charm to the panel.


I still needed a visible edge on the main background panel, so I decided to add Just Java Emerald Creek Aroma embossing powder around the edges. (It really smells deliciously like coffee...yummy!!!).


Then I punched two holes in the top corners of the largest panel so I could later add some rough cord for my hanging device.


I also added a piece of roughly woven ribbon behind the panel with the key charm for additional texture and to make the focal piece pop from the background. A Heart Brad was inserted into the foam board panel before I mounted that onto the background panel.


I love how the different embossing powders created such different effects and surfaces! They're all just great for creating assemblage pieces with that bit of bling!


I hope you like my finished Easter Wall hanging as much as I do!  And I hope to see you play along with us at Emerald Creek Dares of course! Simply click HERE to get taken to the challenge blog.


If you haven't already noticed with the new challenge rules and possibilities over at Emerald Creek Dares - you can now also enter your YouTube, pinterest, facebook or Instagram - not just the usual way by linking to your blogs! Please, check out the instructions given in the challenge post on how to do so!

Hugs and happy crafting!
Claudia
xxx