Monday 23 December 2019

Calico Craft Parts 2019 Review

Hi, servus and how's it going with preparations for Christmas?

Today I am wrapping the candy that goes on the Xmas tree tomorrow and I am also preparing our "French Salad" for tomorrow evening. It's an old recipe and family tradition and takes quite some time to cut all the vegetables into little dice and cook them so they are all firm to the bite but I love doing it because it is quite a meditative thing to do and the result is definitely worth the effort ;)


IF you are actually really reading this on the 23rd...thanks so much for taking the time to stop by! This post is my usual every other Monday invitation over to the Calico Craft Parts Blog. Today I am doing the annual "Favourite Makes of the Year" post over there and picking just three projects always is a hard task to be challanged with - but I managed (and as is often the case I was a bit surprised myself by some of my picks ;).


To find out about my three favourite Calico Craft Parts projects I did this year, simply click HERE.


And of course I would like to thank you all for your lovely visits and comments on my blog, on facebook and Instagram and the design team blogs I am creating and writing for! Your comments really mean a lot to me and it always makes my heart sing to see when one of my projects was able to inspire you or encourage you to try something new or carry on with what you are doing. So thanks for letting me know! Mwah! XXX


Merry Christmas 
and 
a happy new year!


Claudia
xxx


Tuesday 17 December 2019

Gift it or Grid it - Customised Pillow Boxes for StencilGirl Products

Hi, servus and welcome to my short invitation over to the StencilGirl Talk Blog. I am sharing a new tutorial and project over there and if you are in need for a quickly done wrapping for a small present this might be the right tuto for you ;)

I have done a full tutorial video this time and you can find that alongside a lot of images and further info on paints and stencils used in today's blog post over HERE.

Here's an image of the finished pillow boxes.


The video shows how I've layered paints and stencils to create the strips and how I have applied these in a grid-like manner to the die cut and folded pillowboxes. (I have used the Tim Holtz Pillow Box with Labels die - an oldie but definitely still a goodie - to die cut my boxes but you could as well alter bought boxes of course). If you don't want to do the pillowboxes but create the mixed media strips for other projects like maybe using them on a journal page or a book cover the video is still worth a look as you can watch me building up layers and picking stencils and colours during the process.

I hope you'll like it! Thanks for stopping by and as always


hugs and happy crafting!
Claudia
xxx


Tuesday 10 December 2019

An Almost Ready for Christmas - Card

Hi, servus and thanks for stopping by my little creative corner close to the beautiful Austrian Alps!

I just wanted to share another Christmas card I've finished today, done with a lot of Tim Holtz goodness this time.


I haven't taken any steps images this time, 'cos this card meant joyful me-time, but I will of course love to share with you what I've used and how.

The room shown on this card reflects the actual state of Christmas preparations over here at the moment...well, actually the actual state I hope to be in after next weekend to be honest ;)
With the tree already bought and put into its stand (but we keep it on our balcony and only get it in on the 23rd as over here in Austria we do not put up the Christmas tree before that (instead we love to keep it for as long as possible afterwards...lol...I remember my mom having ours one time so long it dried out and one day just fell off to the side while we were away shopping), the presents all wrapped up and piled up in some corner of our flat - as these will also only be put in place on the 24th right before we celebrate Christmas - which over here is on the 24th in the evening.

I have put up a list for you of dies and Distress products used. I inked all the die cut pieces using Distress Ink and Distress Oxide Ink Pads and my blending tool. Most parts were die cut from white cardstock, only the inner of the fireplace was done using black paper instead (with traces of fired brick Oxide Ink on top).


So here's what I've used:

Thinlits dies:

Fireside
Santa's Helper (the books sitting on top of the fireplace and the Christmas crackers)
Handwritten Holidays
Frightful Things (the little candle in front of the books)
Festive Things (the cup with hot chocolate, the tree, the wreath and the present)

Background "wall" paper:
Dapper paper stash

For the floor I've used a strip that I blended with Distress Ink vintage photo and ran through my Big Shot Plus using Tim's
Lumber 3-D Texture Fades embossing folder and Distress Ink gathered twigs on top.

Distress Inks used:
vintage photo
pumice stone (for the fireside)
black soot
chipped sapphire (on top of peeled paint Distress Oxide Ink to mix a different green for the tree and the quote)
gathered twigs

Distress Oxide Inks used:
peeled paint
broken china
fossilized amber
fired brick
ripe persimmon

Distress Stain brushed pewter was used on the fireguard and on the garland the tree is decorated with.
I also used my little Tim Holtz Sidekick for die cutting the smaller parts while creating the scene and coming up with more ideas on what to add to it. I love that you can put the Sidekick directly on the media glass mat and quickly die cut whatever small pieces you need.

I enjoyed creating this card a lot and I hope you like it too!


Hugs and happy Xmas crafting!
Claudia
xxx

Monday 9 December 2019

Quick Christmas Card for Calico Craft Parts

Servus and thanks for stopping by today!

This is the usual every-other-Monday-invite to check out my latest Calico Craft Parts project over at their blog and this time I have a Christmas card for you that is really quickly done and creates a lovely, magical winter-y Christmas forest scene...


A lot of new tree and deer woodshapes as well as gorgeous Christmas themed ones have arrived in the Calico Craft Parts online shop lately and I have used some of these to create my little winter forest scene on a kraft card.

To see the whole card and check out the really short and easy how-to simply click HERE to get taken the the post at the Calico Craft Parts Blog. Hope to see you over there!

Hugs and happy crafting!
Claudia
xxx


Monday 25 November 2019

Christmassy Home Decor with Calico Craft Parts

Hi, servus and welcome to my usual invite every other Monday to check out my latest project and how-to over at the Calico Craft Parts blog!

I am slowly getting in Christmas mood and over here in Vienna the advent or Christkindl markets have opened their gates this weekend (some even already last weekend) - the only thing missing now is some snow (but very likely we will have that after Christmas only...in the last years we've had almost spring like temperatures in the week around the 24th of December...). Anyway I've decided to create and put up some home decoration already - mainly the light chains on our balcony, so it isn't so dark outside.

Actually I really miss the snow since I have moved to Vienna, which is more east than my hometown and has a more southern climate. I love the icy glittering and how it covers grey, muddy streets and houses with white, puffy layers that look soft and cosy. So I decided to create a snow covered house to decorate my home with...


I am only sharing a sneak peek as usual - but it shows the cool icicles I've made and of course I am giving away the secret of how I made these over at the Calico Craft Parts blog ;)...


...as well as the products I have used to add a bit of icy glittery bling to my piece. As always this is hard to capture in a picture, but if you click on it and enlarge it you should get  the idea ;)

How are you doing with Christmas crafting? Are you well in time? Ginger bread and Christmas Pudding already made?

Hope to see you over at the blog!

Hugs and happy Christmas crafting!
Claudia
xxx


Thursday 14 November 2019

Autumnal Splendor...

...is what I love especially about this time of the year.

Even when in late autumn the leaves have almost all fallen to the ground and start losing their warm red, yellow and orange colours and Vienna seems to drown in a foggy soup of cotton wool most of the days I love the tranquillity that comes along with a slowed down pace at everyday life.


It''s time to light candles again and have a cuddly time in front of a fireplace after returning home from a refreshing walk with my dog.


On our walks we usually meet the crows...sometimes when it is very foggy outside I am rather hearing than seeing them, but they are always there and I love hearing how they communicate or when they come close and drop me their walnuts so I can crack them open for them...they have also already made friends with my dog girlie,
Bluna, and often they come down and tease her, touching her lightly at her back and landing not too far away from her, waiting for her to chase them (but Bluna knows this is a game she can't win, so she sometimes just kind of fakes she's starting to chase them and just stands and watches them fly away).


I tried to capture this special mood and time of year in a tag that I made for the DecoArt Mixed Media Blog.

Over there I am sharing the whole process in detailed steps (as always). This time I have used chipboard and laser cut MDF shapes (from Calico Craft Parts and Creative Embellishments) that I used various DecoArt and DecoArt media products and paints on to create different textures and effects (like the "feathers" for the crows). I especially tried to create a foggy sunset background - which maybe was the hardest part when creating the tag.

But I think it all came together quite nicely in the end...and I hope you will think that too when you hop over to the DecoArt Mixed Media Blog ;)


What is your favourite time of the year and what is it that you especially love about it? What would it be that you would want to capture on a tag about your favourite time of the year? 


Hugs and happy November crafting!
Claudia
xxx


Monday 11 November 2019

In November Autumn Mood...

...I have created this fortnight's project for Calico Craft Parts.

The muted colour palette and melancholy feel of this time of the year are something I really love and I have tried to capture a little bit of that special beauty in a little project.


I've played with a lot of different textures and a rather reduced colour palette. The full tutorial with many steps images is as always up on their blog and I hope to see you there and that you will like my project!

Hugs and happy crafting!
Claudia 
xxx


Friday 1 November 2019

Time for our SASPC winter special challenge!

Hi, servus and thanks for stopping by!
It is that time of the year when we are launching our annual "Steampunk Winter Special" challenge over at SanDee&amelie's Steampunk Challenges.


As I am one of the two founders and proud owner of this challenge blog (and the very happy and proud "boss" of a fantastic design team) I always like to take this opportunity to thank YOU all out there - our players without whom we wouldn't be where we are today - for always submitting such fantastic inspiring steampunk and industrial style art and craft projects and of course to wish you all happy holidays as our next challenge will go live on 1st January in the next year!


As our winter special challenge is open for two months (until the end of December) the usual rule of the allowed three entries per person and challenge gets changed to five - twice as much time to create - more projects to enter (maybe). At least this is part of the idea behind our winter and summer special challenges: to give you more time to focus on what we all love about this season and mabye still even find the time to squeeze in one or the other project that fits our challenge (and challenge rules). If there is a touch of winter or Christmas to your makes that is more than welcome of course.

My project definitely has a touch of the approaching holidays (and hopefully the snow that will come with it...over here in Vienna Christmas holidays mostly are muddy and grey, sometimes even with spring like temperatures and green...I miss the snow! Well, maybe it will be a white X-mas this year. Who knows...

I made it snow instead on my steampunk project... ;)


Some heaps of snow have gathered in the nooks of the gears...


I've made some steps images so I can take you through the process if you like (if not, simply scroll to the end of this post and follow the link to our Winter Special Challenge post).


I mainly played with layers and different textures.

I used a left over MDF heart and some left over old MDF gears from That Craft Place (I'm afraid these aren't available anymore but they have other new MDF pieces that are worth a look) that I had in my stash alongside some of the Mini Cogs Woodshapes  and some of the Clock Faces & Clock Hands from Calico Craft Parts and of course a lot of DecoArt and DecoArt media products.


I primed the large MDF pieces with a thorough layer of DecoArt media white Gesso. Then I used DecoArt media fluid acrylic paints Cobalt Teal Hue, Phtalo Blue and Phtalo Turquoise and painted some of the cogs' edges in watercolour technique so I got a kind of fading effect.


Once the Gesso had dried on the heart, I applied some DecoArt media white Crackle Paint here and there with a palette knife and let it dry naturally.


The dried crackled heart was given two layers of diluted Prussian Blue Hue media fluid acrylic paint that behaved differently on the Crackle Paint and created a darker effect where there was just Gesso.


Then I went wild with some Viva Rusty Paper and DecoArt media Antiquing Creams Raw Umber and Titanium White to create a lot of texture and patterns. I sprinkled diluted Prussian Blue Hue and white media Shimmer Mister on top and finished my heart off by blending the edges with black archival stamping ink using a piece of blending foam.


Some of the cogs had been painted using DecoArt Dazzling Metallic paints  Moss Pearl and Teal,


others had been sealed with a coat of Triple Thick before I loosely added media white Crackle Paint on top of these.

I used my fingertip to add some Viva Rusty Patina here and there (and on the clock hand as well).


The larger arrow was also covered with a thick coat of DecoArt media Liquid Glass for additional texture and dimension.


At that point I decided to also crape on some white Crackle Paint to my heart in some spots and to highlight the cracks later with a thin wash of Phtalo Turquoise. After that it was time to glue the finished gears in place.


To make the blue gears stand out from the background I added a thin wash of Transparent Yellow Iron Oxide media fluid acrylic to the heart's background.


One of the last steps before I left everything over night to let it dry, was to add DecoArt Snow Tex to the gears and the Liquid Glass (as mentioned earlier) to the glued in place arrow.


As I needed more glittery snowy bling I decided to also paint the gears and heart with a thin layer of DecoArt Glamour Dust Ice Crystal and the dried snow with diluted Glamour Dust Turquoise Sparkle.  As these are quite translucent and only add a faint tint they still leave visible what's going on underneath.


This is how my steampunk holiday heart looked like in the next morning...


Time to add a final layer of gears, clock face and hand for some contrast and more depth.
The Calico Craft Parts were glued in place using matte Decou-page (that I had also used the day before to glue the pieces to the heart of course) and left in their natural state - actually I really like the MDF brown and neat surface texture and it made for a lovely contrast to all the weathered texture I had created so far.


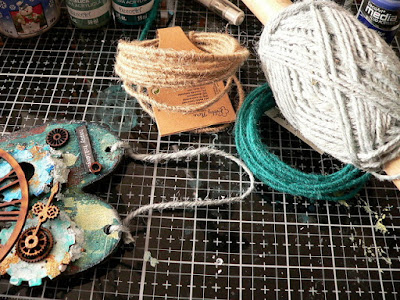
Picking the rough yarn that fit best wasn't easy...I finally decided to go for the pale blue one that repeats the lighter blues from the gears.


Voilá! 


Hope to see you play along with us soon! 
Simply click HERE to get to our challenge blog! 


Happy X-mas and steampunk crafting!

Claudia
xxx