Servus, hi and thanks so much for stopping by today!
My month as a spotlight guest over at the
SimonSaysStamp Monday Challenge blog has come to its last week and I would like to say a huge "thank you for having me" and let you know how much fun it was to be part of an amazing design team! I really enjoyed and loved it a lot! xxx
The start of a new week means the start of a new Monday Challenge of course!
"All Loved Up"
is this week's challenge theme and as Valentine's Day is fast approaching I decided to dedicate my inspirational project for this challenge to my better half, without whom I wouldn't have made it that safely through the last years which have been almost constantly filled with health struggles (having been diagnosed late with Hashimoto's about twelve years ago, Lyme disease a little later and lately menopause setting in has turned a lot of things into even more of a struggle) - and he has always been there for me - like a safe rock in a raging sea.
We usually do not celebrate Valentine's Day as we find we do not need a specific date to remind us to focus on what we have and love in each other and he brings me flowers or some other little "find" to let me know he loves me, whenever he feels like it or feels I need some cheering up. So it was about time to somehow show him in return how much he means to me...and as I sometimes write poetry (normally in German of course) and know he loves what I write, I've decided to try write a poem for him in English and make it part of a tag-with-flaps-book-thingie (actually it took me several days until I had figured out how to combine the poem with some of my favourite and much loved Tim Holtz dies and products from his Distress line...but this is the result and I admit I have already given it to him and he was really touched and loves it a lot (yesssss!!!!).
(for larger view click on images, please)
I still have no proper "name" for what this is...it's a three pages tag booklet and the tags have flaps at the bottom that can be flipped open and the order in which you go through the pages and flaps reveals the whole poem and the imagery on the tags was the attempt to visualise what the poem says.
I especially wanted to have that thicket with the light (from the lit path) already visible somehow as a crucial element...
...so I came up with the idea of making interactive tag pages with fold-able flaps and see-through sections as you can sometimes find them in children's books.
This collage shows how the three tags in each their two states and the poem evolve while flipping through all the "pages":

I also have a larger collage of just the poem for you as well if you're interested in how it goes exactly:
Maybe not the best of poems, but as English isn't my first language I am still quite proud of it - especially of the fact that it really gets close to the kind of poems I write in German and that are "typical me".
But I am sure you're more interested in
how I managed
to create the tag flaps and how I die cut the dark tag with
the "framed thicket tag" as Tim's
"Tangled Twigs" die is wider than the tag that I die cut using the largest from his "Tag and Bookplates" BigZ die. This die isn't available any longer (and was the very first die I've bought when I discovered this hobby I think) but the largest tag from his
"Stacked Tags" Thinlits dies set has the same size - so the procedure of cutting a tag with a flap is the same.
Simply fold the paper you cut the tag from before you run it through your
Sizzix Big Shot and make sure the fold sits INSIDE and parallel to the base edge of that cutting die you're using. This way the cutting blade sits outside the paper you're cutting and the folded edge stays untouched while the rest of the tag shape gets cut as usual.
I die cut three tags with flaps this way - one of black cardstock and two others using white cardstock. I made sure the flaps were at least 2 1/2 '' long.
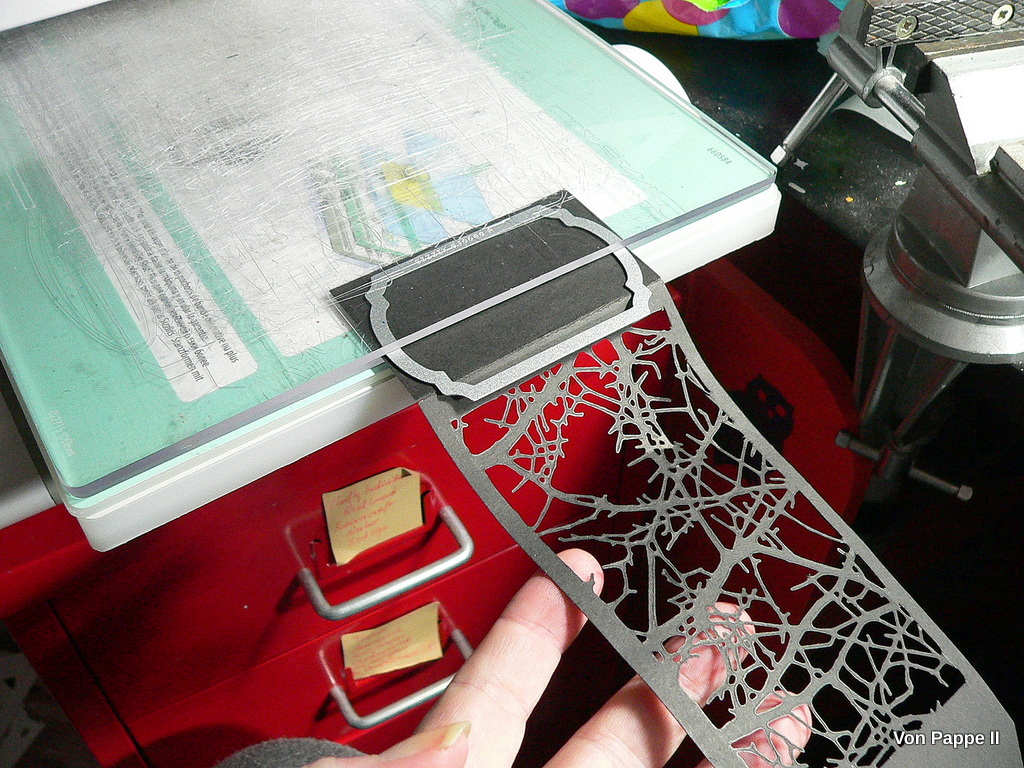
To leave a thin border around the "thicket tag" I placed the Tangled Twigs die that way in my Sizzix so the cutting pads didn't cover the rightmost edge of the tag and the put on top die (see picture below).
This way the die only cut its pattern into the tag where that was covered by the cutting plates on top and bottom. To make this work it is important you line up the cutting pads exactly!
The result looks like this. Only those parts were not completely cut out that were connected to the right "frame edge".
So these few bits needed to be cut out by hand using a
precision knife and a
cutting mat.
To give the flaps more definition I die cut their ends the same way using some of the larger labels from Tim's
"Labels" Thinlits dies set.
See? I simply aligned the cutting pads (and also base plate, but that isn't necessary to make it work) so these only covered the flap up to the position where I wanted the die to stop from cutting the cardstock.
These three tags form the base of the three tags for my tag booklet, but I also cut three tags - this time without flaps - from
Linen Cardstock to later cover the tags' backs with when doing the "binding".
For the first tag page I created an ombre effect background using
Distress Ink chipped sapphire from the top and blending it with
Distress Oxide Ink broken china from the bottom using the
mini blending tool. Then I added some spritzes of
broken china Distress Spray Stain, dried that with the heat tool and went in with more broken china and
evergreen bough Distress Inks and Oxide Ink until I was content with the look. Some sprinkles of water were added for more interest.
I also added Distress Inks chipped sapphire and evergreen bough to the other side of the flap.
The tag's edges were blended using
Distress Ink walnut stain.
I die cut the smaller star from Tim's
3-D Star Bright BigZ die and inked it using
Distress Oxide ink fossilized amber before folding it into shape. Some spritzes of
spiced marmalade Distress Oxide Spray were added on top.
Once dry I blended the edges with walnut stain Distress ink.
My world map I die cut using Tim's
Destinations Thinlits die was coloured using
fossilized amber and
peeled paint Oxide Inks and vintage photo and
gathered twigs Distress Inks.
For my "centre of my universe" I used one of the dies from the fun
Atomic Elements dies set and the smaller
"Faceted Heart" die.
Distress Oxide Inks fossilized amber,
fired brick and peeled paint were used to colour these shapes. The heart got spritzed with some spiced marmalade Distress Oxide Spray as well and the edges got inked with walnut stain Distress ink as I had done with the star.
My first tag page was done! On to the thicket tag that I had cut from black cardstock. I found that the plain black looked way too tidy to match the Distress look, so I added a bit of fossilized amber Distress Oxide Ink to my glass media mat, spritzed it with water and dragged the tag through several times.
I heat dried the tag and then added more fossilized amber in some spots with the blending tool. Where the Distress Oxide Ink had come in contact with water it of course oxidised and added some grey-ish fog-like shades which I really liked a lot.
Together with the dry added Oxide ink in several spots I got close to my aimed for effect of some of the light lighting areas of the thicket while others stayed dark.
On to tag page number three! I started with fossilized amber Distress Oxide Ink in the centre and went in from the outside with Distress Ink chipped sapphire.
On top of that I added some spritzes of
broken china Distress Spray Stain and some spritzes of plain water as well. And of course I blended the tag's edges with walnut stain Distress Ink afterwards.
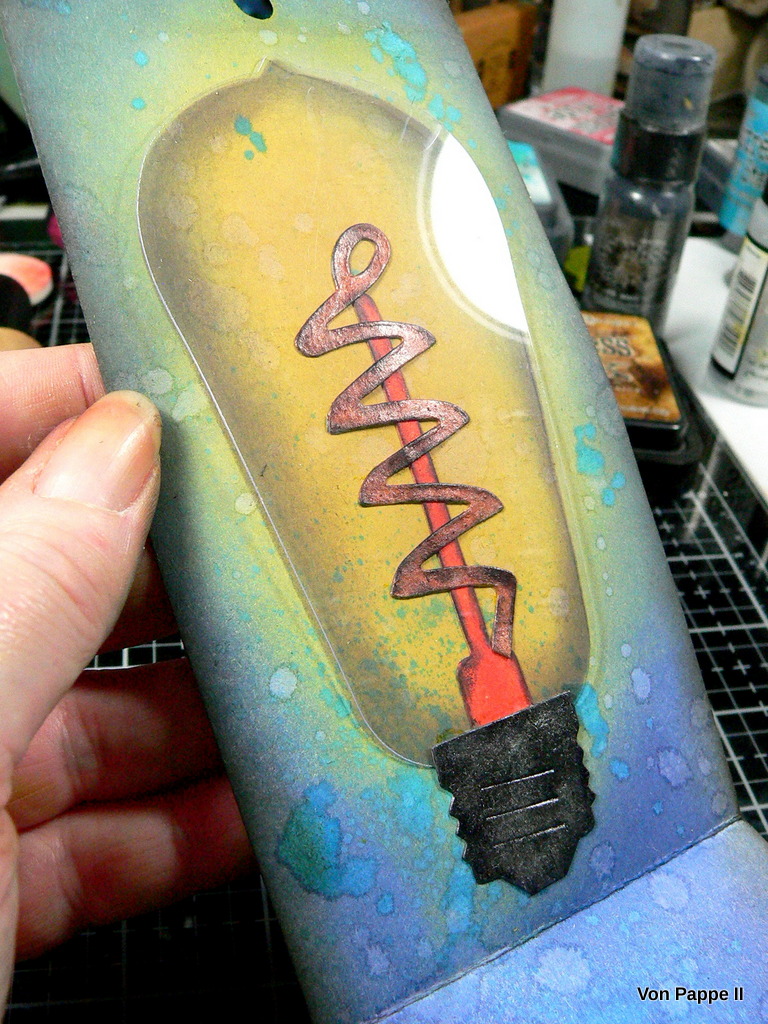
For my "light" I used the Tim's cool
Filament BigZ die and die cut the main shape from acetate (the left over packaging from the die itself)...
...and used both - the die cut shape and the "frame" which I used like a mask to softly "blend in" the bulb shape using walnut stain ink and the mini blending tool and moving the ink from the acetate mask towards the tag's centre.
This is the result after I lifted the acetate mask - cool, huh?
The other die cut parts of the Filament were coloured using
ripe persimmon Distress Oxide Ink,
black soot Distress Paint with
brushed pewter Distress Stain on top and
antiqued Bronze Distress Paint.
I glued everything in place using
Tacky Glue. The acetate piece is just fixed to the tag at its very bottom, where the top of the socket covers up the glued area and once more fixes the bulb to the tag with more glue.
This is how my three tag pages were looking so far. Time to do the "binding" and put it all together.
I had die cut one normal tag of the same size from Linen cardstock for each flap-tag and inked their edges with walnut stain Distress ink. But the tag for the thicket needed to get a special treatment of course.
I put the finished tag on top and marked all four corners of the inner border with a white pencil. Then I cut the needed frame using a
metal ruler and my precision knife (on my cutting mat). To make sure no brown edges were later visible from the front, I then coloured the inner frame's edges with a thick black permanent marker.
Before gluing the backs to the pages I needed two strips for hinging them all together as a binding. I cut these from the left overs from the black cardstock I had used for the tag.
Then I used a bone folder and ruler to fold the two strips so that one side of the folded strip had the same width as the brown frame shaped tag.
The two folded strips were glued together like this:
Then - using Tacky Glue on both sides each time - I kind of "inserted" the shorter middle section of this hinge between the thicket tag and its backside tag, the hinge strip left to that between the first tag page and its backside tag and the hinge strip to the right between the third tag with the filament and its backside tag.
You can see I am still working on my much loved
glass media mat, but I have bought an additional
Tonic Easy Clean Mat to put on top so I have a larger area for gluing and to also keep areas for spreading paint and glue (which I do on the smaller non stick craft mat that comes with the glass media mat) and for putting things together, apart from each other. I found that extremely helpful with not getting any smudges on the backs of my projects and also not having any glue residue on my glass media mat that need to be scraped off to clean the mat for its next use. And it also helps avoid reflections of my two cold daylight work desk lamps when filming video tutorials.
But back to my tag booklet! I still needed to stamp my poem to the according flaps! For this I used a small letters stamp set,
Ranger Jet Black archival ink and
StazOn Cotton White ink. I had first thought of printing the poem out on printer paper and cutting the lines into strips and glue these to the flaps, but then decided to go for a more organic look.
For the back of my tag booklet I had a special idea - I wanted to have our initials carved into wood like into a tree. So I die cut the largest of the planks from Tim's according
Sizzix Planks die, then ran it through my Big Shot using the fantastic
Lumber 3-D Texture Fades embossing folder (one of my favs).
To highlight the wood grain I blended the embossed plank with
walnut stain Distress Oxide Ink and misted that with water to get the lighter, oxidised "version" of the Oxide Ink. This way the ink that had only been applied to the raised areas contrasted the darker brown from the brown cardstock in the crevices.
I "carved" a heart and our initials into the plank using a dry
embossing tool. Afterwards I traced the engraved lines with a thin black marker.
I used one of the tapes from Tim's
Vintage Idea-ology Design Tape set to add a kind of spine to the tag booklet and also added some stamping using stamps from Tim's
Mixed Media Marks 1 and
Mixed Media Marks 2 stamp sets here and there.
The letters for the title on the cover were die cut from a paper from Tim's
Collage Mini Paper Stash using his
"Alphanumeric Classic Lower" Thinlits dies set.
I kept the covers quite simple though as I wanted the "universe inside" to really pop, shine and surprise once the tag booklet was opened and explored.
I hope you like it!
I can't wait to see what the "All Loved Up" theme inspires
you to create for this week's challenge over at
By playing along you get the chance to win a fabulous
to spend in their amazing store!
Simply click on the blinkie above to get to the challenge blog, where you will find more inspiration by the amazing design team! ;) .
If you want to shop for one of the products I have used to create my project, simply click on their names in this post and you will get taken right to the product page in the SimonSaysStamp shop!
Hugs, good luck and happy crafting!
Claudia
xxx