Showing posts with label altered book. Show all posts

Monday, 6 July 2020

The Start of a "House Journal" - a Calico Craft Parts Project

Servus, hi and thanks for stopping by! I hope you've had a lovely weekend!

It's Calico Craft Parts time today and over at their BLOG I am sharing the first piece of a kind of House-Journal I have been wanting to create for a long time, but haven't found the courage yet to start. But finally I took the first plunge and the first house is waiting for you to be visited ;)

A sneak peek should give you a first impression on what kind of mixed media project is waiting for you. Of course there is a step by step as well as loads of pictures and the lists of the Calico Craft Parts and DecoArt media products and paints used as well. Simply click HERE (or on the picture) to get taken to the blog post.


Hope to see you over there soon!

Have a good start into the week!
Claudia
xxx


Tuesday, 14 April 2020

Stencilled Poetry - an Art Journal Cover

Servus and welcome to my blog today! I am so happy you're stopping by as today I am sharing a  make that is really close to my heart as it is about poetry - not only "stencilled poetry" (which I hope I have managed to achieve on my journal cover) but also the poetry from song lyrics and music that have deeply influenced my love for the English language and for music and for song lyrics that evoke images, feelings and stories in my head.

One of the very first songs - or maybe THE very first song - that did this for me was "Eleanor Rigby" from the Beatles (and the lyrics were written by wonderful Paul McCartney). I have been loving the song and also the "Yellow Submarine" movie since I was about twelve years old - and that love has never changed until today.

"Stencilled Poetry" is this month's theme for the Creative Team at StencilGirl Products to go by and a special line from "Eleanor Rigby" immediately came to my mind for this theme. So I created an art journal cover, trying to capture visually what that special line from the song evokes in me and how it makes me feel.


I have done a video of the process again - so you can watch and find out how I built up the layers on the journal cover and how some of the effects were achieved. So I hope you will hop over to the StencilGirl Talk blog to check out the video, some of my other thoughts that went into the design and also some more images of the finished journal.


Hugs and happy crafting!
Claudia
xxx


Monday, 2 March 2020

Book Box Keepsake for Calico Craft Parts

Servus, dear crafty friends all over the world! I am so happy you're stopping by today!
This is my usual invite over to the Calico Craft Parts Blog, where I am sharing my latest make and tutorial.

This time I have recycled an old scrapbook attempt of mine and used it to decorate one of Calico's cool Book Box Kits.


To check out the book box cover and tutorial and to find out about the contents of the box simply click HERE to get taken to the post on the Calico Craft Parts Blog. I hope to see you over there soon!


Have a good start into the week!
Claudia
xxx


Tuesday, 28 January 2020

New Design Team - New Creative Adventure!

Hi, servus and welcome to a quite special blog post today - my first appearance as a design team member creating for MarteLAB - the blog of lovely Marcella's Marte store (an Italian online and  bricks and mortar shop situated in Savona, Italy)!

I was so honoured when they invited me to design for them in 2020 and I was generously given a wonderful collection of fabulous AALL & CREATE stamps and stencils to play with. So my first project (and detailed step by step) can be found over on their MarteLAB blog today and I would like to invite you to check it out (by clicking HERE for example).


I've created a set of three small note books and the detailed tutorial shows how to create beautifully layered covers that fit any size of notebooks - so you can use any kind of cheap thin notebooks and customise them to turn them into a beautiful set (which makes for a perfect little self made gift by the way).


I've used some of my favourite techniques, media and tools to create a lot of depth and interest on some of my favourite substrates. ;)


I hope to see you over at the MarteLAB blog soon!

Hugs and happy crafting!
Claudia
xxx


Saturday, 6 April 2019

Steampunk Traveller's Journal - a Calico Craft Parts Project

A bit late this week I am sharing a make that already went live on the Calico Craft Parts Blog on Monday. But as I had to spend the last week in hospital (with a critical crises of sudden high blood pressure) I am behind with everything and am now trying to catch up with everything.

But the post is still there and the tutorial is too...so I would like to invite you to hop over to the Calico Craft Parts Blog to check out a cool steampunk journal I did using mainly steampunk themed Calico Craft Parts (...and, believe me, there is a wide, wide range of fantastic steampunk craft parts to choose from in their store!) and Eileen Hull's "Passport" book die.


The full tutorial that takes you through the process is over at the Calico blog, alongside with many more pictures and close ups of details. I hope to see you over there!


Hugs and happy crafting!
Claudia
xxx


Monday, 1 April 2019

Mini Tag Album for SanDee&amelie's Steampunk Challenges

Servus and welcome to the start of our April challenge over at SanDee&amelie's Steampunk Challenges!

As always the theme is "Anything Goes - Steampunk/Industrial", so our players, the design team and I were (and always are) free to create what they enjoy most (as long as the steampunk/industrial theme is still part of the creation of course).

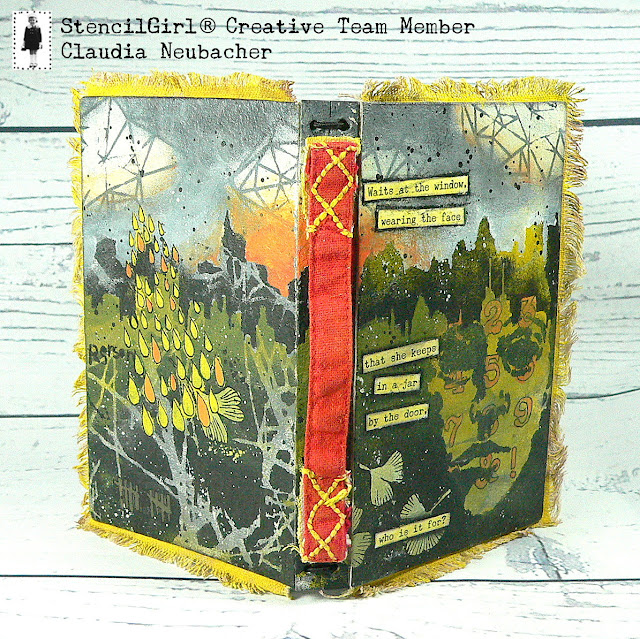
I unearthed an old dies set recently (I guess it was a Spellbinders dies set), when tidying my studio and immediately knew what I wanted to create with it! A mini tag notebook in steampunk style of course! You know me - I love mini!


Well...so now that you have seen the mini notebook from any possible angle, it's time to also show HOW tiny it is...


Isn't it amazing that you can always put so much mixed media on such a small format? I love it! 

Of course I have taken steps images, so I can share the process with you. 

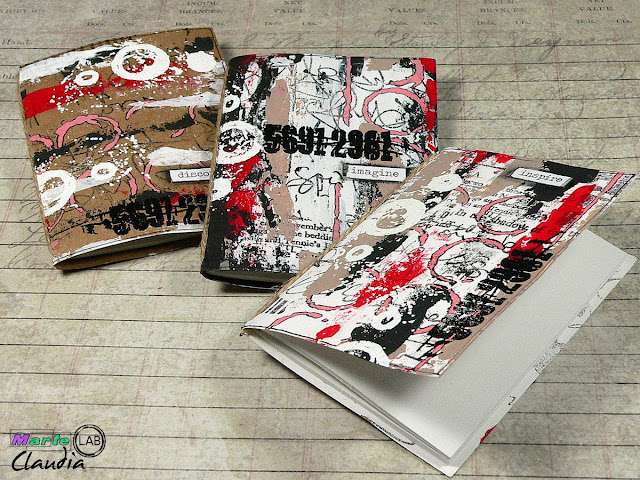
I first die cut all the pieces for the album's cover and signature cover. I cut each piece twice from left over painted paper scraps (from this project over HERE). I had used these to clean the brushes from any excess paint and to create paper-on-paper mono prints to work on (a technique I learned from wonderful Seth Apter!). Now they were the perfect size for my mini tag album and I just love the texture of the brush strokes and all the beautiful layers of paint!


I cut all the needed covers, the closure and signature covers twice as the painted papers were white at the back - so I had to glue two pieces together to get covers that were painted on both sides. I used matte DecoArt Decou-Page for this step.


Then I used DecoArt media fluid acrylic paint "Raw Umber" and a fine detail brush to paint a brown soft edge around all the covers' edges. I first applied clean water around the edges and then applied the paint - this way the water dragged the paint and created a softly blended dark edge.


On the cover's outside I had applied some white DecoArt media Crackle Paint with a palette knife here and there and let that dry naturally. Afterwards I added a mix of DecoArt media Antiquing Creams Raw Umber and Carbon Black on top and only wiped that back a little bit to age it and town down the colours.


A wash of DecoArt media Yellow Oxide was used to tone down the white of the Crackle Paint.


Then I painted the fabulous "Mechanical Hardware" chipboard pieces from our challenge prize sponsor "boozybear". I used DecoArt Matte Metallics "Aged Bronze", DecoArt Dazzling Metallics "Teal" and DecoArt Extreme Sheen "Bronze" on the pieces and toned these down with the Antiquing Cream mix as well.


The left overs from the Extreme Sheen paint on my palette were sprinkled on the cover using a soft fully loaded brush and tapping it with my finger.


 I also used the Dazzling Metallics and Matte Metallics to paint a label holder, some washers and screw heads from a Calico Craft Parts Mini Hardware Wood Shapes Sheet.


Using matte Decou-Page I assembled my mini tag album cover. I also added some DecoArt media Liquid Glass to the small label holder (also a Calico Craft Parts wood shape). Then I set the cover aside to let everything dry naturally.


Once all had dried, I poked the holes for the binding and threaded brown waxed cotton thread through the holes from the outside and simply tied the ends into a knot on the inside. I had also die cut some notebook pages for the signature from beige marbled paper.


Voilá!


I hope you like my tiny tag album! And I also hope to see you play along with us over at SanDee&amelie's Steampunk Challenges too this month! ;)

Hugs and happy crafting!
Claudia
xxx


Monday, 18 March 2019

This Monday it is "Ahoi!" instead of "Servus!" at Calico Craft Parts

Ahoi! Welcome to my usual biweekly invite over to the Calico Craft Parts Blog, where I am sharing a new project that is a nautical theme this time.

My husband, our good friends and I not only love pen-and-paper role-playing but some of us also do (or did...as we are slowly getting too old to run around, fight and camp in old castle ruins and other locations like that ;) live role-playing which involves designing and making costumes and equipment by hand (which is an essential part of the fun)!

Lately we had a very fun Murder Mistery Dinner in a Vampire setting and dear friends of us decided to do another one - this time as pirates in the Caribbean, having to solve another murder case. They have invested a lot of time, effort and thought into writing up their own story and preparing all the characters and info sheets for us and next weekend we will all meet - dressed as pirates of all kinds - and have a lot of fun again ;)

For this occasion I decided to create a book box in which to store any info sheets and other notes for my role (I have already started a list of impressive pirates curses for example) - and luckily the Calico Craft Parts  Book Box Kit is just perfect for this!

And not only the Book Box Kit as you can see....


There are lots of fabulous nautical and ocean themed wood shapes in the Calico Craft Parts store, so I could easily do ten more without having to repeat myself (and I can tell you picking parts for just one possible design was really hard....I loved them all, but had to decide on parts for just one book box for starters).

With just a few DecoArt paints and products and some lovely map wrapping paper the book box was quite quickly and easily done. The more detailed description of the how-to can be found over at the Calico Craft Parts Blog as always. Hope to see you over there!

Hugs and happy crafting! 
Claudia
xxx


Thursday, 26 July 2018

My Notes, Thoughts and Plans - a DecoArt Mixed Media Blog Project


Hi, servus and thanks for stopping by! I hope you are enjoying the summer holidays!

Summer calls for bright and vibrant colours and light and fun projects, right? So I have come up with something really bright and fun and altered a plain cardboard notebook to turn it into a journal to make notes to myself in so I don't forget to think positive and hold on to my dreams and wishes....just in case I loose self-confidence (which I tend to do way too often). 


There's a full detailed tutorial waiting for you over at the DecoArt Mixed Media Blog. Simply click HERE to get taken to the post with loads of steps images and the solution to the secret of how I have made the vibrant background ;)

I hope to see you over there soon!
Enjoy your holidays!

Hugs and happy crafting!
Claudia
xxx


Saturday, 24 March 2018

Meet Miss Maisie Greyfur!

Hi, servus and thanks for stopping by today!
It's still quite fresh outside, but at least the snow has gone and I am optimistic that spring has finally arrived by now!

The last weeks with snowstorms and icy temperatures were well spent indoors at my studio desk which I am - to my own surprise - still managing to keep organized and tidied up most of the time. ;)

I recently was very lucky to get some of the fab StencilGirl® stencils to play with and this is the result of my first happy stencilling session using their designs:


It's a journal I made using Eileen Hull's "Journal" die and left overs from packagings. The back and front covers show a single scene:


Please, meet Miss Maisie Greyfur, who is enjoying her first cup of tea (I'm sure it is a strong tasty Yorkshire blend!) of this year in her outskirts garden plot while admiring the first buds on the still bare trees.


I used the Wolf, City Stories and City Scape StencilGirl® stencils alongside some DecoArt media products to create my little romantic early Spring garden scene.


As I always feel quite uneasy with starting from the plain page, I love to create a patterned background by scraping on paints with a palette knife. Some wet on wet, others on top of already dried layers. This time I've used DecoArt Chalky Finish paints alongside some white premium Gesso. 


Once that had dried I sprayed on some Orange DecoArt Mister and spritzed that with water to let the paint run down my cover. Spritzes of white Shimmer Mister were added too. 


I then started with adding the skyline, dabbing on premium paints Carbon Black and Prussian Blue Hue wet on wet with a cosmetic sponge. I also went in with a bit of white and let that mix with the wet paint on the cover to create an ombre effect.


Miss Maisie was stencilled on using white premium Gesso and Carbon Black - mixing them on my palette first before sponging them on.


That was followed by adding the houses and tree shapes in Carbon Black.
Later I also added raindrops and parts of the flowery border from the City Stories stencil to form a part of the garden fence at the very bottom of the back cover. 


Using a detail brush and white DecoArt media Gesso, I painted Miss Maisie's fur and the cup she's holding. I also went in with a dark grey that I mixed from white Gesso and Carbon Black premium paint to paint some shades to the hind legs and the fur. 


Black archival stamping ink was used to stamp my quotes to the back and front covers.


I added some details with a white gel pen. 


The pages for the journal were made  by folding and cutting to size some sheets of heavy printer paper to form three signatures. These were literally "bound" to the cover's spine with some dark grey cord. I simply inserted each of the signatures and tied knots in their centre folds. What I like about this very simply binding, is that the pages can be removed and/or replaced quickly and easily without having to undo the binding. 


I hope you like Miss Maisie's garden and view as much as she does. She always loves to escape the noise and hectic of the city and enjoy some piece and quiet in the outskirts...

A huge THANK YOU to the kind ladies from StencilGirl® for letting me have some awesome fun with some of their stencils! 

Hugs and happy crafting!
Claudia
xxx