Saturday 29 December 2012

My favorite project from 2012...

...was the "Steampunk Willow" I made for Artistic Outpost's reference challenge in October. As Anything But a Card's challenge asks about our fav projects from 2012, I have the chance to show this one again and am very happy about that.

You wanna know why this is my favourite? Well, I love Steampunk, I love trees, I love to work with wire, I love glass jars, I love corrugated card, I love creating patina and I love these stamps! :)


Hugs,

die amelie xx

Sunday 23 December 2012

I wanna wish you a Merry Christmas!!!

...from the bottom of my heaheaaaheaheaaart! *singing :)

I want to wish all of you, my dear and true (and also the new) followers and scrap-friends I have been making here in wonderful blog-land, a very Merry Christmas with lots of joy, rest and contemplation!

Thank you all so much for your encouraging comments and the constantly provided inspiration throughout this wonderful first half year of blogging as a scrap- and stamp-newbie! I wouldn't have come that far without you!

This time no X-mas card to look at but my nativity set, which is mainly a rural custom in Austria, but a tradition I love very much. Every year I get new figurines as a birthday present from my mother-in-law and so this is a still growing project and one day I will have to build a real stage set as is customary.


Wishes,

Claudia - die amelie xx

Wednesday 19 December 2012

"buttons - part 2"

As I had promised earlier, I am going reveal the content of the altered tin-box with the "buttons" book plate today.


So... drums, please!....here it comes: a buttons bracelet for my sister!


I was working on it for quite a while, as a nasty facial neuritis and/or the medication against it have been slowing me down for almost the last two months, which made tiny crafting and reading (and also commenting - sorry for that, folks!) quite exhausting for me. And it also took numerous attempts to fix the buttons to the bracelet as shown in the "Distressables 2" book by Tim Holtz.

There the buttons were fixed with thin wire, but I wasn't content with the curled up ends of the wire, as they always would stand out (at least a little) no matter how tight I curled the wire and I was afraid they might pull strings from one's clothing or scratch the skin. So after a few failures I decided to sew the buttons to the bracelet rather than use wire.

So I had to sew at least twenty-five buttons to the small rings of the bracelet. (Did I already mention how much I love sewing buttons?).


 But first I had to glue the transparent buttons onto some scraps of design paper, using transparently drying glue. Then they had to be cut out and coloured on the backsides (which I did with Distress stains "brushed pewter" to match the silvery look of the bracelet). I also sealed that with one layer of glossy Mod Podge to make it a bit more "waterproof".


For the inside of the tin box I wanted to have a "mould" that would hold the bracelet in place. Therefore I glued a small oval piece of thick corrugated card to a larger oval piece that fitted the size of the tin box and covered it with the lovely 7 Gypsies "Paris" collage tissue paper. Some more crumpled up tissue paper to cover the bracelet against the lid of the box - done!

(Hope, my sister will like her present!)


I am entering Simon Says Stamp and Show's "gift-spiration" challenge with this project.

Tuesday 18 December 2012

"Lucky Dip" at TIOT

This fortnight over at Try It On Tuesday our theme says "Lucky Dip", which means you should pick four of six ingredients from the following list for your project to use in. (Maybe you are also interested in creating ATCs, then, please, scroll down to the previous post, where I introduce thjs fortnight's new challenge from FwATCs).

But first back to the Lucky Dip!!!

These are: die cuts, ribbon, pearls, distressing, a sentiment and/or a stamped image.

Loved that theme so much and hope to see your fab entries with us at TioT! This fortnight's winner can again choose 4 digis from http://deliciousdoodles.blogspot.co.uk 


I chose a recipe that uses a die cut bird, ribbon, a sentiment and a lot of stamped images.


The theme for my card was mainly inspired by my daily dog walkies which lead me past many trees with a lot of crows sitting in them. I have come to love these intelligent birds - they even sometimes play "catch me if you can" with my dog girl Bluna, which means they come rather close, sit in a place (right before her) and wait for my dog to start running towards them. Then they fly up in the air only to land a bit farther away, waiting again for my dog to start running... I also love watching them trying to crack walnuts open by dropping them from high up above onto the asphalt. (Sometimes I help a little by carefully stepping onto the nuts until I hear them cracking). 

Well, back to the subject! My new stamps from Crafty Individuals already waited to be used (could almost hear them cry from out of the storage box). I so love these tree images and the birds sitting on the wire and the sentiment by Victor Hugo...well, the whole set as it seems ;)


I also only recently bought a gorgeous texture stamp from Kaisercraft - "Grunge". Love that stamp too as it can be used in so many different kinds of projects! This time I used it on white cardboard to stamp a background for the tree images. All images and textures were stamped with archival ink "jet black" from Ranger.


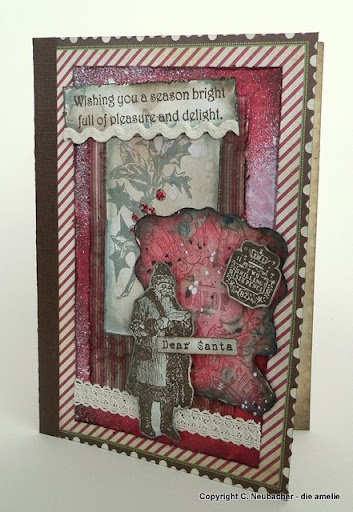
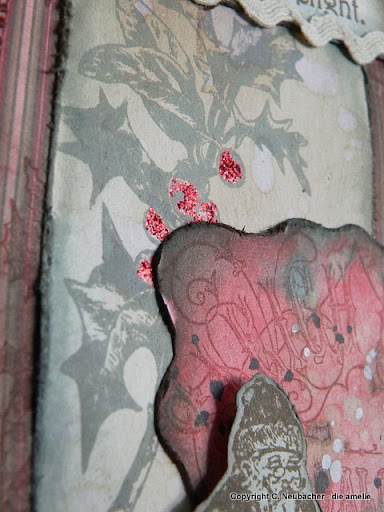
I distressed the edges of the cut out stamped images and the background card and gave them some sprays and sprinkles with Mr. Huey's "inky black" and "opaque white". Distress inks used for blending were "pumice stone" and "black soot".


The panel with the tree images was fixed onto the background with white brads and that was glued onto some black cardboard, which I had embellished with a broad white ribbon to add some texture. I added the white die cut bird to a rather dark area to create some contrast for a finish. Voila!


Hope you like it and maybe it also inspired you to do a recipe on your own. Would love to see you sharing your projects with me and the team over at TIOT!!!

Hugs,
die amelie xx

Fun with ATCs - "Choose a Song!"

This fortnight at FwATCs you are invited to choose a song that inspires you to create an ATC.

Quite a difficult task for me, I have to admit, as I wasn't at all sure how to visualize something a song evokes in me.
When I browsed through our CD-collection at home, I stumbled upon the recording of "The Tiger Lillies'" "Freak Show", which I saw live about a year ago and loved sooo much!

The song "Rosa with three hearts" especially touched me, as I loved the idea of having three hearts, but being as (or even more) vulnerable as anyone else who had only one of them.

I used a red glossy coated party plate as background, which needed some Gesso coating in the area where I wanted to stamp "Rosa", being surrounded by the three hearts. One of them has gone, one is broken and one poisoned and Rosa is meant to die if she doesn't get another three hearts. Some areas received a treatment with alcohol inks to get some texture.

I colour copied three heart-images from an anatomy encyclopedia and cut them out. One got wings, one turned green (from the poison) and one is broken - so I tore it to pieces before glueing it onto the card. I also added a piece of paper from a dictionary, which I stamped and doodled on.

The card's edges were distressed and blended with Distress ink "peeled paint". At last I added a self-adhesive lace ribbon to add some more texture and "loveliness" to the ATC.

I tried to use colours and textures to create something close to the feel of the show being full of poetical enchantment and tragedy as well as curious persons and magical things.


Hope you will join in and have fun!

Wishes,
die amelie xx

Sunday 9 December 2012

"buttons"

Today I want to share a project with you, that is only one part of a present for Xmas: an altered tin box. Its' content will be shown in an extra post, when it is finished ;)


I made this box from a "Fossil" wrist watch tin box, I once got, which originally looks like this:


First I scrubbed off the printed surface with some sanding paper. Then I treated the box with alcohol inks "rust", "juniper" and "sunset" (my favorite mixture). I also added some embossing with Ranger's "Antiquities" embossing powders "verdigris" and "rust" in some areas.


In the meantime I gave a lace ribbon a bath in diluted "vintage photo" Distress ink, then gave it also some sprays of Adirondack Color Wash "Stream" and rinsed it under water to lighten the stains I had created this way (as the color washes are rather intense).


I also aged one of the Tim Holtz idea-ology book plates with some "rust" and created a panel from a scrap from one of my Prima paper stashes or maybe BoBunny's "et cetera" stash - I am not sure any more, which I stamped the word "buttons" on (the deeper meaning of this will be revealed in the other post that's to come some of these days).


 I covered the panel with "crackle accents" and let that dry.


To give the new surface of the tin box more depth, I also stamped some scratches with Archival ink "sepia" onto it using the Impression Obsession Cover A Card stamp. I sprinkled some Maya Myst "Espresso" onto it too, to add some stains.


Then I glued the ribbon, the book plate and a Prima Flower together with one of the Tim Holtz idea-ology "custom fasteners" onto the box, using Pattex glue, which especially works with non porous surfaces like metal.


Hope, you like the result!


Thank you for stopping by and having a look around!

Hugs,
die amelie xx

Tuesday 4 December 2012

Let's Get Inky!

A new tag along with some great and exciting news for you today: I am a brand new and very proud new member of Try It On Tuesday's awesome design team! Whoooeeeeh!!!

The very first challenge I participate in as a DT member is called "Let's Get Inky!", which inspired me to combine various techniques using Distress ink and also to try a real fun technique for creating backgrounds: marbling with washing up liquid and ink. I used Distress ink "vintage photo" (my all time favourite) for the whole tag (for stamping, distressing, marbling and blending).


All you need for that marbling technique is some light coloured cardboard, a cup, a thin straw, washing up liquid and Distress dye ink. Mix some (few) drops of washing up liquid and ink with a tiny bit of water, dip the straw into it and blow bubbles until the bubbles flow over the cup's seam. Dip the cardboard into the bubbles (avoid touching the cup's seam with the paper as it will create circle prints on your marbled piece), blow again with the straw for a new "pile of bubbles", dip another area of the cardboard onto the bubbles asf. until you are satisfied with the result.

Hope the texture created by the inky bubbles is visible: 


I had my son helping me, after he told me he was an expert in blowing bubbles from soft drinks (which he in fact is) and would do a better job in it than me. ;) We had a lot of fun and did four or five tag sized pieces of marbled cardboard in that way.

I also dipped some cardboard into Distress ink, which I first had applied to my craft sheet and diluted with some sprays of water. From that cardboard I tore a thin strip, which I blended with "vintage photo", using the blending tool. I glued the strip onto the cut out tag. After that I distressed the tag's edges with the distressing tool and blended them with "vintage photo" too. The images of the cone and the boys on the sleigh (all from Oxford Impressions) were stamped onto white cardboard, cut out and blended as well. I did likewise with the sentiment. Before attaching the images, I stamped the holly image directly onto the tag and coloured the berries, using Stickles "Icicle".


The lace ribbon was inked as well by giving it a bath in diluted Distress ink "vintage photo".

A lot of inky stuff... hope you like the result and maybe even wanna try some of it for yourself. Please, hop over to TIOT to have a look at all the fabulous projects of my fellow team members (and maybe even pay a visit at their blogs). Hope to see your entries there too of course! The sponsor for this month's challenges will be
who are offering this months winner their own choice of 4 Digi Stamps from their store.

I am also entering Sugar Creek Hollow's and  Simons Says Stamp Challenges' with this tag. 


Hope you enjoyed your visit with me today! 


Hugs,
die amelie xx

"Embossing" at FunwithATCs

This time FunwithATCs' team want you to show any kind of embossing on your ATCs.

I especially love embossing powders that create a weathered look, so the "Fran-tage" aged embossing enamels from Stampendous are up my alley right away.
For this ATC I used aged silver, aged copper and aged aqua, which I added after dapping some embossing ink through a gears-stencil onto the printed card from the "Craftsman" paper stash from Prima.


After heat embossing that mixture, I stamped the gears from my Oxford Impressions' steampunk stamp set and heat embossed that with clear embossing powder to make the background colour resist to blending the whole card with Distress ink "pumice stone", to get a darker tone.


The third embossing step was stamping the London Telegraph advert (also from OI) and heat embossing it with black embossing powder.


The light bulb was stamped with black archival ink and the Tim Holtz gears were fixed with tiny brads. For a finish I dabbed the distressed edges of the card into "aged aqua" embossing enamel and heated it with my heat tool from quite a distance as the embossing enamel doesn't melt into one shiny surface that way but provides a more grainy look.


Hope, you like it and maybe you will want to join us over at FunwithATCs this fortnight...I would love to see your entries there. :)
Hugs,

die amelie xx


Monday 3 December 2012

"Dear Santa"

The countdown until Christmas is down to three weeks and I still haven't done very much "X-massy" yet (except having bought almost all the presents). This is actually the first card for Christmas I made. But I am not much of a card maker anyway. (I am working on some pendants for the tree instead...will show you, when I am done).

The challenges from Sugar Creek Hollow and Our Creative Corner want to see some "Distressing" and "Santa Claus is Coming!" - which finally got me on the track. I needed a card for my son's awesome teachers anyway, whom I have and want to thank so much for carefully guiding him out of a state, where he thought of himself as a useless and dumb pupil (due to the teacher he had before and in a different school).

So here's what I made for them:


The paper for the background is from makingmemories "Noel" paper pack and already had that lovely die cut brown edge!!! (Which is, why I also enter Fashionable Stamping Challenges' "To Die For" challenge with this project).

I cut three panels and distressed their edges with the Tim Holtz paper distressing tool.
The first is cut from red cardboard, which I stamped with a Christmas script image in "iced spruce" to add some texture and also sprinkled with some dashes of Mr. Huey's "opaque white" and "inky black". The edges were blended with "walnut stain" Distress ink .

The second panel is a bit smaller and from the Maja Design stash "It's Christmas time". I stamped some holly twig images onto it and blended the edges with "festive berries" and "walnut stain" .
The third panel is the smallest and simple white cardboard, which I blended with "iced spruce" and stamped with the Oxford Impressions' holly twig image in the same colour.

The berries got some treatment with Stickles "Xmas red" to add some sparkle too. For a finish of these I flicked some drops of water onto that panel too, to get a worn look.


The sentiments, Santa, the Galop-plaque and the price tag (all from Oxford Impressions) were stamped with "walnut stain", cut out, distressed and blended with the same inks to match the cards design. Some of them I glued onto the card using foam sticky pads to add some depth, the others were layered and embellished with ribbons.


I wonder, whose wish list Santa is reading... ;)

Thank you all for stopping by again and being such true followers and friends!!!

I also enter Simon Says Stamp's "Anything Goes" challenge with this card.

Hugs,
die amelie xx

Thursday 29 November 2012

It's Top Talent Thursday!


Gosh! I am so excited to share this with you today!


The team from Our Creative Corner invited me to being their spotlight on Top Talent Thursday today! Whooeeehh! I am so honoured! Thank you once again, Ladies, for this lovely opportunity!

When you hop over to their lovely site, you will find a post today, showcasing me and my latest project along with the possibility to learn a bit more about me and my approaches to crafting and arts in general in a breaf question and answer session.

When they asked me to do a project for TTT, I first planned to do something X-massy, as I have some lovely papers and stamps lying around, just waiting to be used in some festive X-mas-crafting. I rolled thoughts about an Advent calendar in my mind for days and sat down at my table to do something appropriate... only to find myself about an hour later or so right in the midst of another steampunk project *LOL.

Here it comes:


I made some pictures for you, showing the wooden box in its' original state and during its' process of becoming something more attractive, but accidentally I deleted them during the attempt to sort my image folders. Sorry about that!  :(
So, sadly, you can't see it as it looked like in the beginning... it was a simple untreated wooden box, originally containing painted Easter eggs - and the compartments were just the perfect size for storing my ATCs in!! But for the last months it was just some wooden box for storing my ATCs.... well, you know what I mean ;)
There had to be finally done something about that!!!


First I painted the box with white Gesso all over, then I mixed acrylic colours brown, black and copper and gave the box some strokes with a broad bristled brush. After that I sprayed some areas with Mr. Huey's "passport" and  Adirondack Colour Wash "Stream" for some contrast in colour. I stamped some gear images with acrylic copper paint onto some areas too. The insides of the box compartments were also painted with copper acrylic colour. At last I embossed some of the edges with Frantage aged embossing enamels.


 Letting that dry, I stamped some steampunk images onto tissue paper and tore them to size. ( I prefer tearing to cutting, as the images' edges blend in better and less visibly than cut edges when being mod podged).


After I had glued the images onto the box, using Mod Podge, I browsed through my "treasure chest" with all those lovely embellishments and found these gorgeous Tim Holtz idea-ology box feet, some gears and wooden chipboard keys (which I painted with paint dabbers and embossed with Fran tage embossing enamels), Artemio keyholes and labels, which were just perfect for a worthy finish.


Hope, you like the box and will also enjoy Top Talent Thursday over at Our Creative Corner, featuring MOI this time!!!
Thank you all so much for stopping by again!


Wishes,
die amelie xx


 As usual some close-ups as well: