Showing posts with label Crafty Individuals. Show all posts

Tuesday, 15 March 2016

Happy Steampunk Easter!

Servus and Happy Easter to you!

Yes, yes...I know...there are still two more weeks to go but I am not early with starting painting some Easter eggs, right?

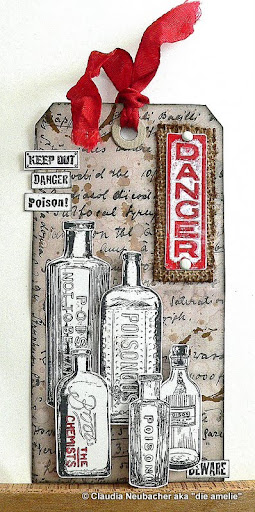
And as our March challenge over at SanDee&amelie's Steampunk Challenges ends shortly after Easter, I thought I could already send some wishes your way and share a steampunk Easter egg with you:


I used a goose egg as they are larger and harder and therefore easier to work on. The fabulous steampunk chipboard pieces are from the range of our new challenge sponsor boozybear! You really should check out her Etsy store - she has the most fantastic steampunk designs!


 You can see the egg before the painting process. I stamped the cool steampunk image from Crafty Individuals onto some tissue and glued it to my egg with slightly diluted matte Decou-Page from DecoArt. Then I painted over the dried image using Distress markers and DecoArt Media fluid acrylics.


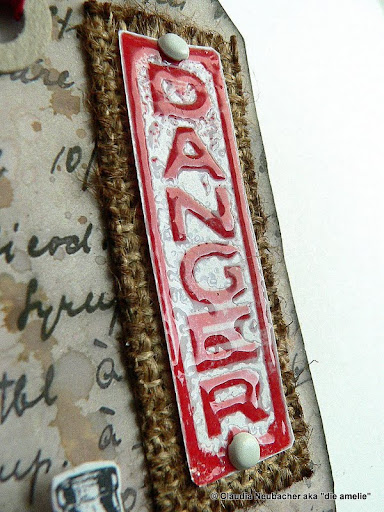
 The rust effect on the winder and jar ring was achieved by first dabbing on some DecoArt Media Sand Texture paste in some areas and then painting over the dried pieces with Quinacridone Gold, Paynes Grey, Diarylide Yellow and Transparent Yellow Iron Oxide - adding some paints directly from the bottle, others as washes and layering them until I was content with the look.


 The pieces were fixed to the finished egg using DecoArt matte Decou-Page.


As you can see I got some wrinkles from glueing the stamped on tissue to the egg as the image was quite large. But honestly I think that it adds to the distressed and worn look. No place for neat 'n tidy there.


I glued one of the gorgeous idea-ology ring fasteners to the bottom so I could add a gear embellishment.


I cut the "happy easter" chit chat sticker in half and stuck it in place. Then I slightly blended the edges with a walnut stain Distress marker.
Voilá!


Have you already started painting Easter eggs (or is this a tradition that is slowly dying out)? I haven't done it for quite some time but I really enjoyed doing this one and think I might do some more!

I would love to invite you over to our steampunk challenge blog to check out the makes of my fabulous teamies and maybe even get a little imaginative spark for a project to enter to our challenge!

Hugs and happy crafting,
Claudia 
xxx


Friday, 4 April 2014

Craft Stamper's April Take It - Make It Challenge

Servus and welcome back to the new Take It - Make It challenge over at Craft Stamper!

http://craftstamper.blogspot.co.at/

This month we want to see

 "Bottles" 
 at the center of your makes. 


This was the perfect excuse for me to buy the lovely Crafty Individuals stamp set with the poison bottles to use it on this tag:


To achieve more depth I layered and stacked the stamped and cut out bottles with sticky foam pads.


The "Danger" sign was stamped with DI "barn door" and given two coats of clear UTEE. Then I mounted it to my tag together with a cut to size piece of burlap paper.


The background was done from a colour copy of some old chemists notes I found at the flea market. I blended it with some DI pumice stone and sprinkled some water droplets on it. I also sprinkled it with some drops of watered down Distress ink "gathered twigs" (using a fine detail brush) and stamped some faux mug prints in several spots.


I repeated the red colour with the ribbon and one of the bottles' labels to make all my elements "bond" with the design and added a simple card enforcement ring to place emphasis on the worn and aged paper look of my tag.


Hope to see you join in Craft Stamper's Take It - Make It challenge soon! There's a prize to be won too! ;)


Hugs and happy crafting,
Claudia xx

Tuesday, 22 October 2013

FunwithATCs - "night"

Wow - time runs fast! It's already time for a new challenge over at FunwithATCs!

This fortnight the theme is

"night".


So get out your dark papers, night creatures, moons, stars and creepy crawlies stamps...or whatever you can imagine to happen at night ;)

I went for a more romantic approach - as I love full moon when being outside (and hopefully outside of Vienna, as you can see much more stars then). It's always amazing how much light it reflects - you really can see perfectly and walk without any additional light between the shades of the trees. 

The world seems so very different then. Like frozen in time. Love that.


Stamps used are from Crafty Individuals and 100 proof press. I did some masking and heat embossing to make the trees stand out a bit more and add some texture.


I hope you like it. And I also hope that you like the theme and play with us again! So hop over to the challenge blog to see what my teamies have prepared for your inspiration!

Hugs and happy crafting,

Claudia x

Tuesday, 23 April 2013

"Inventions" at Try It On Tuesday!

Sometimes it is scary how time flies - another fortnight has passed (better: flewn by) and it is time for a new challenge theme over at Try It On Tuesday!

This time our theme is 

"Inventions"


As usual our challenge is "anything goes" as long as your project follows the theme.  (As you may well know, Tuesday is also the day I invite you over to FunwithATCs - so, please, scroll down to the previous post to have a look at this fortnight's challenge!)

Of course I had something "Steampunky" in mind when first reading our challenge theme and I wanted to use my new stamp from Crafty Individuals as well as the new Tim Holtz Alterations "pediments" and "layered wings" Sizzix dies, my beloved cogs and gears dies from Xcut, some of the Perfect Pearls Mists, my selfmade Steampunk wordstamp (the How To can be found here) and lots of alcohol inks!!!! 


I created a little "Steampunk engine shrine", using a left over chocolate box (yes, I have to face the truth that  I can no longer hide the fact that there are chocolate boxes to be found at my place ...er...from time to time *lol, but I guess I mentioned the sacrifices we have to make for our art earlier on...). 


I had a lot of fun creating this box, stamping, glueing and doing a lot of die cutting, layering and alcohol inking. I hope the close ups show a little of the variety of effects on the gears and cogs!


The outside of the box was covered using washi tape, blending some of it with alcohol inks too. 


The background for the gears and stamped images was covered with papers from the Prima "Craftsman" and "Romance Novels" collections.

Stamps used are from Crafty Individuals, Oxford Impressions and Tim Holtz. 


Some of the cut out gears were partially folded and glued to the inner sides of the box, thus creating some depth and additional layers. 

The moveable pointing hands with the cogs were mounted using tiny brads and the panels they are on were glued onto the back using foam sticky pads.


The words on the side read "Achtung Zerbrechlich" ("Attention! Fragile!"). Love this tape! As it was only black&white I added alcohol inks to achieve some contrast with the ruler tape on the front. 

To some of the alcohol inked parts I also added some sprays of Mr. Huey's "gold" and Perfect Pearls Mist "blue patina". 


The pediment was given the same treatment:


I wanted to create the impression of a lot of mechanical movement - even though I didn't "invent" something useful *lol. 


I hope I will see a lot of awesome entries from you over at our challenge blog!!! And you have to hop over and see the great projects my DT fellows made too!!!! 

This month's sponsor is 


who are giving away a $25  Gift certificate ! 


As I made all the rusted looking pieces used on this project from white glossy cardstock treating it with alcohol inks, patina and metal colour sprays (I used the backing of one of my Tim Holtz paper stashes...they are perfect for being used with alcohol inks using their white insides), I enter Simon Says Stamp and Show's "Color" challenge with this project.

I also enter the challenges at

Crafty Boots - "Recycle"- recycled chocolate box

Love to Scrap - "Cut it out!"- a lot of die cut gears, cogs, wings, pediment


Thanks for stopping by and Happy Crafting!
Hugs,

die amelie


Monday, 11 March 2013

"finally spring" - 3rd Eye's VIVID Challenge

Over at 3rd Eye they have a really talented bunch of ladies doing awesome LOs, art journal pages and other stuff! And they have a challenge too!


I stumbled upon their great stamps by accident - and the challenge requires to use some of them alongside with vivid colours.

So here comes my take on a vivid colours tag:


As I own only a few 3rd Eye stamps I had to improvise a little as I mainly ordered stamps I wanted to use on grungy or Steampunk projects ;)
(only the bird images are stamps from Crafty Individuals and my beloved alphabet stamps are from Hero Arts).

The lovely tree branches are my favourite image from the 3rd Eye range (well, besides their awesome light bulbs)! The brick wall stamp is fab too and now to the tricky part: "Marcel".

"Marcel" is part of the tag too...but let me introduce you to Marcel first ;)


Voila! Marcel is the guy to the left (well, obviously). But where the hell does he appear on the tag I can hear you ask. To be honest: I needed some grass to grow in front of the brick wall...and Marcel's hair was perfect for the job (and I wanted to use as many of my (six) 3rd Eye stamps as possible)! See?


The background of the tag was made using Distress inks in various tones. Hope you like the result :)

I also enter Vintage Stamping Challenges "Spring Is In The Air" challenge  and The Artistic Stamper's "tag" challenge with this tag. 


Thanks for your visit!!!


Hugs,

die amelie xx

Tuesday, 18 December 2012

"Lucky Dip" at TIOT

This fortnight over at Try It On Tuesday our theme says "Lucky Dip", which means you should pick four of six ingredients from the following list for your project to use in. (Maybe you are also interested in creating ATCs, then, please, scroll down to the previous post, where I introduce thjs fortnight's new challenge from FwATCs).

But first back to the Lucky Dip!!!

These are: die cuts, ribbon, pearls, distressing, a sentiment and/or a stamped image.

Loved that theme so much and hope to see your fab entries with us at TioT! This fortnight's winner can again choose 4 digis from http://deliciousdoodles.blogspot.co.uk 


I chose a recipe that uses a die cut bird, ribbon, a sentiment and a lot of stamped images.


The theme for my card was mainly inspired by my daily dog walkies which lead me past many trees with a lot of crows sitting in them. I have come to love these intelligent birds - they even sometimes play "catch me if you can" with my dog girl Bluna, which means they come rather close, sit in a place (right before her) and wait for my dog to start running towards them. Then they fly up in the air only to land a bit farther away, waiting again for my dog to start running... I also love watching them trying to crack walnuts open by dropping them from high up above onto the asphalt. (Sometimes I help a little by carefully stepping onto the nuts until I hear them cracking). 

Well, back to the subject! My new stamps from Crafty Individuals already waited to be used (could almost hear them cry from out of the storage box). I so love these tree images and the birds sitting on the wire and the sentiment by Victor Hugo...well, the whole set as it seems ;)


I also only recently bought a gorgeous texture stamp from Kaisercraft - "Grunge". Love that stamp too as it can be used in so many different kinds of projects! This time I used it on white cardboard to stamp a background for the tree images. All images and textures were stamped with archival ink "jet black" from Ranger.


I distressed the edges of the cut out stamped images and the background card and gave them some sprays and sprinkles with Mr. Huey's "inky black" and "opaque white". Distress inks used for blending were "pumice stone" and "black soot".


The panel with the tree images was fixed onto the background with white brads and that was glued onto some black cardboard, which I had embellished with a broad white ribbon to add some texture. I added the white die cut bird to a rather dark area to create some contrast for a finish. Voila!


Hope you like it and maybe it also inspired you to do a recipe on your own. Would love to see you sharing your projects with me and the team over at TIOT!!!

Hugs,
die amelie xx