Showing posts with label Maya Road. Show all posts

Sunday, 1 December 2013

A Very Vintage Christmas! - Our Creative Corner's December Challenge

Welcome back , dear readers, followers and crafting friends,

to another edition of Our Creative Corner's challenges!!! Laura, who is your lovely host for this month's challenge, chose

A Very Vintage Christmas


which means you are to use neutral colours only!

Seems the 1st of the month will be a double-feature day over here in the future as it presents TWO new challenges - the one over at Our Creative Corner AND at SanDee&amelie's Steampunk Challenges! So, please, check out both as they are really worth a look and I hope both provide a lot of crafting fun and inspiration for you. 

Back to the Very Vintage Christmas:

I admit this was a rather hard job for me to do as I rather seldomly dare create "vintage" combined with that touch of delicacy neutral colours add to this sort of makes.


I used a lovely stamp from Red Lead for the cones and a script stamp with X-mas greetings for the background. The flourishes were die cut using the Tim Holtz "mini flourish" Alterations Sizzix die. Some sprinkles of dark brown and gold for more texture and a velvet ribbon added to the bottom for a more festive feel. I also added some tiny blots of clear stickles for a bit of "snowflake bling" - done!

I hope you like it and you definitely should check out the vintage X-mas makes my awesomely talented teamies have prepared for you over at the challenge blog!!!
I so look forward to see your entries (which will definitely put me in a very merry mood ;)

As usual some close-ups:


If you also want to know the new challenge over at SanDee&amelie's Steampunk Challenges, scroll down to the previous post. ;)

Hugs, happy crafting and enjoy the pre-Christmas period!!!! (I definitely will ;)

Claudia x

I enter this tag to the following challenges:

Fashionable Stamping Challenges - In the Holiday Spirit
The Artistic Stamper - Anything Goes
Simon Says Wednesday Challenge - Anything Goes


Sunday, 20 January 2013

"remember"

As you may still remember, I have been given some awesome cigar boxes by a very dear friend of mine, that are waiting to be altered. The first one I altered was this one.

As I guess I am best known in blog-land for my altered pieces, for distressed, dark, grungy and/or time-worn looks, using aged embossing enamels and for embellishing with metal pieces and vintage pics, I cannot withstand to enter SSSS's challenge with this project, as they ask "what are you known for? " ( a clever theme for a challenge and my cigar-box just fits in perfectly - if this isn't the perfect coincidence, huh?!!!).

I am also entering the challenges at Pin And Tack ("Anything Goes" - SYCN), Happy Daze ("use something recycled"), Eclectic Paperie' ("Altered boxes"), Out of a Hat Creations("most useful stamp" - which my Hero Arts tiny alphabet stamp set I use for the "remember" in fact is, as it is the one I use most often) and Vintage Stamping Challenges ("Vintage") with this project (at least the "remember" is stamped - hope this will do ;).

I altered this cigar box (its orginal state can bee seen in my first altered cigar box post which is linked at the beginning of this post) using the faux leather technique from "Technique Tuesday's" awesome tutorial (which can be found here) again. But for the second box I varied that technique a little by covering the ink-blended masking tape surface with a heat embossed coat of "Old Paper" embossing powder and after that another coat of clear rock candy Distress crackle paint. That was followed by spraying the hardened surface with loads of spray paints from Mr. Huey's, Glimmer Mist and Maya Road to achieve a quite dark appearance that should match the mainly silvery aged embellishments.


The lady on the photograph assumably is a very early ancestor of mine...I found her picture in the photobox my beloved grand-aunt left me. According to her dress and hat this one has to be taken in the late eightteen-hundreds I guess. (wow!)

I distressed a copy of the image with the distressing tool and blended the edges with "vintage photo" and the image with "antique linen". I gave a piece of white lace a bath in Distress inks and stains.

Before I attached the embellishments to it using tiny loops, I darkened them with StazOn jet black ink, which I rubbed in using a small sponge dauber, wiping off the excess with my "painting cloth" (a piece of one of my husband's old (and can be seen through) t-shirts I finally managed to sort out from his all time favourites pile unseen...*phew!).


The hinges (cut out from a Kraft core sheet using the awesome Alterations die from the TH series for Sizzix) were embossed with Fran-tage "aged silver embossing enamel" and glued to the box using special power glue (as usual craft glues won't stick to that kind of surface).


For easily opening the box I attached a piece of brown lace ribbon to the lid's inside, fixing it with a piece of masking tape and later with an additional layer of paper from one of my stashes that would cover the whole inside of the lid.


The book plate was heat embossed with aged silver embossing enamel too and glued to the box instead of fixed with the brads as the lid would have been too thick to simply punch holes in it.

I had one of my awesome Prima flowers left, that matched the design of the box perfectly and I embossed that one too with small traces of aged silver embossing enamel (you possibly could have guessed by now which embossing enamel is my absolute favourite ;). I added two punched leaves, that were coloured by using Distress stains "brushed pewter". (Maybe you can see some of it on the picture.... love these crackles!!!)


For additional embellishing I used some silver parts for making jewelry. The "remember" was stamped with my Hero Arts tiny alphabet stamp set.


As usual some close-ups (which means you have finally reached the end of this post ;)


Hope, you enjoyed your visit today!

Wishes,

die amelie xx


Tuesday, 8 January 2013

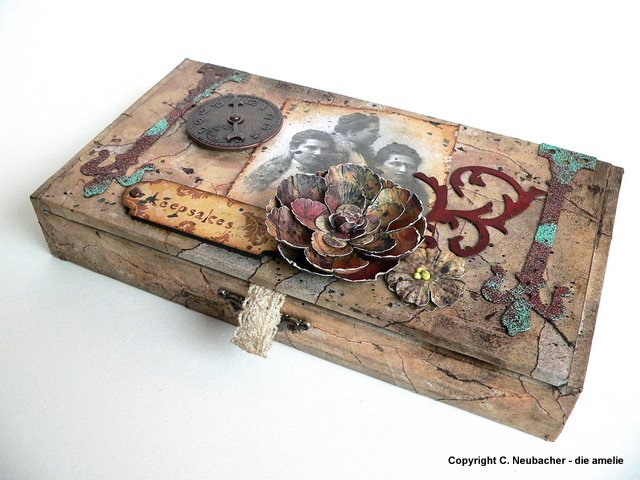
"Keepsakes"


A dear friend of mine recently gave me some awesome cigar boxes for altering. (Thanks, Alexander!)

For a start I wanted to try the "faux leather technique", which is shown here at Technique Tuesday, who are having a DT call right now! (Check it out if you are interested!)


So, as shown in the wonderully made tutorial, I first covered the box with torn pieces of masking tape all over. Then I blended the surface with Distress inks "rusty hinge", "vintage photo" and "walnut stain" using the blending tool.

This picture shows a "before and after":


To give it a glossy finish the whole box was covered with clear embossing powder and heat embossed, which gives it a stunning leather-like look! (I admit, I really was surprised by the effect as I hadn't expected it to be that "leather like").


 Then I cut out two hinges using the Sizzix Alterations die from Tim Holtz and heat embossed them with Ranger embossing powders "Rust" and "Verdigris". They were glued onto the box using special power glue as the normal crafting glue would not work with the embossed surface (so pay attention for good results).


What remained to do was embellishing the box with some nice "goodies" as distressed and inked copies from pictures of my ancestors, Prima flowers, Tim Holtz die flourishes, key holes, clock faces, gears and a self made label to indicate the box's purpose.

The "keepsakes" label was made using one of the Xcut "Dielicious dies and stamping the quote (surrounded by a flourish design in "Sepia" archival ink, which is a stamp from Rico Design's "Ornamente" stamp set).

...at last some spritzing and spraying with darker tones of Maya Mist and Mr. Huey's colour sprays for an even more used look and for the inside of the lid a cover, using some scraps of my paper stash....done!


Here are some close-ups and views, which I hope you will like!
Thanks again for visiting and a big hug!

die amelie xx


I am also entering Simon Says Stamp and Show's challenge "Embrace the Old", Loves Rubberstamps "Use Dies or Punches" challenge, Fashionable Stamping Challenges "Surprise Us" and Vintage Stamping Challenges' "Vintage" challenge with this project.


Sunday, 9 December 2012

"buttons"

Today I want to share a project with you, that is only one part of a present for Xmas: an altered tin box. Its' content will be shown in an extra post, when it is finished ;)


I made this box from a "Fossil" wrist watch tin box, I once got, which originally looks like this:


First I scrubbed off the printed surface with some sanding paper. Then I treated the box with alcohol inks "rust", "juniper" and "sunset" (my favorite mixture). I also added some embossing with Ranger's "Antiquities" embossing powders "verdigris" and "rust" in some areas.


In the meantime I gave a lace ribbon a bath in diluted "vintage photo" Distress ink, then gave it also some sprays of Adirondack Color Wash "Stream" and rinsed it under water to lighten the stains I had created this way (as the color washes are rather intense).


I also aged one of the Tim Holtz idea-ology book plates with some "rust" and created a panel from a scrap from one of my Prima paper stashes or maybe BoBunny's "et cetera" stash - I am not sure any more, which I stamped the word "buttons" on (the deeper meaning of this will be revealed in the other post that's to come some of these days).


 I covered the panel with "crackle accents" and let that dry.


To give the new surface of the tin box more depth, I also stamped some scratches with Archival ink "sepia" onto it using the Impression Obsession Cover A Card stamp. I sprinkled some Maya Myst "Espresso" onto it too, to add some stains.


Then I glued the ribbon, the book plate and a Prima Flower together with one of the Tim Holtz idea-ology "custom fasteners" onto the box, using Pattex glue, which especially works with non porous surfaces like metal.


Hope, you like the result!


Thank you for stopping by and having a look around!

Hugs,
die amelie xx

Wednesday, 3 October 2012

Tag Album "creepy.crawly."

Maybe you know that too: you have just received gorgeous new stamps but the inspiration won't come....

Well, I found some really awesome Halloween stamps at RedLead! And when they finally had arrived, I still had no idea for a Halloween project that got me going.

Yesterday evening, finally, I stumbled upon Frilly and Funkie 's "A Different Kind Of Tag (Plus A Theme)" and THAT (thank you so much, FaFs!!!) turned the switch. So today I started my "Four Tags Halloween Album", also keeping in mind, that I wanted to use my beloved flonzcraft stamps (frame on cover and all the flourishes and borders in the project are flonzcraft stamps. Skeletton as well), as I was invited to a wonderful new challenge blog, called "Vintage Stamping Challenges" , which is sponsored by Flonzcraft (which I think, is absolutely fabulous!!). So I planned to use some of my flonzcraft stamps too, to enter their challenge too.

I also enter the challenges from "ABAC" with my sparkling front cover and all the embossing, from "Loves Rubberstamps", as I luckily found "scarecrow" and "Halloween" in the word cloud for the actual autumnal challenge and the one from the "Smudger Challenge Blog", where "anything Halloween" is asked for.

This time I decided to do a size 5 tag project, as it fitted my stamps best.
This is how it looks like:

First I cut out four tags from four sheets of some of my paper stashes ("Chillingsworth Manor" from echo park and "Olde Curiosity Shoppe" from Graphics 45) and - for the binding - a strip out of corrugated card the same width as the tags, but twice the length plus about a centimetre for the album's back. 


Then I also needed something to attach the tags to. So I folded a small accordion, where I wanted to glue the tags in between. I did twice the amount of creases, to have spare folds between the singel tags, to provide space in the album for things attached to the tags.

Hope, you can see it here:


Stamps used for the tags and the cover are from: Tim Holtz, flonzcraft, My Mind's Eye and RedLead.
Distress inks used: "peeled paint", "pumice stone", "mustard seed", "spiced marmalade", "black soot", "barn door" and "antique linen".

Here are the four tags the booklet contains:

 (Click on pictures to enlarge)

Spider webs on the tags were embossed with white, black and deep red "Sternenstaub". Images were stamped with archival black ink and Distress ink "black soot".


The cover was first sprayed with Glimmer Mists "Marmalade" and "Pomegranate" and Maya Mist "Espresso Brown", afterwards partially painted with the "Snow Cap" acrylic paint dabber and the edges blended with black stamping ink.

 (This is the backside of the cover).

For little "Darla's" glowing red eyes (see third tag) I used "Xmas red" Stickles and for the embossed title "efco embossing powder "red superglitter".


I attached various ribbons to the tags, glued them into the folded accordion and then the whole bundle into the pre-cut and folded cover.

Here some more close-ups as usual!


Hope, you like it!
Hugs,
die amelie xx