Showing posts with label boozybear. Show all posts

Saturday, 1 May 2021

Two Rusty Crusty Tags for SanDee&amelie's Steampunk Challenges

 Hi, servus and welcome to the start of a new challenge over at SanDee&amelie's Steampunk Challenges, dear friends! 

A new two months long challenge is waiting for you to be faced and with my inspirational project for May and June I decided to get rusty again! 


I was given some delicious chipboard pieces to play with by lovely Glenda from boozybear - one of our two prize sponsors: two cool gentlemen from the "Canes" set, the beautiful "Umbrella" set, a fine selection of awesome cogs and gears and the fabulous "Stacked Suitcases"! 


Of course these had to be used with some steampunk/industrial style travel theme tags! 


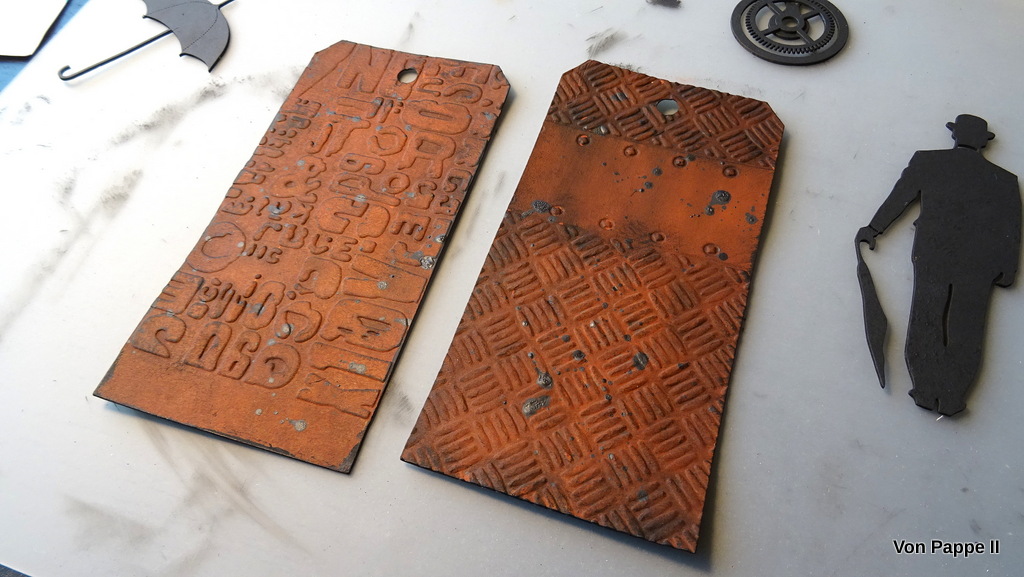
I started with die cutting two #8 size tags from old packaging cardboard using my "Tag&Bookplates" die designed by Tim Holtz - one of the very first dies I bought and still one of my most often used ones. 


I ran them through my BigShot using an embossing folder from Carabelle Studio and another from Spellbinders (I think). 
Then I added a base layer of red-brown acrylic paint - which already gave a great rusty appearance. 
I enhanced that by dry brushing the dried tags with Carbon Black acrylic paint and adding sprinkles of a very dark grey that I mixed by adding a tiny amount of white acrylic paint to the black paint left overs on my palette. I also painted the chipboard pieces with that dark grey tone. 


The hat, shoes, umbrella and suitcase handles were heat embossed using black embossing powder. The buckles got painted using DecoArt Extreme Sheen "Vintage Brass". I also added sprinkles of that to the tags before I fixed the finished pieces in place. The umbrella man and suitcases got a bit of shading with a detail brush and black acrylic paint for more depth and dimension. 


To fix the elements in place I used some chipboard left overs that I glued to the backs. 


The second gear was heat embossed with Ranger "Rust" embossing enamel. 


I found the umbrellas needed to be painted over with Yellow Iron Oxide acrylic paint - as this tone has a bit of a green-ish touch it makes the orange rusty tones pop even more and it also forms a great contrast. 


The quotes were stamped using Tim's "Noble Gent" stamp set. 

Some detail shots: 


I hope you like my two tags! I made these in my new (and not yet fully equipped) studio in our new home in the countryside! I love this spot so much and moving in kept us busy during the last months - so this was one other reason for my being absent for quite some time (besides struggling with break down, exhaustion and depression after an obviously too long struggle with health issues and many nasty side effects from tried out medications...but I won't bore you with that now). 

Here's a first view of my new creative spot at Lake Atter! So far I've managed to put together a base equipment that allows me to play whenever time allows and creativity comes by for a short visit (which isn't too often at the moment, but it is slowly returning). 


Two thirds of the shelves are still empty - and I guess these will only get filled slowly as it is a slow process to find out which things I want to keep and use in my Vienna studio and which ones in our country home. The room also serves as a guest room - therefor the sofa which can be turned into a comfy bed. 


I intend to buy less new crafting stuff, but one item had to bought again - the BigShot. I found I couldn't do without one in either spot! I remember when I got my first one...I was a bit sceptic if I would use it a lot, but I found it really took my creativity to another level and I wouldn't want to miss it now. 

And here's a first picture of the lovely view from my studio window - taken several weeks ago when winter came back for a short but hefty surprise visit after spring had already set in. 


But back to our steampunk challenges! The team and I are waiting for your entry over at our challenge blog! I hope to see you play along with us soon!

Hugs, stay safe and happy crafting! 
Claudia
xxx


Wednesday, 1 January 2020

Le Roi Frédéric - Steampunk ATC for SanDee&amelie's Steampunk Challenges

Hi, servus and welcome to this year's first design team post for SanDee&amelie's Steampunk Challenges! May the new year bring you loads of good health, joy and success in (not just) your creative endeavours!

Over at SASPC we're kicking off the new year with another

"Anything Goes - Steampunk/Industrial" 

challenge - so you are free to create away as long as you make sure you follow our few rules and as there is a touch of steampunk or industrial style to your makes.

I decided to start small this year and do an ATC - one of my favourite formats to work on.


Meet "le roi Frédéric"! Doesn't he just look like a truly honourable man? His crown is made of a kind of book page feathers - I just love it!


It's a cut out from one of my two Spellbinders "Media Mixage" Ephemera paper pads designed by Susan Lenart Kazmer. Together with the gorgeous MDF steampunk ATC frame from Calico Craft Parts, Seth Apter's awesome "Chunky Rust" Baked Texture embossing powder, my beloved black Stabilo All aquarellable pencil and DecoArt media fluid acrylics I had a lot of fun piecing it all together.

Especially the Chunky Rust looks great on top of "Burnt Orange" Americana acrylic paint (which I used as an adhesive for the embossing powder). Later I dabbed on some DecoArt media Diarylide Yellow fluid acrylic paint here and there and also inked the outer edges of the ATC frame with a piece of blending foam and black archival stamping ink.


I added diluted DecoArt media Carbon Black Antiquing Cream on top of the heat set Baked Texture to darken the look. Finishing touches were done using media fluid acrylics Prussian Blue Hue and Diarylide Yellow.

The shading in the background around Frédéric was done using the black Stabilo All aquarellable pencil and a soft wet detail brush. Using the same method I also shaded lightly around the glued on ephemeras' edges for more depth.


As glue I used DecoArt Americana "Antique" Decou-Page that already has a light brown-ish tint to it - so it slightly tones down the collage pieces while you're gluing them in place. 

Our challenge is - as always - open until the end of January and - thanks to our wonderful sponsors DecoArt and boozybear who have generously decided to be with us for another year we are able to once more offer two fabulous prize packages that go to two randomly chosen players among all proper entries. For more information and to check out my wonderful team's makes simply click HERE to get taken to our challenge blog post. I hope to see you over at SanDee&amelie's Steampunk Challenges soon! 


Hugs and happy 2020 crafting!
Claudia
xxx


Saturday, 1 June 2019

Assimilated - an SASPC Project for our June Challenge

"We are the Borg. You will be assimilated. Resistance is futile!"


Welcome and thanks for stopping by to take a closer look at today's project I have made for our June challenge over at SanDee&amelie's Steampunk Challenges!


Oh, my! I loved watching the Borg and Captain Jean Luc Piccard and his crew from "Startrek - The Next Generation". You too?

So when I saw the cool "eyepiece" chipboard kit from boozybear it made me feel quite nostalgic and I immediately had to think of a Borg themed project for the June challenge over at our Steampunk challenge blog.


Doing a background that is one completely crackled surface was inspired by the awesome "Crackle Masterclass" over at the MixedUp Creative Academy.

I used DecoArt media white Crackle Paste on a thick wooden panel that had some chalk letter quote on it (from the sales section of a home decoration store) . I always browse the sales sections of these stores for cheap alterables. ;)


I spread the crackle paste with a palette knife and made sure I didn't cover the panel too evenly. This produced a beautiful mix of differently crackled areas.


I stamped an eye onto a paper tissue in black archival stamping ink to use the top layer of the stamped tissue and decoupage it on top of the crackle surface.


But first I had to draw the missing parts of the face. The eye surrounded by the "eyepiece" was put in place first as this was my focal element. The nose and mouth were added with a permanent black ink PITT marker (I used the medium sized tip marker and the brush tip marker).


Time to glue the stamped eye in place. I used DecoArt Paper Decou-Page this time as it is more liquid than the matte Decou-Page and therefore does not tear the tissue when you glue it in place with a soft brush.


Then I misted the dry panel with DecoArt media Misters and also some dark brown Distress Stain spray. I added, dabbed off, sprayed some water on top to dilute the added paint sprays, dabbed off again, added more....until I was content with the look. Heat drying was no problem at all as the crackle had been done a day earlier and obviously was completely dry. Also none of the crackle came off during this heavy treatment with loads of paint and water. Really cool!


To make the face more prominent I painted in the highlights with a soft brush and DecoArt Americana Snow White acrylic paint.


Then I went in with a wash of DecoArt media Quinacridone Gold fluid acrylic paint to paint the shades.


The irises were painted in DecoArt media Cobalt Teal Hue fluid acrylic paint.


The finished face so far. 


To paint the eyepiece I used DecoArt matte Metallic paints Pewter and Aged Bronze.


On top of some of the parts I added a wash of Carbon Black DecoArt media fluid acrylic paint.


While the eyepiece was set aside to dry I die cut the letters for my Steampunk word (using the cool "Wonderland" font die from Tim Holtz) from thin greyboard. The letters were painted using DecoArt media fluid acrylic Transparent Red Iron Oxide.


Then I drew the shades with the black permanent PITT marker before I stamped some faux rust texture on top using black archival stamping ink and an Andy Skinner stamp.


I found the eyepiece needed another metal tone, so I painted some parts with Silver DecoArt media fluid acrylic Metallic. I diluted the left overs on my palette and loaded a brush with these to sprinkle them on the dry eyepiece.


I lightly smudged the edges of the two smaller pieces from the eyepiece chipboard kit with DecoArt Silver Sparkle Metallic Lustre. A very thin wash of media fluid acrylic Quinacridone Gold was added on top of all the pieces.


Some washers and screw heads from my beloved Calico Craft Parts MDF Mini "Hardware" sheet
rounded up the design just beautifully. I painted these in Silver and Quinacridone Gold.


I used DecoArt matte Decou-Page and Tacky Glue to glue the eyepiece, screw heads and letters in place.


Some detail shots:


Over at the challenge blog you will find more inspiration made by our amazing design team! I hope you like my Borg inspired project and I also hope to see you play along with us this month. Two prizes are waiting to be given away to two randomly drawn winners among all proper entries...and of course our players' entries are worth taking a closer look at too ;)

I just love how our players and the design team always share so many amazing steampunk designs and ideas over at our challenge blog! Together we are all making SanDee&amelie's Steampunk Challenges such a special mixed media steampunk and industrial style place to meet at. And this makes me very happy and the proudest challenge blog owner ever! Mwah! XXX

Hugs and happy crafting!
Claudia
xxx