Showing posts with label Paper Artsy. Show all posts

Sunday, 13 November 2022

A Short Creative Update

 Hi, servus and thanks for stopping by! 
I hope you are all doing well and are looking forward to enjoying a lovely Advent season! 

I have been having a hard year to be honest - health-wise. Luckily the new home in our house near the lake and my garden are great sources for happiness, so gardening, hiking (or rather taking walks), riding my kayak and simply being out in nature have been helping with keeping me healthy on the mental side at least. 

I have also taken on a new hobby that is a perfect means to deal with inner restlessness - archery! My husband and I found we have an archery club nearby and it is located in a most beautiful corner there a ten minutes drive away. Spending time on the shooting range (or the 3D shooting course), trying to focus on the perfect motion sequence and the tension of your body and then letting go just feels so calming and it brings the shaking of my hands and mind to rest. 

I have also started to write again - poetry mainly. It also is something that calms the mind and it is a creative process too - I am painting with words in a kind of way. 

I haven't spent a lot of time in my studio this year - being ill for such a long time, crafting and being creative with stamps, paints, stencils and all the other mixed media goodness just wasn't what appealed to me and my restlessness and shaky hands weren't helpful either. 

BUT...I still have been creating projects for StencilGirl Products and PaperArtsy and is always quite a rewarding thing to do. I mostly do home decor pieces for the new home at the moment and being able to plan and make these in my own pace also makes it easier for me to not get panic attacks the moment I enter my studio. 

So to get to the core of his little update, I would like to present both new projects and the links to the according posts on the StencilGirl Talk blog and the PaperArtsy Blog: 

For StencilGirl I created a little canvas, collaged with stencilled tissue paper elements. I needed something to go on the wall near the fireplace that matched the colours of the metallic grey and the rocking chair grey as well as the wooden wall...


And I am really happy with how my "little village close to the mountain"-canvas turned out! 


A detailed step by step and all the stencils and products used can be found here: 


The other project that has just gone live on the PaperArtsy Blog is a cloche displaying an autumnal arrangement of stamped leaves, paper beads and dried seeds and twigs. 


That was a project I also enjoyed making as the lovely PaperArtsy stamp sets designed by Courtney Franich finally made it possible to use (faux) autumn leaves in a project without having these crumble away and lose colours after some time...

I also used their fabulous Rusting Powder and some Infusions. How? Find out by clicking here:

Paper, Seeds and Twigs - Autumnal Cloche


There's some cool techniques there to check out and of course a lot of steps and detail images as well. 

I hope to see you there! 


Stay healthy and enjoy the last days of this beautiful autumn! 

Claudia

xxx


Tuesday, 10 May 2022

Luminescent Specimen Cabinet - a PaperArtsy Project

 Servus, hi and how's everyone doing these days?! I hope you are all fine and enjoying Spring and (finally!) warmer temperatures! 

Over at the PaperArtsy Blog they have just started a new topic - "Specimen Jar". You can tell I loved that one right away! I immediately thought about all the specimen neatly aligned in the beautiful vintage glass cabinets in Vienna's Natural History Museum. I could look at these for hours and just feel happy and soothed (I guess not only because I love studying fossils, insects and other small specimen but also looking at something so intriguing to me being displayed in such a neat order and large numbers). 

My aim with this project was to capture the feel of a cabinet from the Victorian era and also re-create an effect from a display box from Salzburg's "House of Nature" where they show some fish of the deep sea that make their own light down there. You press a button and their lights turn on - how cool is that?! So, yes, you're guessing right - I also used some mini-lights with my cabinet (and that was great fun). 

Just a few pictures to lure you over to PaperArtsy's blog


Find out more about the how-to and products used and meet me there

Hugs and happy crafting!
Claudia
xxx


Wednesday, 21 March 2018

Happy Easter at Emerald Creek Dares!

Servus, hi and thanks for stopping by my little creative spot today!

The latest challenge over at Emerald Creek Dares is in full swing and there is still a chance to play along to get the chance to win an amazing $50 voucher for the Emerald Creek Craft Supplies shop


or just by playing along and entering a project to their challenge will give you a 10% off code for shopping with Emerald Creek Craft Supplies! How cool is that!

Easter Delights


is the current challenge theme - so we hope to see loads of Easter themed projects being entered by you!


I wanted to create an Easter wall hanging that would fit with our dinette. As we have several different types (and therefor colours) of wood from the furniture there, I wanted to create something that would go with the various tones from my beloved Sheesham table and the spruce and birch wood benches and chairs. 


And of course I also wanted to showcase the gorgeous Bunney Key Charm alongside some of Emerald Creek's fab embossing powders - not just Seth Apter's and Kim's latest stroke of genius - the Baked Texture embossing powders, but also some of the others Kim creates and which are just as cool (like the Aroma embossing powders or her metal tones for example). 


Emerald Creek Products used: 

also available at Emerald Creek Craft Supplies:


Everything you see on this image has been created using Emerald Creek Craft Supplies! No designer papers were used!


I started out with cutting a larger panel plus a house shaped panel from thick paint board and I also added a layer of foam board to add more dimension to the house panel. 


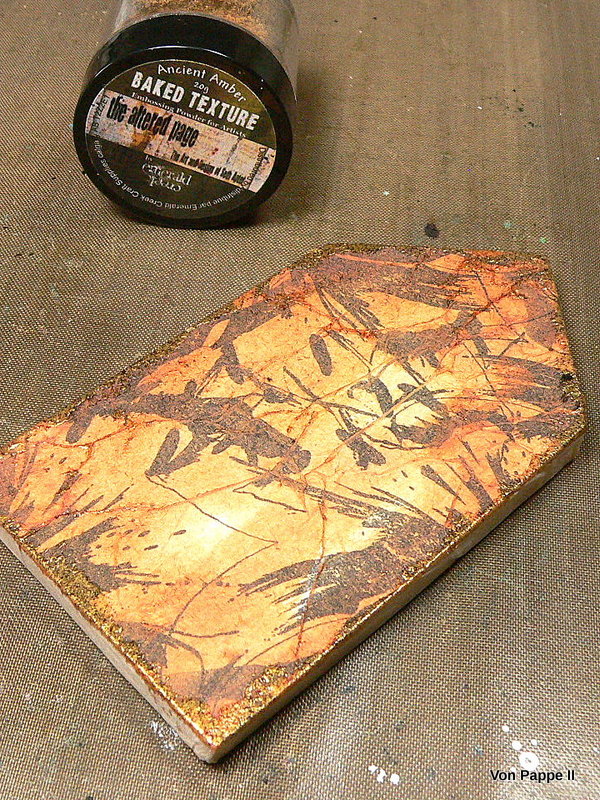
Then I used Ranger jet black archival stamping ink and the Kimilese and Tiger Lily stamps to create my backgrounds. Especially the patterns from the Tiger Lily image were perfect for creating a kind of brush stroke like pattern on the house shape! 


The main background panel was toned down using one layer of Vintage Beeswax Baked Texture embossing powder...


....and the stamped house panel was glued to the foam board. Then both were covered with slightly crumpled tissue paper using DecoArt Antique glue and sealant.


Once that had dried I added Distress Stain tea dye to the house panel and made sure I added more of it around the edges so I had a bit of a shading effect for a visual frame.


As I wanted to customize the metal Bunny Key Charm, I first added some matte DecoArt Decou-Page to the key to build up a layer that would provide some tooth for paints to cling to. I simply dabbed on a layer using a soft flat brush.


While that was set aside to dry I added Ancient Amber Baked Texture embossing powder around the edges of my house panel. I simply dabbed on the clear embossing ink around the edges using an Emboss-it dabber. Sometimes I also prefer to use my fingertips for that as it creates more random patterns (to do so I simply dab a bit of the embossing ink on my craft mat and dip my finger in).


I used Paper Artsy Fresco Finish paint and DecoArt Gold Rush Metallic Lustre to customise the key charm.


I had some left overs from die cutting and one was a perfect match to form the background panel for the key charm! I heat embossed the edges with Dirty Sand Baked Texture embossing powder....


...and then used three layers of Clear Ultra Thick Enamel embossing powder in the centre to fix the key charm to the panel.


I still needed a visible edge on the main background panel, so I decided to add Just Java Emerald Creek Aroma embossing powder around the edges. (It really smells deliciously like coffee...yummy!!!).


Then I punched two holes in the top corners of the largest panel so I could later add some rough cord for my hanging device.


I also added a piece of roughly woven ribbon behind the panel with the key charm for additional texture and to make the focal piece pop from the background. A Heart Brad was inserted into the foam board panel before I mounted that onto the background panel.


I love how the different embossing powders created such different effects and surfaces! They're all just great for creating assemblage pieces with that bit of bling!


I hope you like my finished Easter Wall hanging as much as I do!  And I hope to see you play along with us at Emerald Creek Dares of course! Simply click HERE to get taken to the challenge blog.


If you haven't already noticed with the new challenge rules and possibilities over at Emerald Creek Dares - you can now also enter your YouTube, pinterest, facebook or Instagram - not just the usual way by linking to your blogs! Please, check out the instructions given in the challenge post on how to do so!

Hugs and happy crafting!
Claudia
xxx


Thursday, 15 October 2015

Top Hats and Moustaches...and a little Halloween

Servus and welcome to my mid-month reminder project for SanDee&amelie's Steampunk Challenges!

Our theme this month is 

Top Hats and Moustaches


and I think both are essential elements with steampunk as they recall the miraculous era of Victorian gentlemen and engineers....

I love browsing flea market stands for vintage photographs and I think all men looked so distinguished back then - simply because of their impressive moustaches and the suits.


But then it is Halloween season at the moment...so I am afraid I got once more carried away and there's no moustache to find with my project for our steampunk challenge but at least a top hat...phew!


And honestly...a moustache would have covered up the beautiful teeth, right?
So here he is - my boney gentleman with his top hat.

As I had no top hat stamp for the project I had in mind, I made my grinning chap using a Paper Artsy skull stamp and combining it with a scanned, put to correct size and printed out top hat image from this wonderful book...

http://www.amazon.de/Victorian-Goods-Merchandise-Illustrations-Pictorial-ebook/dp/B008TVLTTS/ref=tmm_kin_swatch_0?_encoding=UTF8&qid=&sr=

...which I found at amazon.com.

But first I created a background in my art journal by collaging on some scraps of designer papers and torn book pages.


Next I scraped on some black acrylic paint with a small palette knife. 


That was followed by scraped on medium grey,...


 ...light grey and titan buff...


..and then I went in with a black and red DecoArt media Mister and created some dripping lines to make it all look more Halloween-ish for Mr. Bonehead-without-moustache.


For more detail I also added some drops and splatters of black and white - directly from the Mister bottle.


My stamped skull and the printed out and fussy cut hat were fixed to the page using DecoArt media Matte Medium. Mr. Bonehead got a monocle (made from a chipboard gear I had coated with red DecoArt Metallic Lustre and fixed to a small chain) and some black and white thread was "thrown" on the page for more interest (or chaos).


So this is my post for today. Maybe a bit too much blood...but hey - Halloween is still on my plate and I enjoy this season so much. Hope you do too - and maybe also join in our challenge at SanDee&amelie's Steampunk Challenges!


Booo!...erm...
Hope to see you over there!
Hugs and happy crafting,
Claudia 
xxx


Tuesday, 20 May 2014

52 Card Pickup - Session 5

It's been quite some time since I have done any altered playing cards for my 52 cards pickup project. If you don't know that "52 Card Pickup" means, learn more about it here.

This time my group of four cards look a bit less "lighthearted" and "fun"...which mainly is caused by the fact that I have been struggling with constant nervousness and sometimes also panic attacks from out of the blue for the last months. And although I still try not to let it take me down too much, I have reached a point where I can feel the exhaustion quite a lot. (The source for this still isn't found yet, but my doctors and I are getting closer it seems...).

You will find that the quotes I used on these four cards indicate some of the struggle I am in at the moment. But then I think: in that hectic life most of us have they should be helpful to others too sometimes.


#17


#18


#19


#20


Materials used:  Paper Artsy Eclectica Fresco Finish Chalk Acrylics "Chutney", "Chartreuse", "Seaweed" and "Tikka" alongside some scraps from the Prima "Cartographer" paper stash. Washi tape, some Bo Bunny, Kaisercraft and Prima stamps for texture and Distress markers "black soot" and "broken china" to shade in the word tiles and hearts.

Hugs,
Claudia x