Showing posts with label Bubbalux. Show all posts

Tuesday, 15 October 2019

Dressed It to Wear It - Stencilled Bubbalux Bangle for StencilGirl Products

Servus! I am so happy you're stopping by my little creative corner today!

I am especially happy you're here as today I am sharing one of my first full process videos that comes with this special bangle I created from bubbalux Craft Board and fabric that I had decorated with DecoArt paints and fabric painting medium and StencilGirl Products stencils. The video gives infos on the products used and shows how I create my layers on the fabric and how I put the bangle together and add some wire wrapped shell scraps...


So if you want to find out, simply hop over to the StencilGirl Talk blog to watch the twelve minutes long video I've done for you.


I hope you will like the video and that it encourages you to create your own non-sew fabric bangles!
Simply click HERE to get taken to the blog post with the tutorial and loads of images.


Hugs and happy crafting!
Claudia
xxx


Saturday, 22 September 2018

Rest in Peace, Myrtle Mulgrave! - Halloween Fun with Tim Holtz Dies and Bubbalux Craft Board

Hi, servus and welcome to another fun Halloween project today! It seems I am on a real roll this year with Halloween projects. Obviously reducing my design team commitments has been the right thing to do. With more time for projects that are just for fun (and just for me. myself and I) inspiration finds me more often and faster. And with all the awesome Halloween projects out there you just can't help being infected with the Halloween crafting virus, can you?

I have once more used the cool Bubbalux Craft Board (as in this project over HERE) - the white and yellow one this time - and once more I just loved the many different possibilities being given by this product and especially its sturdiness - it's perfect to create 3D projects that stay in shape AND are light weight at the same time.

I was inspired by some fabulous projects from some talented ladies that I recently saw (on the inspiring Tim Holtz Addicts facebook group), on which they were using the new Tim Holtz Tombstone Overlays (for the Etcetera Tags) to create the most fantastic tombstone projects.
Being in Austria, getting one of these is not only a matter of good luck but also of a long waiting time (due to shipping times from outside of Austria) - so mostly I am late to the party with latest releases...so I decided to find a way around that and create my own "tombstone overlays" using some of Tim's fab products from my stash - mainly his Alterations Halloween dies. That was great fun! And using his dies to cut the shapes from Bubbalux Craft Board just worked wonderfully!

So I have come up with this own version of a Tim Holtz Tombstone project. I hope you like it!


I have also done a how-to for you.

And here's the list of Tim dies and die sets I have used:

- Headstone (Alterations)
- Iron Gate (On the Edge Alterations)
- Pediments (Alterations)
- Trophy Antlers (Alterations)
- Labels (Thinlits)
- Garden Greens (Thinlits)
- Feather & Ravens (Thinlits)


I started with cutting out the needed pieces from white Bubbalux. As you can see I cut out some more pieces so I could try out different designs.


I removed the protective foil AFTER die cutting the Bubbalux pieces. This way any black foam residue from the dies was removed as well.


Then I sanded all the edges and cut off the top of the headstone shape (as that was going to be replaced by a pediment piece). I also die cut another bottom part of the Headstone shape so I could layer pieces to create the impression of the tombstone sitting on a wider stone base.


I added some lines and other detail to the pieces with hand embossing.


To bend the iron gate shape to create a little fence for the grave, I heated the Bubbalux with my heat tool and quickly bent it into shape around a jar. I held the piece in place with my fingers until it had cooled down.


Then I placed the shaped fence piece onto a flat piece of yellow Bubbalux and traced along the curved outside with a ball point pen. Using large scissors I cut out the drawn shape to create my base. I left an overlap at the back for the tombstone to sit on and even added another half inch to the base's depth for a better stand.


Using some of the lovely Tim Holtz Thinlits dies sets I die cut some twigs from sturdy white cardstock to decorate the tombstone with.


The little plate shape from the Trophy Antlers die was the perfect shape to put the portrait of Myrtle Mulgrave on. (May she rest in peace!)

I used black DecoArt media Gesso to prime all the die cut pieces. I stippled the Gesso on with an old and worn bristle brush. This way I already created some rough texture with my base layer. I let everything dry naturally (as heating the Bubbalux will make the pieces warp a little).


Once dry I stippled on some DecoArt media Texture Sand Paste and let that dry naturally as well.


In the meantime I heat embossed my smaller cardstock shapes and the Bubbalux base plate using Emerald Creek embossing powders Hammered Metal, Moss Stone Green, Clear Chunk Gloss and Vintage Ivy.


The hand punched portrait got three layers of the Clear Chunk Gloss embossing powder for a dimensional look.


Using a wide soft flat brush I dry brushed DecoArt premium Warm Grey acrylic paint onto the tombstone pieces. First I had glued the pieces together using superglue.


I also used superglue to assemble all the finished pieces.


The iron fence was loosely painted using DecoArt media Silver Metallic paint and Lamp Black Americana paint. I also added touches of the Silver Metallic paint to other parts of the tombstone to visually fuse all the elements. Et voilá!


Some detail shots:


...and once more the finished piece:


Thanks for stopping by, dear crafty friends! I hope you like my self made "Tombstone Overlay". ;)

And thank you, Floortex, for generously letting me have some Bubbalux to play with for free! 

Hugs and happy crafting! 

Claudia
xxx


Friday, 24 August 2018

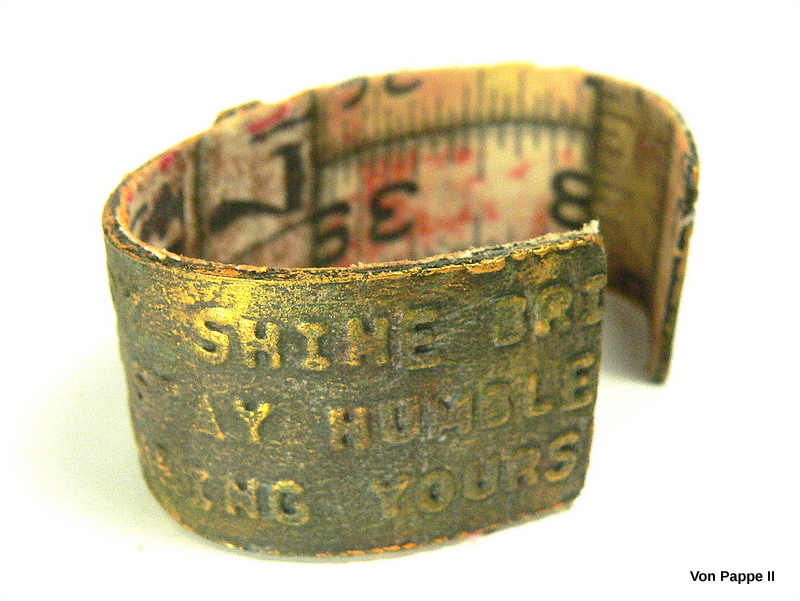
Don't Forget to Shine! - Bubbalux Bangle


Hi, servus and thanks for stopping by! It's Friday evening over here and I wish you all a lovely weekend! Finally temperatures have cooled down. Phew! With lower temperatures my creative muse seems to have returned as well and I would like to share a project today that I made using something new to me - CraftTex Bubbalux Creative Craft Board.

The lovely people from Personal Impressions let me have some for free to play and experiment with. Thank you so much! I had great fun and have yet just started to find out about all the possibilities.

On the package it says that Bubbalux can be cut with scissors (I used large ones and that worked well), die cut (that's on my list), embossed (of course I had to try that!), painted (yes, that had to be tried out too), shaped (Whoa! Cool! That was definitely the first thing to put on my "try this"-list!), stamped on,  screen printed and ...well, I am sure other crafty folks out there will find out a lot more amazing things to do with it.

Of course my aim was to find out if I could also use it and create something Claudia-style...if you know what I mean...something a bit grunge and worn looking.

And here we go:


Voilá - my first Bubbalux Bangle, done with the use of our hair drier and various DecoArt and DecoArt media paints and products. But let me also show you the back and inside of my bangle....


...and then take you through the process.


I received some blue Bubbalux to play with (it comes in six different colours). Packages come in sizes of three sheets of 2mm thickness that measure 215 x 279 mm.


I used my large pair of household scissors to cut a strip of 25 mm width off one sheet. That took a bit of an effort, but I managed to do a neat cut easily. Then I removed the protective clear board-coating from the cut off strip.


I cut the strip to the length of about 16 cm and sanded all the edges and corners with a sanding block.


Of course I had to try some embossing with my Big Shot! That went absolutely smoothly and the result looked really cool!


I carefully heated the embossed strip with our hair drier  (as there's only a little heat needed to soften the Bubbalux to bend it into shape). That was really easy too. You only have to pay attention to not heat it too much,  otherwise the embossed texture might get lost (also pay attention not to flatten the embossed texture when holding and shaping the softened bangle with your fingers!)


For my focal element (and to cover up the edge where the two embossed sections meet in the centre) I also cut out and embossed a single word using a tiny piece of Bubbalux from the left overs and the same embossing folder again. The single word was glued on using superglue.


Next I primed the bangle's outer side with Lamp Black DecoArt Americana acrylic paint. I stippled the paint on with a worn bristle brush to avoid any visible brushstrokes. By stippling on the paint instead of brushing you also achieve beautiful texture and tooth for the following layers of paint to hold on to.


Then I started dry brushing on different layers of acrylic paints. The first layer was DecoArt Titanium White Americana paint.


That was followed by a layer of DecoArt Quinacridone Gold Hue premium paint, ...


...then by some Raw Sienna,...


...some Cobalt Teal Hue...


....and once that had dried, a wash of DecoArt media English Red Oxide fluid acrylic paint.


I let that air dry thoroughly before I went on to my next step - gently dry brushing on a very light layer of Lamp Black here and there and then sealing the dried paints with a matte spray sealant. I finished off my bangle by adding some Orange Flicker DecoArt Metallic Lustre with my fingertip for the final bling.


To cover up the blue colour from the Bubbalux sheet on the bangle's inside, I glued on some fabric using matte DecoArt Decou-Page. I first glued the fabric on, let that dry and then cut off the excess. The Decou-Page also helps to prevent the fabric from fraying.


I added more Orange Flicker Metallic Lustre to all the edges once the glue had dried to finish up my bangle.


And this is how it looks when being worn:


The Bubbalux is so lightweight that you hardly feel it on your wrist and there's a short moment of surprise when you pick it up, because it weighs nothing - the worn metal look even adds to that effect.


I spy some potential for more fun and lightweight mixed media jewellery projects in the future! ;)


I hope you like my heavyweight looking lightweight "metal" bangle as much as I do! I would also love to hear about your experiences and projects with Bubbalux as I have only just started to find out about all the possibilities there are. I am sure some creative geniuses out there have already taken this new crafting substrate to the next level. ;)


Have a nice weekend and as always
hugs and happy crafting!

Claudia 
xxx