
Hi, servus and thanks for stopping by! It's Friday evening over here and I wish you all a lovely weekend! Finally temperatures have cooled down. Phew! With lower temperatures my creative muse seems to have returned as well and I would like to share a project today that I made using something new to me - CraftTex Bubbalux Creative Craft Board.
The lovely people from Personal Impressions let me have some for free to play and experiment with. Thank you so much! I had great fun and have yet just started to find out about all the possibilities.
On the package it says that Bubbalux can be cut with scissors (I used large ones and that worked well), die cut (that's on my list), embossed (of course I had to try that!), painted (yes, that had to be tried out too), shaped (Whoa! Cool! That was definitely the first thing to put on my "try this"-list!), stamped on, screen printed and ...well, I am sure other crafty folks out there will find out a lot more amazing things to do with it.
Of course my aim was to find out if I could also use it and create something Claudia-style...if you know what I mean...something a bit grunge and worn looking.
And here we go:

Voilá - my first Bubbalux Bangle, done with the use of our hair drier and various DecoArt and DecoArt media paints and products. But let me also show you the back and inside of my bangle....
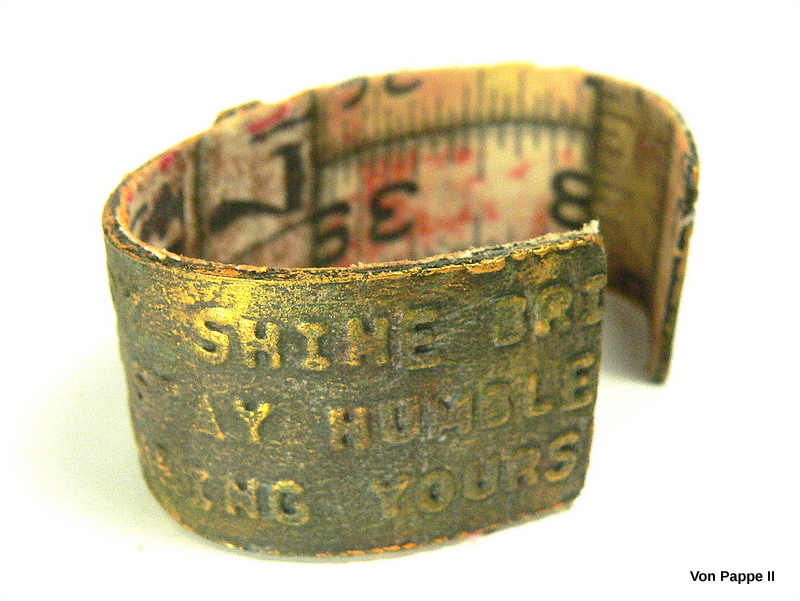
...and then take you through the process.

I received some blue Bubbalux to play with (it comes in six different colours). Packages come in sizes of three sheets of 2mm thickness that measure 215 x 279 mm.
I used my large pair of household scissors to cut a strip of 25 mm width off one sheet. That took a bit of an effort, but I managed to do a neat cut easily. Then I removed the protective clear board-coating from the cut off strip.

I cut the strip to the length of about 16 cm and sanded all the edges and corners with a sanding block.

Of course I had to try some embossing with my Big Shot! That went absolutely smoothly and the result looked really cool!

I carefully heated the embossed strip with our hair drier (as there's only a little heat needed to soften the Bubbalux to bend it into shape). That was really easy too. You only have to pay attention to not heat it too much, otherwise the embossed texture might get lost (also pay attention not to flatten the embossed texture when holding and shaping the softened bangle with your fingers!)

For my focal element (and to cover up the edge where the two embossed sections meet in the centre) I also cut out and embossed a single word using a tiny piece of Bubbalux from the left overs and the same embossing folder again. The single word was glued on using superglue.

Next I primed the bangle's outer side with Lamp Black DecoArt Americana acrylic paint. I stippled the paint on with a worn bristle brush to avoid any visible brushstrokes. By stippling on the paint instead of brushing you also achieve beautiful texture and tooth for the following layers of paint to hold on to.

Then I started dry brushing on different layers of acrylic paints. The first layer was DecoArt Titanium White Americana paint.

That was followed by a layer of DecoArt Quinacridone Gold Hue premium paint, ...

...then by some Raw Sienna,...

...some Cobalt Teal Hue...

....and once that had dried, a wash of DecoArt media English Red Oxide fluid acrylic paint.

I let that air dry thoroughly before I went on to my next step - gently dry brushing on a very light layer of Lamp Black here and there and then sealing the dried paints with a matte spray sealant. I finished off my bangle by adding some Orange Flicker DecoArt Metallic Lustre with my fingertip for the final bling.

To cover up the blue colour from the Bubbalux sheet on the bangle's inside, I glued on some fabric using matte DecoArt Decou-Page. I first glued the fabric on, let that dry and then cut off the excess. The Decou-Page also helps to prevent the fabric from fraying.

I added more Orange Flicker Metallic Lustre to all the edges once the glue had dried to finish up my bangle.

And this is how it looks when being worn:

The Bubbalux is so lightweight that you hardly feel it on your wrist and there's a short moment of surprise when you pick it up, because it weighs nothing - the worn metal look even adds to that effect.

I spy some potential for more fun and lightweight mixed media jewellery projects in the future! ;)


I hope you like my heavyweight looking lightweight "metal" bangle as much as I do! I would also love to hear about your experiences and projects with Bubbalux as I have only just started to find out about all the possibilities there are. I am sure some creative geniuses out there have already taken this new crafting substrate to the next level. ;)
Have a nice weekend and as always
hugs and happy crafting!
Claudia
xxx
What a brilliant result Claudia, hard to imagine now that this started out blue! Love that you used the fabric on the inside too! x
ReplyDeleteWow! That really is Cool! I thought it was metal! You rock those products girlfriend!
ReplyDeleteJackie xx
I've not heard of this product before, but I love what you've done with it. Oh, the possibilities!!
ReplyDeleteFantastic tutorial! Thanks for using Bubbalux and for helping to explain some of its many craft applications - we're about to put your tutorial up on the Bubbalux Gallery and blog. We hope you'll use Bubbalux again soon, as we'd love to see what you do with it next!
ReplyDeletethanks from the CraftTex Team xx
Thanks from the CraftTex team
:) Thank you very much for sharing my project on your site and thanks again for letting me have some Bubbalux to play with! It is great fun to use and I haven't even tried out all the possibilities yet ;) xxx
Delete