Friday, 1 December 2017

A Very Merry Steampunk Christmas!

Hi, servus and welcome to my make for Round Two of our winter special challenge over at SanDee&amelie's Steampunk Challenges!

Each year we open a two months long challenge at the start of November, so our players and the DT have enough time to enjoy their Christmas crafting and are still able to play along. So the makes of Team A have already been presented on 1st November over HERE and today it's time to share the projects of Team B. The challenge will be open until the end of December!


I created a set of three steampunk gift tags this time...but these could also be used for decorating the tree if you do both sides of the tags. I simply painted the backs of mine black.


I wish you all a Merry Christmas and happy holidays, dear steampunk mixed media friends (and of course I hope to see you play along with us soon ;) !

To share a bit of Christmas joy I have also decided to add a little extra prize to our winter special challenge - a little surprise package donated by humble me.  So playing along gives you the chance of winning one of three prizes this time! 

And now on to the tutorial for my steampunk tags, which are made really quickly and easily. I used some of the new fab DecoArt Americana premium media and paints (but am still only starting to experiment with them as I only got this wonderful surprise package from DecoArt some days ago...yay, Christ Child has been here already! :) )


In their range you'll find 47 of the cool colour tones most of which we already love and know from the media fluid acrylic paints range. The premium acrylics are heavily pigmented and  provide medium-viscosity and satin sheen. There's also black and white Gesso as well as an extender, matte and gloss medium. 

I used the black Gesso on the wooden tags that I got from the dollar store. It's very creamy and easy to apply and if you only add one thin coat the texture from the wood still shows through. I used two layers on my tags though. The Gesso dried really fast. 


I also applied two layers of black premium Gesso to some die cut gears and three wood panels. As it is very creamy and spreads easily you don't need much of it to get good and even coverage.


Once the Gesso had dried I applied black DecoArt media Modeling Paste through the fab "Short Circuit" Americana stencil and let everything dry naturally. 


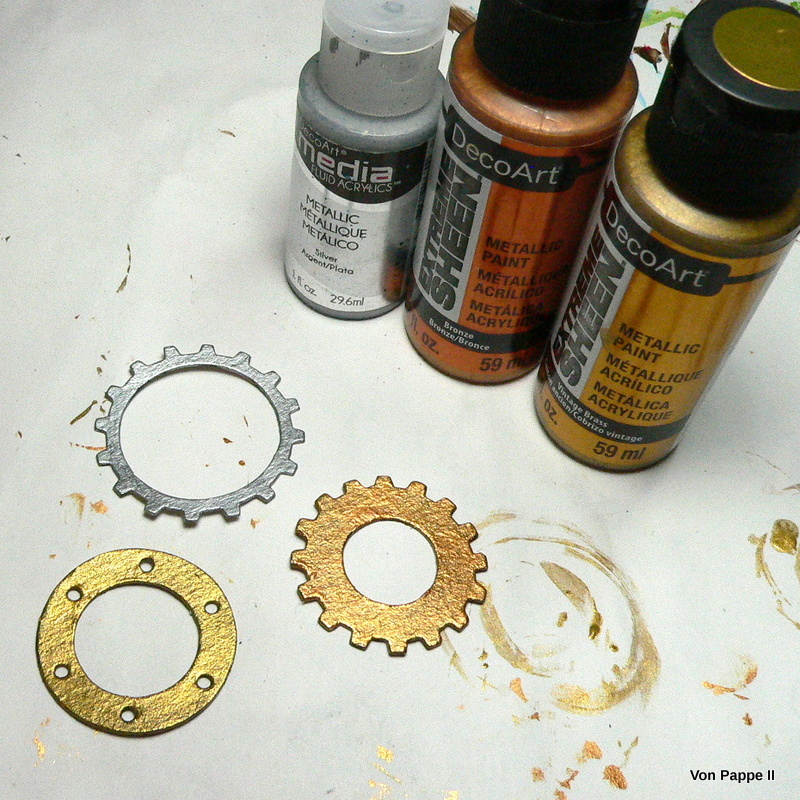
The gears were painted with two coats of DecoArt media Metallic Silver, DecoArt Extreme Sheen Bronze and Vintage Brass. 


Using my fingertip I rubbed Lavish Green, Orange Flicker and Brilliant Turquoise DecoArt Metallic Lustres onto the raised areas of the stencilled on circuit. 


Black Shimmer Metallic Lustre was painted onto the wood panels using a soft brush and a little water. 


The pieces were all dry brushed using a wide flat and worn bristle brush and DecoArt Americana premium Carbon Black paint which worked just perfectly!!! 


Dry brushing makes such a difference, doesn't it? You can turn something bling-y and shiny into aged- and worn looking only by adding traces of black paint. So cool! 


I added some quote stickers to the small wood panels and then fixed all the parts to the tags with matte DecoArt Decou-Page. I also covered the quote stickers with a thin layer of the Decou-Page to seal them to the surface properly. 


The tags were finished off by adding three little self adhesive metal stars...


...and cord loops. 


Done! 


Wishing you 
a
very merry steampunk Christmas
and 
happy holidays!


Claudia
xxx



Monday, 27 November 2017

Jingle Bells, Jingle Bells...

...whose sleigh could it be, I hear coming from the snowy forest?


If you want to find out, I would like to invite you over to the Calico Craft Parts blog. I am sharing a really quick and easy home decoration project for the Advent season. Simply click HERE to get taken to the post with a full tutorial.


I hope to see you over there!
Hugs and have a good start into the week!
Claudia 
xxx


Monday, 13 November 2017

Time to Yodel at Calico Craft Parts

Servus, hi and hollodrio from the Austrian chick on the Calico Craft Parts design team!

After our short holiday in the beautiful Austrian Salzkammergut district with its many lakes and mountains, I was inspired to create something rural and typical Alpine...


Of course the roaring stag is still missing in this picture.....and some good yodeling too. 

I have taken steps images so you can follow me along while I paint my little Alpine landscape (maybe some of you can name the mountain I picked as my model). To see these and the finished project simply click HERE and get taken to the Calico Craft Parts blog. 

Hope to see you over there!
Hugs and have a good start into the week!
Claudia
xxx


Monday, 30 October 2017

Potions & Spells at Calico Craft Parts

Hi, servus and welcome to today's invite over to the Calico Craft Parts Blog, where I am sharing my last Calico Halloween project for this year.


Poisonous potions....


...and creepy crawlies (bot only very tiny ones!) ...


...are awaiting you! 

To see the finished project and check the how-to simply click HERE to get taken to the project post!
I hope to see you over there!

Hugs and Happy Halloween!
Claudia
xxx


Thursday, 19 October 2017

Inuit Esprit at DecoArt Mixed Media - a new project and tutorial!

Hi, servus and thanks for stopping by!
I just found that I completely forgot to share a short invite to the DecoArt Mixed Media Blog, where you can find my latest DT make as one of their proud DT members!


The title of my project is "Inuit Esprit" and I really fell in love with the little Inuit girl and her kite when I first saw her!


I combined a lot of found "treasures" in this piece - left overs from die cuts, jute cord, a little capsule with lichen in it, vintage buttons, Dresden ornaments, a bottle cap and a piece of driftwood from one of our holidays in the beautiful Austrian Salzkammergut district.

I always buy wooden houses when I find them in the sales section at home decor shops because I just love to use them as a substrate for my assemblage pieces. Houses "speak" to us. They evoke special feelings in us...so whatever is "in" a house, is safe, special and treasured, isn't it?


If you want to know how I built the various layers to create the beautiful aged look and depth, you find all the info and steps images over at the DecoArt Mixed Media blog!


Isn't she just gorgeous? I love that rubber stamp (which is a Tiger store design and was a gift from my lovely sister). 


The upper "button" actually is a seedpod that was once part of a necklace.


And I loooove the traces on the driftwood - "drawn" by nature itself!
I am happy that this piece finally found a good "home" - 
in this Inuit girl's house ;)


I hope to see you over at the Mixed Media Blog. 
Simply click HERE to get to the post!


Hugs and happy crafting,
Claudia
xxx