
I am glad you stop by and before I continue I want to thank all those who have been taking the time to leave their comments with me since I started this blog - I really appreciate that a lot and they also mean a lot (of encouragement) to me. So thank you very much! (We all know that comments are what keeps us going, don't we? ;)
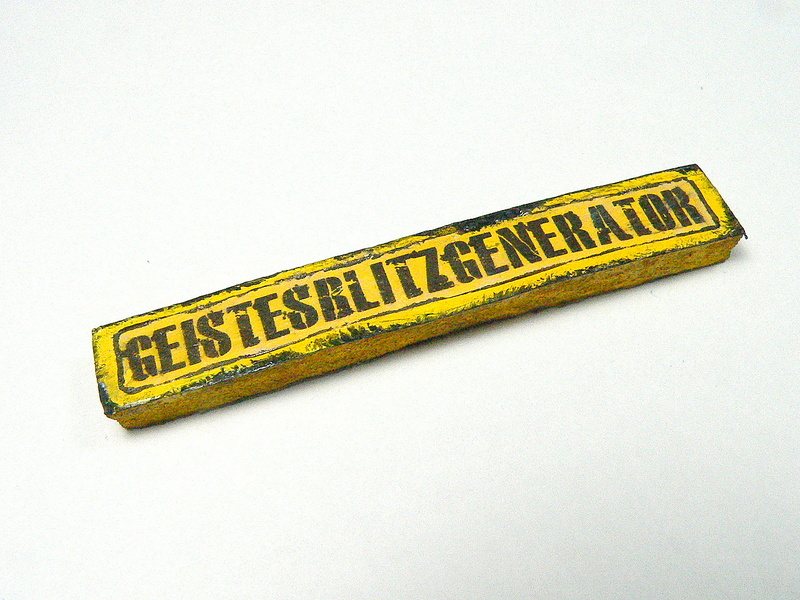
Well, here's my new invention! The "Geistesblitzgenerator" - which is German for "flash of genius-generator". By sharing this project with you today I want to invite you to take a look at or even play along with our actual "Anything Goes - Steampunk/Industrial" challenge over at SanDee&amelie's Steampunk Challenges.

The idea originated from several days of mojo-less suffering - trying to figure out what I could create for our steampunk challenge. I knew that I wanted to use some of the awesome steampunk chipboard pieces from our second prize sponsor "boozybear"...and I knew I wanted to arrange them to give a machine-like impression. But which kind of machine?
The final kick off needed came from our short trip last weekend when we visited one of my favourite places - Castle Bernstein in Burgenland. There is a small museum at the foot of the castle hill that shows old mining equipment and machines and I took a picture of this little digger:

I loved the rust working through the coat of yellow varnish and all the rusty texture!

And my plan was to recreate this exact look - but I still didn't know what kind of machine I would want to "build"...well...as usual when this happens I decided to simply start and find out where the project might take me...as long as there was yellow and rust and loads of gears...

So here's what I used:

parts of three packs of boozybear chipboard pieces
and a lot of DecoArt Media Fluid Arcylic paints and mediums:

I started with playing around with the "mechanicals" and "lightbulb" chipboard pieces until I had found the "right spots" to make them look a bit machine like. Then I glued them to the wooden block (a find from the sales section of a home decor shop) using matte DecoArt Decou-Page.

Next I gave everything a thick (stippled on) coat of Raw Umber heavy body acrylic paint. After that had dried I stippled on two layers of DecoArt Americana "Primary Yellow" acrylic paint.

After that had dried, I applied DecoArt Media Texture Sand Paste in some spots - using my fingertip and a small palette knife.

I let that dry too and then started dry brushing the piece with DecoArt Media Fluid Acrylics "Raw Umber" and "Dark Grey"

I also added first shades of English Red Oxide - dry brushing it on and also applying a light wash.

Then I built up layers of paint - dry brushing them mainly onto my piece - using an old bristle brush and a soft flat brush.
Paynes Grey:

Quinacridone Gold:

Paynes Grey again:

I also added mixes of Quinacridone Gold, English Red Oxide, Transparent Yellow Iron Oxide and Diarylide Yellow here and there for more depth and richness in colour.
I painted some drip lines too and toned everything down with a wash of English Red Oxide.

Next I needed the icy blue spark that jumps from the lever to the light bulb. I used a little bit of wire and applied some matte Decou-Page to it with a soft brush. Then I dipped this piece of wire into various sorts of glitter and let that dry:
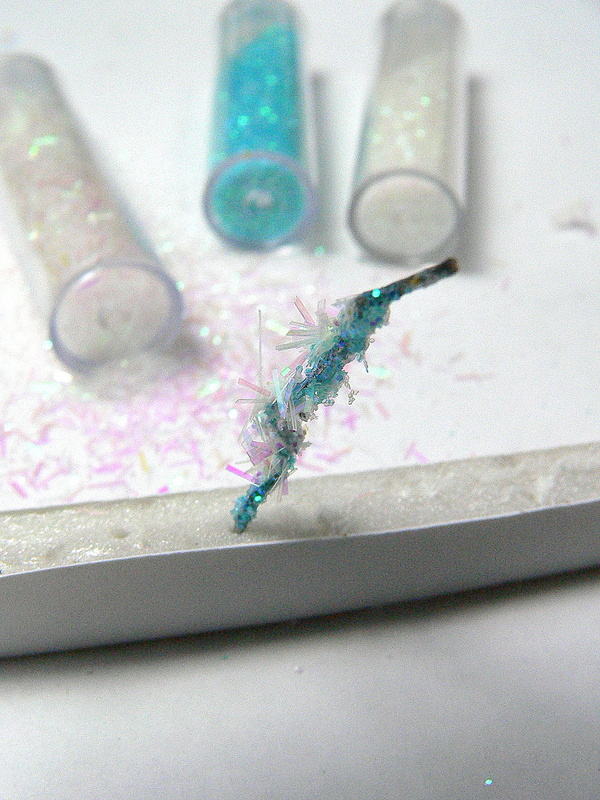
I drilled a tiny hole into the chipboard and inserted the wire into it - fixing it with matte Decou-Page. Once that was dry I added some dashes of Primary Yellow to blend my spark in.

The ramifications were painted directly onto the lightbulb using a white gel pen and a light blue marker.
I still needed a sign though. As I didn't have a stamp that matched, I searched the internet for a stencil font I liked, mirrored the word on the computer and printed it out in matching size.

I used DecoArt Americana Decor Image Transfer and applied it to both: my prepared substrate (cut from foam board and painted with acrylic paint) and the front of my cut out word. Then I glued the word face down onto the substrate and made sure I applied thorough pressure so there would be no bubbles.
After that had completely dried (best wait for several hours) I used a soft sponge and added clear warm water to my "sign" to soak the glued on paper. With soft pressure and rotating motion I rubbed off the paper with the soft sponge to reveal the letters - voilá:

Then I used the same paints I had used on my machine to "age" my sign:
I fixed it to my wood block using two short pieces of rusty wire that I inserted into two drilled holes at the side.

I added a bit of matte Decou-Page (using a fine tip brush) to the holes and wires to make sure everything would stay in place.
Done!

Now I will never run out of good ideas! Yay! And I can outsource a lot of brain activity (or rather replace missing brain activity? lol)...
Here are some more close ups, if you like. But first I will give you the link to our challenge blog - over HERE. ;)


I hope you enjoyed your visit today! And I hope I will see you soon over at our steampunk challenge blog! My teamies have prepared the most stunning inspirational projects for you! So make sure you check them out! I promise you will get a bundle of fantastic steampunk inspiration!
Hugs and happy crafting!
Claudia
xxx

What a clever idea, love it and love your paint colours. The spark is brilliant. Tracy x
ReplyDeleteOMG! Great rusting, love this
ReplyDeleteLove
Amanda x
Cool stuff and a fantastic result!
ReplyDeleteI love your machine Claudia and all the details you have shown us in how you put it together and achieved those fabulous results. It's amazing where our inspiration can come from and so glad you found the museum pieces to help out xxx
ReplyDeleteSo brilliant Claudia (thank you for the tuto....)
ReplyDeleteWell I'll say! This is such a BRIGHT idea and so clever! Huge round of applause for such an interesting idea! Love the chippies and the colors you have used. The texture sand adds such a nice rusty element! Awesome sauce and fabulous! Thank you for translating the word as well. Hugz to you muffin! ~Niki
ReplyDeleteMagical!!!!!!!
ReplyDeleteFreaking fantastic Claudia!! I want a G...generator! We all need a boost of genius now and then and to have this little machine in our pockets, oh wow, wouldn't that be something! Loved seeing your process and I would never have guessed all of those colors went in to it. I want to turn those levers and rev it up!!
ReplyDelete