Tuesday, 5 March 2013

It's Technique Time Tuesday!

Which means I am able to welcome you today being a new DT member over at Technique Time Tuesday - Mynnette's awesome challenge-blog where you get wonderfully detailed technique tutorials and challenging fun every month! Wow! I am so proud to be part of her fab DT!

For this month's challenge I learned to know the "Brick Wall"-technique, which is a really cool effect for cards, tags or other crafting projects.

My take on this technique looks like that:


As you can see I took the technique's name quite literally ;)
AND I had to use my recently bought Tim Holtz stamps on this tag of course (together with a lot of other TH goodies) ;)
These had been on my wish list for quite some time now...

The background for the bricks was made by applying distress inks directly from the pad onto the craft sheet, spraying it with water and dipping and dragging the white card throught the stains on the sheet - thus creating a lot of layers with great texture from the stains.

With that background I used the Kaisercraft "Graffity" texture stamp and did some heat embossing using black embossing powder.

After that I cut the paper to bricks and applied those to the prepared tag. The rest was a lot of stamping, blending, distressing and fiddling until I was content with the result - but first of all: it was great fun! Really love this technique and will use it again! You will find a great tutorial for the brick wall technique over at Mynnette's challenge blog!

I hope you liked what you saw AND I will see you over at Technique Time Tuesday giving this awesome technique a try on your own!


I am entering SimonSaysStamp's Challenge "Anything Goes"  and The Artistic Stamper's challenge "Tags" with this tag.


Hugs,

die amelie aka Claudia xx


Sunday, 3 March 2013

12 tags of 2013 - march

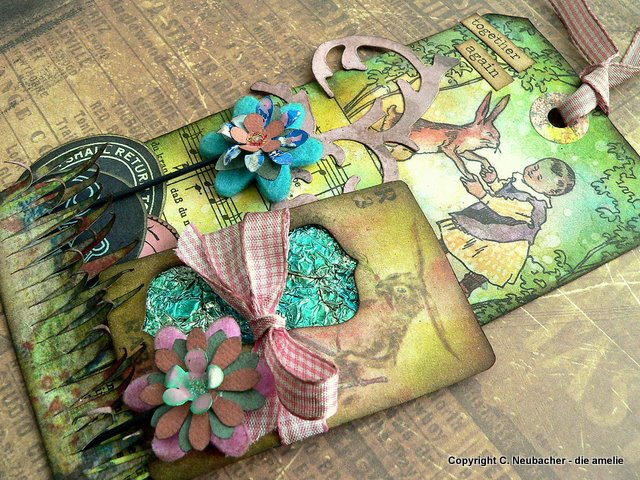
Encouraged by my latest win with Tim's "12 tags of 2013" and of course inspired by the awesome march tag he did, I decided to try a first take on the march tag although I hardly have any of the stuff Tim used on his...but improvising is one of the things I love (and luckily I own sufficient Tim Holtz stuff) and therefore I had great fun making this tag:


I immediately fell in love with Tim's altered flowers on their wire stems! I combined some die cut felt flowers with punched from metal foil and Kraft Core flowers. The grass was cut from a sheet from the Tim Holtz "Lost and Found" stash and even the rabbit card from the "Crowded Attic" stash finally found a home :)

The main background image is a colour copy from the 1909 published "Sang und Klang fürs Kinderherz" song book (whose editor was no other than Prof. Engelbert Humperdinck). "Häschen in der Grube" is a really well known and famous nursery rhyme and I was glad to find such a lovely illustration to go with it in the book.

I wanted some Easter eggs to go with the grass and the flowers but the only egg-shaped stamps I have are three hotel labels from the Tim Holtz "Travel Labels" stamp sheet. I stamped them on soft blue, pink and green paper to match the main colour scheme of the tag.


I die cut an opening into the rabbit card and coloured a piece of crumpled aluminium foil with Ranger alcohol inks which I glued to the back of the card afterwards. The Tim Holtz flourish was die cut from the same sheet of the "Lost and Found" stash as the grass as the backside was just a perfect match!!


For a finish I added idea-ology chit chat stickers and reinforcers.


The ribbon was blended with Distress ink "walnut stain" as it was too bright. Edges of flowers and the tag were blended with "walnut stain" too. Done!


I also used Stickles with the flowers and acrylic paints.

For blending the background I used Distress inks "peeled paint", "rusty hinge", "mustard seed" and "broken china".

Additional Distress inks used: "barn door", "shabby shutters", "walnut stain".


Hope you like my interpretation of the march tag (and the close ups too)!

Hugs,

die amelie xx

Saturday, 2 March 2013

"Orange and Purple Butterfly"

is this fortnight's recipe at DragonsDreamTagItOn.

Great choice of colours and quite tricky to combine with the butterfly theme...here comes my take on this challenge:


I took some card for the background which originally was from a shoe box I used as colour spraying box - therefore the shading from light orange to dark purple was there already ;)

I added the flourish using texture paste and a stencil and sprayed it with GlimmerMists after it was dry.

The background paper for stamping my favourite butterflies on was made bathing and dipping the paper in dots and puddles of purple and orange GlimmerMists and Distress inks.

The originally orange flowers were treated the same way and also stamped with buttefly images to add some texture.


I stamped and heat embossed some script rather randomly onto the tag using dark purple embossing powder. After assembling the whole tag I sprinkled some colours (Mr. Huey's and GlimmerMist) directly onto it to turn the tag from too lovely into more grungy until I was content with the result.


Hope, you like it too ;)
Hugs,

die amelie x

Friday, 1 March 2013

Cuckoo Clocks Go Steampunk!

Good evening, dear visitors, crafting friends, followers and those still to become!
Maybe you have already visited the new challenge blog my FF (=fantastic friend) SanDee and I have set up for you...


Our very first challenge is about cuckoo clocks, which are a little different than the ones you get in the Schwarzwald ;)


My first try on this month's challenge theme was mainly a metal oriented one.
I embossed silver metal foil and treated it with alcohol inks and sanded it afterwards using steel wool.

The main background of the tag is made from embossed black Kraft core, which I rubbed some metal rub ons in to highlight the shapes of the cogs and gears just a little.

For the roof of the cuckoo...er...owl clock I cut the embossed silver foil to pieces and glued them together to build a roof-like shape. I punched the hole for the owls home and fixed the die cut owl with some sticky foam pads to the opening.


The main corps of the clock is cut from the prepared silver foil too, the watch parts, cogs and gears were die cut using Xcut chronology dies and blended with Distress inks around the edges. The little fence was also cut from silver foil and coloured with alcohol inks.


I tried to achieve some depth by mounting the parts to a lot of different layers.


The second cuckoo clock I tried, uses one of my most beloved panels again alongside with some wire work, mod podgeing and tissue stamping, a lot of distressing and heat embossing using my favourite aged metal embossing enamels...


I hope you like it and even more this time I hope I will soon see you over at  our new Steampunk challenge blog, sharing  some awesome cuckoo (or whatever *lol) clocks with SanDee and me!!!


Hugs,

die amelie x


Steampunk, Steampunk, Steampunk - and a challenge!

Drumrolls please...

...as here we go with our very, very first own Steampunk challenge over at SanDee&amelie's Steampunk Challenges!!! 
Whoop, whoop!


We - this means incredibly talented SanDee and humble me, die amelie.
Of course we have prepared some specials on this occasion to celebrate the event with you!

It was really hard for us to decide on a worthy theme for a "first challenge", but we have finally come up with something we hope you will find both - fun AND challenging!

I will not show the whole project I created or tell you the challenge theme for now, but - as I am a really kind person (*huahh huahh!) - I will give you a tiny sneak peak of what's awaiting you if you decide to hop over to our Steampunk challenge blog...


So go, find out and meet SanDee and me over at our new challenge spot! 

Hugs,

die amelie xx