Showing posts with label Kaisercraft. Show all posts

Tuesday, 20 September 2016

Hip to be Square

I finally managed to not only have a wonderful messy time at my workdesk but also help myself to one of Seth Apter's wonderful workshops - an online one of course because I am one of approximately ten mixed media lovers in the whole of Austria - so the really good live workshops are all too far away. lol

But there are several pros to doing workshops online (as long as you don't feel the urge to be part of the hype and among those who are the first to try and show the actual styles and techniques) - one I especially appreciate is that you can do them at your own pace and also use different materials or simply adapt techniques you learn to your own work (which isn't something you manage to do in a live class).

[edit - you can buy and download his workshop by clicking HERE.   ]

I learned some really awesome techniques watching Seth Apter do "his thing". Seth - being a recognized artist - definitely knows what he is doing and it is such a joy to listen to him and his ways of explaining art and how to approach it.
And as I recently managed to get me some of his (also older) dies and stamps I decided to finally jump right in and play around.

And this is the result after several days of playing with paint, mono printing technques and arranging pieces:


There isn't much to explain - as that would mean giving away workshop content - but I can tell you what I used to create my mixed media board:

I used DecoArt Americana Chalky Finish paints, Viva Decor Rusty Paper and Patina, DecoArt Dazzling Metallics paint, DecoArt media black Gesso, dark brown and black archival stamping inks, a Kaisercraft stamp, Seth Apter stamps and Spellbinders dies and matte Decou-page.

The squares I used were blanks to make your own "pairs" game (or "Memory" as it is called in German).

Some close ups:


and once more the finished project:


and my desk as it has been looking during the last days....


Thank you for stopping by and I hope you are all doing fine! 
Hugs and happy crafting,
Claudia
xxx 

Thursday, 17 September 2015

She Who Doesn't Smile

Today I finally jumped the hurdle and took up doing portraits again. I hadn't done portraits and faces in general for ages...maybe because I never really could decide on what to do to finish them up satisfyingly. Now that I have been exploring mixed media and other "non-academic" media and techniques I thought that I might succeed this time...


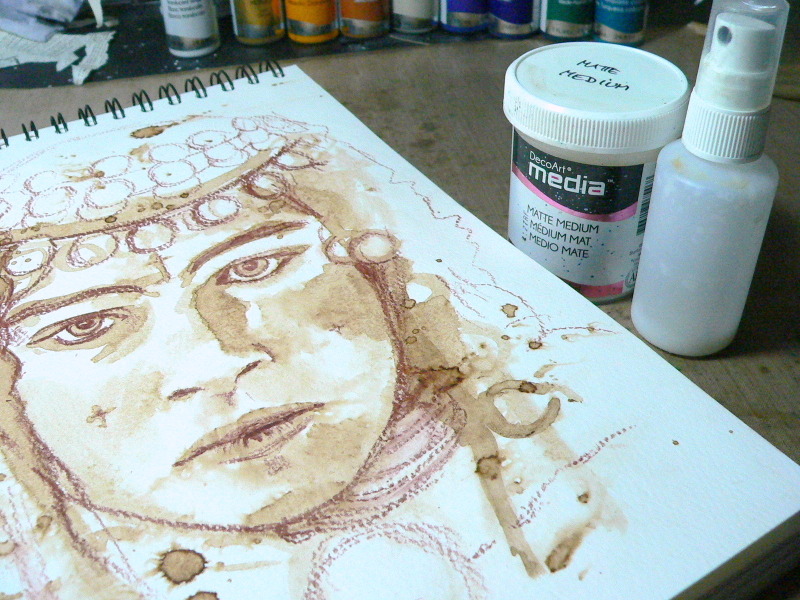
And I knew that I had to trick myself so I wouldn't erase and correct my "mistakes" all the time (and until I had erased a hole in my heavy artists paper). So I forced myself to "draw" the first rough (and quick) sketch with a soft brush and walnut ink and focus on the shades first instead of trying to get all the proportions and parts of the face in the right places and shapes. And that worked just brilliantly!!!

I took some steps images so you can see how I approached the portrait:

 Step 1
I quickly painted shapes and layers and did some rough shading
using a soft brush and the diluted ink


Step 2
For details I went in with a dark brown wax crayon


finished sketch


Next I sprayed on two coats of heavily diluted DecoArt media Matte Medium to seal my sketch so the ink and crayon would not react with the water and wet paints.


Then I made a copy of the sketch to use as a mask in the steps to follow. 


 I covered the face with my selfmade mask and stamped on some Chinese text and other patterns in various spots using black archival stamping ink. Then I applied DecoArt media white Modelling Paste using various stencils and a palette knife.


I let the modelling paste dry naturally (using a heat tool can cause bubbling). In the meantime I cut a lot of small circles from old book and magazine pages. I cut them by hand so the shapes were irregular and therefore not perfect circles as perfect circles quickly get too dominant in a painting and look too artificial (which doesn't go well with handpainted projects).

The cut out circles were then glued onto my sketched portrait using DecoArt media Matte Medium.


In a later step I painted them and outlined them roughly, seeing to it that I ended up with various shades of natural whites, browns and orange. Some were painted with DecoArt media Translucent White, which makes toning in collaged on elements really easy. The dark brown colour between the circles was painted in using Raw Umber DecoArt media fluid acrylic and a fine tip brush.


I added some doodling with a white Sharpie, dots of acrylic paint, DecoArt media Metallic Gold paint and smudged outlines with a watersoluble black pencil and a wet brush here and there.


The stencilled on texture was first given a wash with diluted DecoArt media Raw Umber fluid acrylic and once that had dried I rubbed on some DecoArt "Brilliant Turquoise" Metallic Lustre. I also painted some of the glued on circles and shapes with the Metallic Lustre (using a soft brush and little water).


I added washes and scraped on layers of DecoArt media fluid acrylics Diarylide Yellow, Burnt Siena, Transparent Yellow Iron Oxide, Quinacridone Burnt Orange, Titan Buff and Raw Umber alongside some scraped on black and white DecoArt media Gesso.


Using the palette knife to scrape on and layer paints creates a lot of depth and texture.


I finished up my painting by highlighting the eyes (with white paint and a black brush tip china ink pen) and adding some white, red and black doodling to some of the collaged on circles.


And here she is:


I hope you like her as much as I do!

And I just discovered that I am well in time to join in the lovely and utterly inspiring community of "Show Your Face" - hosted by the wonderful Kim Dellow!

To find out more about it and this weeks link up collection, click HERE.


Hugs and happy crafting,
Claudia 
xxx


Saturday, 1 March 2014

Let's Get Scrappy !

UPDATE (March 4th): due to some unforseen problems that have to be cleared the OCC is shutting down for the month of March. Sorry to all players, who already have worked on a project to enter the challenge. The events that caused this time out were unpredictable...but that's how life usually just "happens", isn't it? 

I hope you enjoy getting inspired by the DT makes anyway and also have enjoyed coming here for some information and/or inspiration. 

See you at OCC soon.
Claudia x


Hello and welcome to another edition of Our Creative Corner's challenges!
This month Linda, the Funkie Junkie, is your host and she wants us all to

Get Scrappy!


"Use your scraps and left overs from previous projects, pieces of paper, scraps of ribbon, embellishments made and never used.  If you are like me and can't bear to discard all those yummy scraps, you'll have a variety of possibilities to use for this project.  Let's put some of them to use!"...

...Linda says and that's exactly what I did on this birthday card. Yes, you read that right - I made a birthday card.... being no card maker at all I was suprised how much I love the outcome of this one (and that is has not a single fingerprint on it too. Yay!).


I am sure some of you can remember the project, where my scraps originate from. I really hardly ever throw away scraps... don't ask me why. I guess it has something to do with my love for paper in general...and for the traces left on it.

So I had this pile of lovely torn and cut off scraps and paper strips and I also remembered how much I loved the colour design when I originally painted the paper... so I decided to use it again.


After playing around with some of the coloured strips and the torn book page piece, everything found its place and I glued all my elements to the white card.

I added some stamping as I had done on the other project - the lovely feather stamp from Red Lead seems to have become one of my favourites (as has the numbers stamp from Kaisercraft).


The label stamp and die were a gift from dear SanDee1899 and I really love it as it gives sentiments a wonderful frame and makes them focal points on every make ! Thank you so much, Sandra! xoxo!


It's a clean and simple design, but when you already have a lot of texture on the elements you use, you are better off with working with a more static design. So I focussed on verticals and horizontals only, which makes the traces of the acrylic colours and the shape of the stamped feather image more prominent.


This month our sponsor at Our Creative Corner is Tando Creative


and you can win their prize (or become our winner, Top Talent Spotlight or one of our Top3) by joining in our challenge and entering a make that follows the challenge theme and general challenge rules properly! Can't wait to see how you use your scraps!


Thanks for stopping by and happy crafting,
Claudia x

Friday, 10 January 2014

My Books of Ruination

What is the best that you can do when your creativity needs a bit of a push (due to a nasty cold that just won't go away and makes your head dizzy)? Yes - you do yourself something good and follow one of all those awesome online workshop tutorials out there :)

Seems I started my creative journey exactly one year too late to be among the first ones who do those workshops live and with interaction and all the Q&A stuff... but the good thing when doing them later is: you don't have to wait for the next lessons to come online - they are all just there.

So I was able to get myself the "Book of Ruination" Online Workshop from Andy Skinner two days ago and watch all the videos at once and start my book(s) as soon as I was ready to go - and finish them off within two days. Tadaah! :)


I really had a lot of fun doing all the preparations, creating that "alien skin"-lice surface, adding colour washes and dry-brushing until my arm almost fell off!


That texture has been amazing me to bits since I ever first saw it! And with the embossed and softly highlighted structures underneath popping through here and there this is one truly awesome project to make!


I used a lot of DecoArt products in the making: DecoArt Americana and Traditions Acrylic Colours, Decou-Page matte medium (which is one of my favourites as it is so very versatile) and the awesome DecoArt Metallic Lustre!

Having known the dry-brushing technique already I really enjoy that I now can incorporate it into my mixed media projects. I first learned dry brushing for model making. When I met my husband, he and his friends had been playing table top strategy games with tiny painted tin model armies of dwarves, elves, orcs, skeletons and other fantasy creatures for quite some time and I made him some landscape models for X-mas during our first years.

With these games dry brushing is used to create stone like surfaces, bark of trees or for highlighting the tiny details of the figurines.

We haven't been playing table top strategy games for ages, but this year I used one of my selfmade hills for our nativity scene - the perfect place for the tired sheep and shepherd *lol.


But back to my Books of Ruination ;)
As I accidentally (if a hoarder like me may even say a word like that) had two paper mache books at hand, I decided to make two in one go (which is often a good idea, as you don't have any unused drying times).

I really love the colour scheme Andy suggests in his workshop, so I followed it rather closely.


Sadly the Spellbinders embossing folder did not make the same deep impression as
the Sizzix did, so the gears and cogs structures are really "decent" on the first book.
As you can also see I became more courageous with the surface technique on the second book - which I really like as it looks even more like a layer of rotten skin that covers something "mysterious".

I don't have the Sizzix die Andy used in his workshop, so I cut my own gears border from heavy cardstock and painted it with his awesome quick rusting technique he shows in his workshop too.


Then the borders were stamped on and dry embossed. The embossed areas were highlighted with DecoArt Metallic Lustre. (Honestly I could do this with almost all of my makes - this stuff is absolutely awesome ;)


The sides of the book box were covered with Tim Holtz Tissue Tape and given a light wash with acrylic colours to tone them down a bit.


The spines and back covers of my books were painted with acrylic colours I had also used on the covers, but this time I dabbed them onto the surface with a piece of cut to size kitchen sponge and blended the colours while they were still wet.


I did not want to use the same border for both books (as I was too lazy to cut another gears border by hand honestly), so I cut a strip of card and distressed it heavily around the edges, which led to this:


Actually I love these torn edges as they look like crooked metal.


For a finishing touch I added two metal corner embellishments with the left book and three metal screw brads with the right. Done! Phew - I loooooved these hours of messy fun!

I leave you with some more close-ups and highly recommend you give Andy's Workshop a try (if you haven't already). No - I don't get paid for this *lol...but I think giving credit to those out there who put a lot of creativity, thought and effort into providing us with awesome workshops like for example this one, is necessary sometimes and the least I can do to show my gratitude for a lot of inspiration.

Sometimes I think we take things for granted too much without giving it any further thougth and thus forget about saying "Thank you" or giving credit to those who add to this crafty world of inspiration.


I am sure this feels at least a bit rewarding to most of them. It definitely would to me...


Remember: by clicking on the images you can see them enlarged.
Thank you for stopping by and hugs and happy crafting!

Claudia xx