Sunday, 8 October 2017

"Where You Are Planted" - acetate box with three acetate cards

Servus!

I am feeling truly blessed at the moment because my creativity seems to be at maximum level. Autumn always is "my" time. The autumnal Vienna Woods are a well of inspiration that never dries out. Nature standing on the brink of decay, bursting with last intense colours and textures...it is the visual intensity of that time of year that I love most and that I hope to one day be able to capture in my work accordingly.

At the moment I feel I am still practicing on it...but I am getting closer ;)

I also love to turn trash into treasure and I can never throw away packaging materials like corrugated card, acetate or little boxes and all that stuff others regard as being trash. I have a whole box filled with the acetate packages the Sizzix dies come in, as I love their sturdiness. This time I have created a little acetate box with three acetate journal cards. I hope you'll like it!


This is how the box looks when being closed and with the cards inside. 
It is tied up with a black leather cord. 


The beautiful images on the acetate journal cards are stamped to the backsides of the front acetate sheets and are Indigo Blu and Penny Black designs.


The cards' backsides were decorated with acrylic paints and quotes stickers and then covered with another acetate sheet.


This image shows the front acetate layer with white Gesso painted to its back. 


The three layers (acetate, black cardstock, acetate) are held together by eyelets. 


The acetate box is decorated with a quote as well. 


 Some pictures of the finished project:


Thanks for stopping by!
Claudia 
xxx

Friday, 6 October 2017

Mixed Media Portrait - finished

Servus!

My mixed media portrait is finished. Thank you all so much for the lovely comments on my "work in progress" post over here and for the likes and comments on facebook - this really means a lot to me and is great encouragement! Mwah! XXX


Time to write down a bit of info on media and techniques used before I forget them...

In my previous post I had come to the stage to the right - with charcoal sketch and walnut ink being added to the shady spots.

Then I went in with a fine tip brush and Raw Umber and Translucent White DecoArt media fluid acrylics to fill in any fine detail, more detailed shading and highlights.


As many of the fluid acrylics are at least semi-transparent they work really well for shading as you can dilute them into washes and still have the background show through. 


I made a copy so I could cut out a mask.


Placing the mask on the portrait I spritzed on some rusty hinge Distress stain. I also added some of it to the portrait with a fine tip brush. As the Distress stains stay reactive with water (or moisture in general) I sealed everything with a matte spray varnish.


Then I used the mask again and added white Gesso that I scraped on with a palette knife. Then I added Raw Umber. Once that was dry, I used Prussian Blue Hue to add a bit of contrast to the warm colour tones. I finished the portrait up with some stencilled on black stars and a bit of stamping here and there.


The finished piece (detail):


Some close ups of spots that I like best:


Materials and media used:
MDF panel
DecoArt media white and black Gesso
DecoArt media fluid acrylic paints - Raw Umber, Translucent White, Prussian Blue Hue
DecoArt media matte medium
DecoArt media white modeling paste
Charcoal pencil
Walnut Ink (Tsukineko Walnut Ink Crystals)
Distress Spray Stain - Rusty Hinge
Matte spray varnish
Stencils
Rubber stamps
Archival black stamping ink (Ranger)


Thursday, 5 October 2017

Mixed Media Portrait - Work in Progress - Part 1

Hi, servus and welcome to a new kind of post on my creative blog.

I have decided to use my blog a bit more as the means it originally was meant to be - a personal creative diary that helps with keeping track of my creative journey quite easy. The fact that I am sharing my "creative diary" with "the world out there" makes it also a place where you can take a look at the curtains or get inspiration for your own projects. I also write the tutorials not only for you but also for myself - so I can come back to check on any products I have used or look at the steps images. But these "more personal" kind of diary posts will not have as detailed tutos as my projects for my DTs have. IF you have any questions, don't hesitate to email me or drop me a message on facebook, okay?

To start with I am sharing a work in progress that is meant to become a mixed media portrait when it's finished.
This is how it looks so far:


What I have done so far is prepare a mixed media wood panel by glueing on scraps of old magazines and dictionary pages. I have also included some left overs from stamping onto dried and used tea bags.


I also sealed the glued on papers with another coat of matte medium. Then I added a bit of diluted white Gesso and once that was dry I toned the whole thing down with a wash of Walnut Ink Crystals. 

A bit of texture was added using white texture paste through various stencils. Then I sketched the portrait with a soft charcoal pencil. I used a picture from a magazine as a model. 


It is helpful to first lightly mark directions and distances....like the curves and angles of the eyebrows against the angle of the nose, the shape of the upper lip and the shape of the hair. 


Then I filled in some shading with more Walnut Ink. I simply used a soft brush and painted the ink in the darkest spots. The edges from the glued on pages and scraps created a wonderful random texture thus being highlighted by the walnut ink! 
As the surface was sealed with matte medium, I could still go in and wipe back where I had added too much ink.  


Then I let my sketched portrait air dry.

I've not decided yet on what to add...maybe some word stencilling at the top left...some scraped on paint...I definitely need a contrasting colour (like turquoise for example) against the browns for more interest. 

Well....I guess I will continue with first painting the details in the face with a fine detail brush. Maybe that will spark some inspiration for the background. ;) 

Thanks for stopping by! 
Claudia xxx


Tuesday, 3 October 2017

Haunted Manor (created with Tim Holtz Sizzix dies)

Hi, servus, thanks for stopping by and welcome to my first Halloween project for this year!

I have finally managed to take the time to create my own little haunted manor! Yay!

I think I am not the only one who fell in love with Tim's "Village Dwelling" and "Village Manor" dies at first sight. ;) These are just so brilliantly designed: with just one roll through the Big Shot you get all the pieces you need to create a little gorgeous house. And the addition of the Village Manor die is all you need to take your little house to the next level and turn it into a manor - I just love love love this! I also had to help myself to the genius "Village Rooftops" die that provides me with three different types of roof tiles!

With these plus Tim's "Brick Wall" and "Cobblestones" Sizzlits dies I had all I needed to create the Village Manor of my dreams! ;) And it was very easy to be honest. There's a list of the number of parts needed and steps instructions on how to build up the house and tower on the backside of the Sizzix packagings!


I just love how "real looking" the brick wall turned out! It was a lot of fiddly work to get it done, but soooo worth it! (and a very meditative thing to do too ;)


I die cut the parts I needed for building the house and the manor's tower from heavy cardboard. I love to use left overs from packagings for this. It's sturdy - and cheap! ;)
Then I die cut two strips of Tim's "Brick Wall" and glued on each single brick separately. 


I used tacky glue but next time I will rather use matte medium. I also found it helps a lot to seal the painted (and dried) brick walls with matte medium so the bricks don't come off when wiping back paint from added washes! Ah well....I'm still on a learning (and experimenting) curve with this ;)

To create the front door I die cut two more window frames from the Village Manor die...


...cut off the parts like shown in the picture below...


...and put them together with two tiny half pearls (as door knobs) for my door.


Building up the bricks on the two chimneys was especially fiddly. I simply glued longer bricks across the sides with the V-shaped openings and cut off the excess once the glue had dried. 


I did the same with the tower that sits on top of the roof...I simply glued the bricks first and then cut off the excess where the V-shaped openings were.


To paint the brick wall I simply dabbed on some dark brown, red, orange and dark yellow wet on wet using an artist's sponge but you can as well use the cleanly and easy to use Distress paint dabbers. Simply layer the paints until you are content with the look. Once the paints are dry, seal them with some matte medium (I forgot to do so, which caused some of the bricks to nearly come off when wiping back excess paint from the wash that was to follow). Heat dry or let air dry. 

Then I added a wash of dark grey acrylic paint. Wash means that you add water to dilute the paint. Then spread it with a wide soft brush quickly across the brick walls. Work section-wise so the paint does not dry, because once it is applied you quickly need to wipe off the paint from the bricks with a baby wipe or soft cloth. This way the paint only remains in the crevices between the bricks and visually works as a "joint compound". The wash will still darken your bricks...so don't worry about using bright reds and oranges! 


I am sure I would have got a brighter result if I had not forgotten to seal the painted bricks with the matte medium. But hey - as it was meant to be a haunted mansion, a bit of "darkness" was more than okay. 


Time to "build" my house. 


As you can see I also painted the backsides of my die cut house parts with a dark brown for a darker look (and for hiding any printing on the packaging left overs in case it could be seen through the windows). 
Looking at the primed roof plates I think the paint streaks would also look good on a different kind of house type. Maybe a shed in a forest...but of course I wanted to have beautifully textured roof tiles for my mansion! 

So I die cut 25 strips using one of the three rooftop styles from the Village Rooftops die (which was quite close to my estimated number of strips needed for a mansion...I found I needed 21 or 22 in the end). I gave them all a priming with texture/grit paste that I stippled on with an old and worn bristle brush. I let the texture paste dry thoroughly so it wouldn't come off during the next steps.  
Then I stippled on a mix of black and dark brown acrylic paint and let that air dry as well. (Maybe I will use spray paint next time because it is much quicker and also makes sure you do not miss tiny spots).
To finish off my rooftop strips I dry brushed them with a mix of shabby white and dark blue heavy body acrylic paint. Dry brushing means that you use a very soft wide brush and only dip its very tip into the paint, brush off most of the paint on a dry kitchen towel and lightly brush over the raised areas of the textured roof tiles. This way you just add very little paint to only the raised areas - so the dark priming still remains visible but the texture gets highlighted beautifully. 


If you happen to find that your result is too bright you can simply tone everything down with another wash of dark grey acrylic paint or also dry brush some black paint on top. 


The spikes for the roof top were given a coat of silver paint and once that had dried I dabbed on some black paint here and there to tone them down. I used a soft cloth to dab off any paint where I had added too much. I did the same with the metal chimneys and circle window frames. 

I used mica sheets for the windowpanes, but also asked for alternatives in the Tim Holtz Addicts facebook group (which is a nice spot with helpful people to meet, share and discuss all things Tim).  Some said they use acetate that they colour with alcohol inks, transparencies or frosted panels. Loads of beautiful options there...


So before I glued the finished mansion's roof top in place I glued the mica sheets behind the windows. You see that most of the sheets have the same shape. That is because you can first cut the needed shape from your mica tile (I used scissors but you can also die cut mica) and then used my finger nail to split it into several thin layers. The thinner these are the brighter the tint of the mica.

You can see the light reflecting on the mica in this picture...


I went over my finished mansion with some more dry brushing with black arcylic paint because I thought the colours still didn't look dark and spooky enough in some spots. But then I was done and my Haunted Mansion was ready to be spooked up with some ghosts, spiders, pumpkins, bats and ravens....yay! I am really REALLY happy with how my first try on Tim's gorgeous Village Manor turned out! And I can see sooo many variations that are worth being tried out! And maybe my niece will want to create her own haunted mansion sometime....that would be great fun too!!!!

If you want to learn more about the setting I created for my haunted mansion, simply click HERE

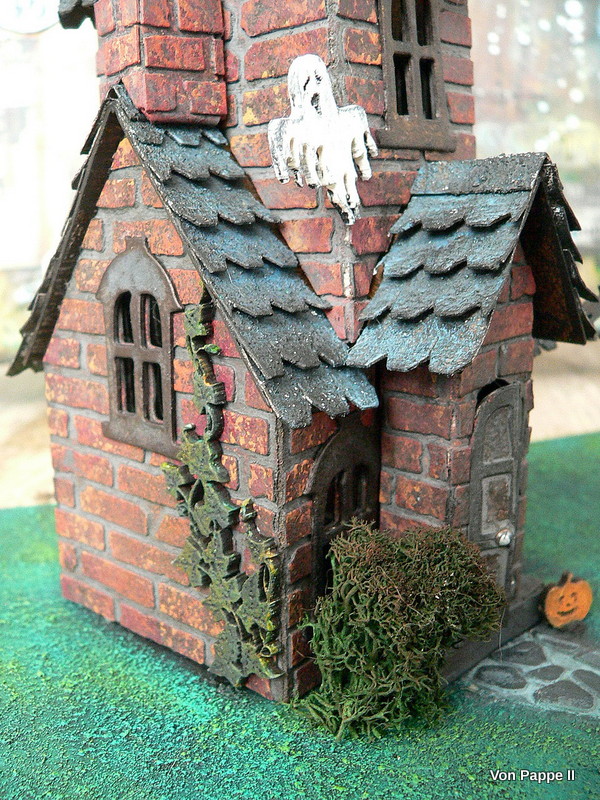
Well, I guess that's more than enough talk for now....here come the close ups and views. I hope you'll like them! Thanks so much for stopping by! And happy Halloween crafting! (I can't wait to see your spooky mansions, haunted houses on hills and villas....!)

Claudia xxx


xxx

Monday, 2 October 2017

Enter if you dare!

 Servus and welcome to my "Calico Craft Parts Monday" as a proud DT member for the Calico Craft Parts Blog!

It is my turn today to inspire and share some new ideas and possible techniques on how to use Calico Craft Parts to enhance your projects and - of course and in the first place - to have a lot of fun with them!

Halloween is fast approaching and I finally managed to take the time to create my own little Haunted Manor using Tim Holtz' lovely house dies! It was great fun and I am really happy with the outcome of my first try! But I was even more happy when I found that the new Calico Craft Parts Halloween Mini MDF Wood Shapes were the perfect size to turn my abandoned house into a spooky one!!!

If you want to find out about how I created the setting for my mansion, simply click HERE to be taken to the post at the Calico Craft Parts blog. I decided to dive in and create a little diorama with a spooky tree, an abandoned graveyard, bats, ravens, ghosts and this cute little pumpkin fella... (more about the house in particular and how I made it over here on my blog tomorrow).


Here's a little sneak peek for you:


Have a good start into the week and - as always - hugs and happy crafting! 
Claudia xxx