As always the theme is "Anything Goes - Steampunk/Industrial", so our players, the design team and I were (and always are) free to create what they enjoy most (as long as the steampunk/industrial theme is still part of the creation of course).
I unearthed an old dies set recently (I guess it was a Spellbinders dies set), when tidying my studio and immediately knew what I wanted to create with it! A mini tag notebook in steampunk style of course! You know me - I love mini!
Well...so now that you have seen the mini notebook from any possible angle, it's time to also show HOW tiny it is...
Isn't it amazing that you can always put so much mixed media on such a small format? I love it!
Of course I have taken steps images, so I can share the process with you.
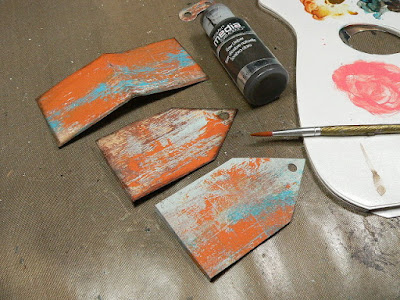
I first die cut all the pieces for the album's cover and signature cover. I cut each piece twice from left over painted paper scraps (from this project over HERE). I had used these to clean the brushes from any excess paint and to create paper-on-paper mono prints to work on (a technique I learned from wonderful Seth Apter!). Now they were the perfect size for my mini tag album and I just love the texture of the brush strokes and all the beautiful layers of paint!
I cut all the needed covers, the closure and signature covers twice as the painted papers were white at the back - so I had to glue two pieces together to get covers that were painted on both sides. I used matte DecoArt Decou-Page for this step.
Then I used DecoArt media fluid acrylic paint "Raw Umber" and a fine detail brush to paint a brown soft edge around all the covers' edges. I first applied clean water around the edges and then applied the paint - this way the water dragged the paint and created a softly blended dark edge.
On the cover's outside I had applied some white DecoArt media Crackle Paint with a palette knife here and there and let that dry naturally. Afterwards I added a mix of DecoArt media Antiquing Creams Raw Umber and Carbon Black on top and only wiped that back a little bit to age it and town down the colours.
A wash of DecoArt media Yellow Oxide was used to tone down the white of the Crackle Paint.
Then I painted the fabulous "Mechanical Hardware" chipboard pieces from our challenge prize sponsor "boozybear". I used DecoArt Matte Metallics "Aged Bronze", DecoArt Dazzling Metallics "Teal" and DecoArt Extreme Sheen "Bronze" on the pieces and toned these down with the Antiquing Cream mix as well.
The left overs from the Extreme Sheen paint on my palette were sprinkled on the cover using a soft fully loaded brush and tapping it with my finger.
I also used the Dazzling Metallics and Matte Metallics to paint a label holder, some washers and screw heads from a Calico Craft Parts Mini Hardware Wood Shapes Sheet.
Using matte Decou-Page I assembled my mini tag album cover. I also added some DecoArt media Liquid Glass to the small label holder (also a Calico Craft Parts wood shape). Then I set the cover aside to let everything dry naturally.
Once all had dried, I poked the holes for the binding and threaded brown waxed cotton thread through the holes from the outside and simply tied the ends into a knot on the inside. I had also die cut some notebook pages for the signature from beige marbled paper.
Voilá!
I hope you like my tiny tag album! And I also hope to see you play along with us over at SanDee&amelie's Steampunk Challenges too this month! ;)
Hugs and happy crafting!
Claudia
xxx


What a brilliant idea Claudia and beautiful colors as usual, sure I should try a tagbook. Thanks for your fine tutorial. xx Susan
ReplyDeleteEin kleines Album ganz groß, wieder eine voll gelungene Farb/ Texturkombination im Steampunkstil! LG Kerstin xxx
ReplyDeleteAmazing Claudia...........
ReplyDeleteBisous
this is super cute Claudia ....hope your health is better...hugs !!
ReplyDeleteSo enjoyed reading your post and learnt lots....Thank you for the amazing inspiration and what a stunning project x.
ReplyDeleteThis is such a cleverly constructed creation Claudia. Sweet in size but packing a real punch in design, amazing creation. Thank you for sharing this super make.
ReplyDeleteCreative wishes Tracey x
I just love the paint and crackle effects and overall finished design. Absolutely delightful little tag book Claudia xxx
ReplyDeleteThis is awesome, Claudia! Love the mini size, and those gears!! hugs, Maura
ReplyDelete