Thursday, 13 September 2018

From Trash to Treasure - over at the DecoArt Mixed Media Blog

Hi, servus and welcome to a short invitation to my latest project that's going live on the all time inspiring DecoArt Mixed Media Blog!

Those who know me, know that I am a hopeless hoarder of everything alterable - especially boxes of all sizes and kinds - cigar boxes, wooden boxes, cardboard boxes, chocolate boxes (I even empty these myself - all for the sake of art!)...my wonderful family and friends are always on the lookout for empty boxes - so I never run out of any (only of space to store them in).

This time I upcycled a sturdy cardboard box that once held a new mobile phone - it was a wonderful format to work on!
And of course I had to use my newly bought Tim Holtz 3D embosslits alongside many of my favourite DecoArt and DecoArt media products too!

So if you want to find out what I turned these die cut and embossed (in a single go!) beauties into...


...and how I created the background for these beautiful paper embellishments...


...simply click HERE to get taken to the post and the DecoArt Mixed Media Blog! Hope to see you over there!

Hugs and happy crafting!
Claudia
xxx


Saturday, 1 September 2018

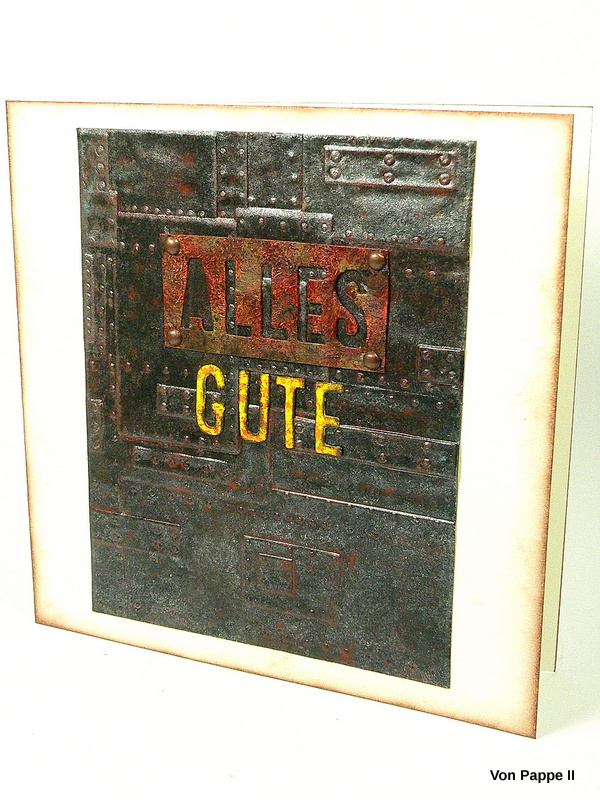
"Alles Gute!" - Steampunk Style Birthday Card for SanDee&amelie's Steampunk Challenges

Hi, servus and welcome back after the long summer break with our two months long summer special to a new challenge over at SanDee&amelie's Steampunk Challenges! We're back to monthly challenges as usual and the theme is once more an "Anything Goes - Steampunk/Industrial".
Lovely Maura, my new co-host, is awaiting you over at our challenge blog to present the new makes of the design team!


As it is my husband's birthday today, I have once more faced my personal all-time challenge and created a card. 


"Alles Gute" is German for "all the best" and as it had to be a male card, that was a great opportunity to play with my newly bought "Foundry" 3D texture fades folder from Tim Holtz's latest release. 

The birthday quote was also cut out using Tim's "Alphanumeric" dies set, using both - the cut out letters and the card with the negative space from the cut out letters to create a kind of industrial style sign. 

The result from the 3D embossing folder looks really cool! I followed Tim's advice and misted the paper before I ran it through the Big Shot three times. I used the heat tool to dry the embossed cardstock.


For even coverage I sprayed on a coat of Carbon Black DecoArt media Mister and heat dried my background (as I am an impatient girl sometimes).


Then I created my own "Mister" from one part DecoArt Zinc Dazzling Metallics paint and about four parts water. I thoroughly shook the spray bottle so everything mixed well and then sprayed on a thin layer.


While that was set aside to dry, I cut out my birthday quote using the Alphanumeric dies set and some washi tape to hold the letters in place while running everything through my Big Shot.


To create a quick faux rust effect on the sign-like word, I stippled on DecoArt premium paints Carbon Black and Quinacridone Gold Hue. I used a very worn bristle brush and mixed both paints wet on wet on the die cut piece until I was content with the look.


The letters of the second word were first painted with DecoArt Americana Primary Yellow acrylic paint and afterwards I stippled on the left overs from the Quin Gold premium paint on my palette.


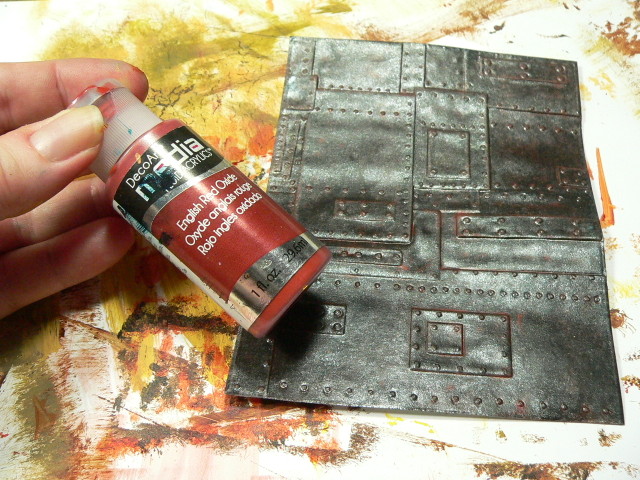
The dried background was given a wash of DecoArt English Red Oxide media fluid acrylic paint.


I also blended the edges of the yellow letters with black archival stamping ink. I recently found some drop shaped cosmetic sponges with a cone-shaped tip and these work just perfect to get the ink into all the narrow corners and tiny openings.


I used a fine tip brush and matte Decou-Page to adhere the quote to the background. 


I also added some tiny copper brads to the rusty sign's corners... 


...before I mounted everything to the card blank with double sided sticky tape. 


zum Geburtstag, 
mein Schatz! 
xxx


Our design team has come up with some very different inspiring projects this month - so hop over to the challenge blog and get your dose of inspiration! I hope to see you play along with us this month! 

Hugs and happy crafting!
Claudia
xxx


Friday, 24 August 2018

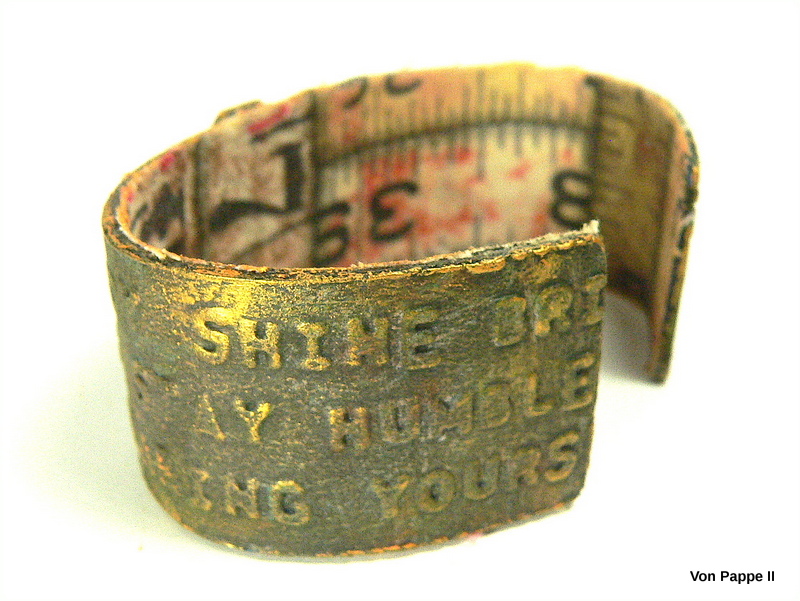
Don't Forget to Shine! - Bubbalux Bangle


Hi, servus and thanks for stopping by! It's Friday evening over here and I wish you all a lovely weekend! Finally temperatures have cooled down. Phew! With lower temperatures my creative muse seems to have returned as well and I would like to share a project today that I made using something new to me - CraftTex Bubbalux Creative Craft Board.

The lovely people from Personal Impressions let me have some for free to play and experiment with. Thank you so much! I had great fun and have yet just started to find out about all the possibilities.

On the package it says that Bubbalux can be cut with scissors (I used large ones and that worked well), die cut (that's on my list), embossed (of course I had to try that!), painted (yes, that had to be tried out too), shaped (Whoa! Cool! That was definitely the first thing to put on my "try this"-list!), stamped on,  screen printed and ...well, I am sure other crafty folks out there will find out a lot more amazing things to do with it.

Of course my aim was to find out if I could also use it and create something Claudia-style...if you know what I mean...something a bit grunge and worn looking.

And here we go:


Voilá - my first Bubbalux Bangle, done with the use of our hair drier and various DecoArt and DecoArt media paints and products. But let me also show you the back and inside of my bangle....


...and then take you through the process.


I received some blue Bubbalux to play with (it comes in six different colours). Packages come in sizes of three sheets of 2mm thickness that measure 215 x 279 mm.


I used my large pair of household scissors to cut a strip of 25 mm width off one sheet. That took a bit of an effort, but I managed to do a neat cut easily. Then I removed the protective clear board-coating from the cut off strip.


I cut the strip to the length of about 16 cm and sanded all the edges and corners with a sanding block.


Of course I had to try some embossing with my Big Shot! That went absolutely smoothly and the result looked really cool!


I carefully heated the embossed strip with our hair drier  (as there's only a little heat needed to soften the Bubbalux to bend it into shape). That was really easy too. You only have to pay attention to not heat it too much,  otherwise the embossed texture might get lost (also pay attention not to flatten the embossed texture when holding and shaping the softened bangle with your fingers!)


For my focal element (and to cover up the edge where the two embossed sections meet in the centre) I also cut out and embossed a single word using a tiny piece of Bubbalux from the left overs and the same embossing folder again. The single word was glued on using superglue.


Next I primed the bangle's outer side with Lamp Black DecoArt Americana acrylic paint. I stippled the paint on with a worn bristle brush to avoid any visible brushstrokes. By stippling on the paint instead of brushing you also achieve beautiful texture and tooth for the following layers of paint to hold on to.


Then I started dry brushing on different layers of acrylic paints. The first layer was DecoArt Titanium White Americana paint.


That was followed by a layer of DecoArt Quinacridone Gold Hue premium paint, ...


...then by some Raw Sienna,...


...some Cobalt Teal Hue...


....and once that had dried, a wash of DecoArt media English Red Oxide fluid acrylic paint.


I let that air dry thoroughly before I went on to my next step - gently dry brushing on a very light layer of Lamp Black here and there and then sealing the dried paints with a matte spray sealant. I finished off my bangle by adding some Orange Flicker DecoArt Metallic Lustre with my fingertip for the final bling.


To cover up the blue colour from the Bubbalux sheet on the bangle's inside, I glued on some fabric using matte DecoArt Decou-Page. I first glued the fabric on, let that dry and then cut off the excess. The Decou-Page also helps to prevent the fabric from fraying.


I added more Orange Flicker Metallic Lustre to all the edges once the glue had dried to finish up my bangle.


And this is how it looks when being worn:


The Bubbalux is so lightweight that you hardly feel it on your wrist and there's a short moment of surprise when you pick it up, because it weighs nothing - the worn metal look even adds to that effect.


I spy some potential for more fun and lightweight mixed media jewellery projects in the future! ;)


I hope you like my heavyweight looking lightweight "metal" bangle as much as I do! I would also love to hear about your experiences and projects with Bubbalux as I have only just started to find out about all the possibilities there are. I am sure some creative geniuses out there have already taken this new crafting substrate to the next level. ;)


Have a nice weekend and as always
hugs and happy crafting!

Claudia 
xxx

Monday, 20 August 2018

Diving Deep at Calico Craft Parts

Hi, servus and welcome to another Monday on which I try to lure you over to the Calico Craft Parts Blog to check out my latest project and tutorial there!

Of course I had to help myself to some of the new Tim Holtz 3D embossing folders and my first play with one of them was not only great fun but the result has definitely exceeded my expectations. Just wow! I have long been waiting for a possibility to create a beautiful wood texture on paper withouth having to use a stencil - now it's here!


 I have even dared use some driftwood from the home decor shop alongside my selfmade driftwood plank (and I like my paper version of it more to be honest). ;)

But what I love most on my new Calico Craft Parts project is this:


The picture only shows part of the amazing new wood shape, but isn't the detail just stunning? I only needed to add some DecoArt media fluid acrylics and look at that!

You will love this new Calico Craft Parts wood shape (and of course all the others) once you have seen the whole piece! I promise! Hope to see you over there! Simply click HERE to get taken to the project post and a very detailed tutorial!

Hugs and happy crafting!
Claudia
xxx

Monday, 6 August 2018

A bit of Gold, Pink, Green and Divine Crackle - a Calico Craft Parts Blog Invite

Hi, servus and welcome to another quick invitation over to the Calico Craft Parts Blog, where I am sharing my latest project. As the sneak peek image shows I have mixed divine crackle (thanks to the fab DecoArt Weathered Wood crackle medium) with delicate flowers and dashes of gold to create a.....erm....click HERE to find out. ;)


Hugs and happy crafting!
Claudia
xxx

(Advertisement)