
This month we chose
"Dolls 'n Robots"
as our challenge theme.
Whether you create paper dolls or some piece of assemblage art, altered mixed media Steampunk robots, show us some vintage Steampunk ladies or a stamped/drawn/painted image with your creation that fits the theme...it is all up to you and we are already very curious to see what you will come up with.
We also invited the very creative and talented mixed media artist Elly Pirally this time to be our guest designer for this month's challenge and she did an awesome job (just as we had expected ;).
But first I want to introduce you to Mrs. Copperbottom - my DT project for your inspiration, inspired by the TCF film "Robots":
As you can see, my Mrs. Copperbottom is a very stylish modern woman, who loves handbags, sassy boots and hats ;)

I made her from a collection of corks, some wire, embellishments and Tyvek (which I used for the boots).
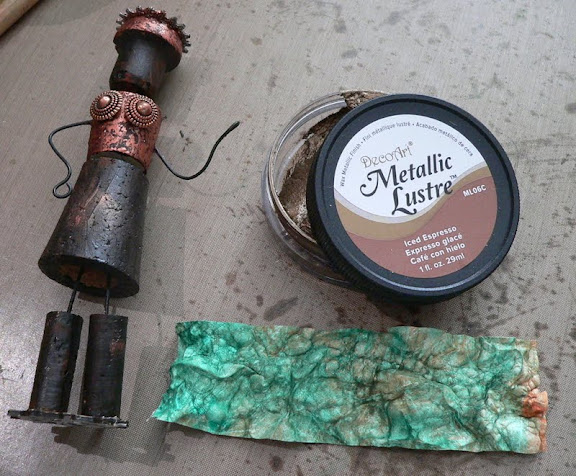
For my robot lady I used:
- DecoArt Traditions Acrylic colours (raw umber, burnt siena, transparent red iron oxide, phtalo green-blue, quinacridone gold, titanium white)
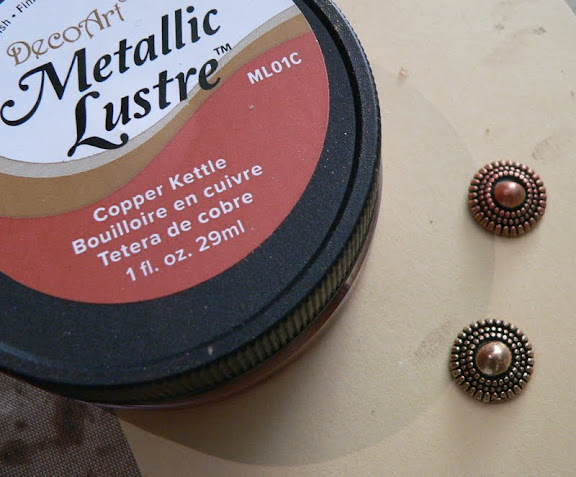
- DecoArt Metallic Lustre (one to three various tones - I used "copper kettle", "champagne ice" and "iced espresso")
- DecoArt Weathered Wood Crackle Medium
- DecoArt Americana multi-surface SATIN "deep turquoise"
- corks of various sizes (skirt, body, boots, head, hat)
- black wire, cutting and bending pliers
- a piece of Tyvek (if you want her to have some fashionista boots ;)
- heat tool
- some self adhesive half pearls
- bristle brush, kitchen roll, glue, card, scissors, two sewing pins, some cardboard gears of various sizes (or Sizzix gears die and heavy card), embellishments of your choice (for the hat, the skirt and the handbag)
- two buttons or similar (her bosom ;)
- punching needle
- hot glue gun
1. Cut some pieces of wire to size using cutting pliers: three short pieces (for connecting the body to the skirt), two longer pieces (arms), two medium pieces (for fixing the lower legs to the skirt), one short piece (her neck).
2. Form two circles for the hands
3. If needed, punch or drill narrow holes into the corks first, before setting in the wire pieces to build the figure of your robot. Mrs. Copperbottom looked like this now:

4. Give the figurine a coat of DecoArt Traditions "raw umber" acrylic paint and let dry. Oh, but before I forget: now would be the perfect time to talk about your figures (no matter if they are painted or 3D) looking quite natural in posture!
The ancient Greeks knew very well how to make their gods and goddesses look as if they were frozen in natural movement - they invented the so called "contrapposto"! Which means that a very clever guy called Polyklet looked very closely at the human body and its "construction" and movement. He found out that if you stand still, most of the time you stand in a relaxed position which causes the spine to form an S-shape seen from the front. This is due to the two legs not working evenly - one leg is the "supporting leg (SL)" and the other becomes a "free leg (FL)" then. This automatically causes your hip to lower at one side and your body and shoulders to do a counter movement... .I used Mrs. Copperbottom as a model to demonstrate what I am talking about:
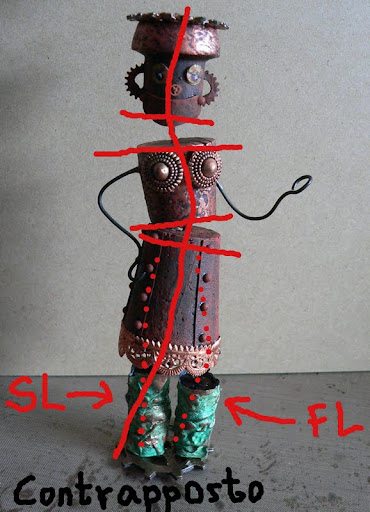
In this case she stands with all her weight on the left leg (SL - supporting leg), so her right leg does not have to carry any weight and relaxes (FL - free leg). You can see what it "does" to the hips, the body, the shoulders and the head - none of them are really straight. Actually hips, shoulders and head always counter-react to each other (see the imagined axes that are never exactly horizontal but always bent to one or the other side - depending on which leg is the supporting leg at that moment).
If you keep that in mind when building/drawing human figures, you will always achieve a much more natural (and therefor real) appearance.
_02a.jpg/450px-Venus_del_Pomo_(Museo_del_Prado_E-65)_02a.jpg)
(source: Wiki Commons)
But back to our goddess - Mrs. Copperbottom, who "contraposes" during drying time:

5. After the paint has dried, give the body and the hat a coat of DecoArt Weathered Wood Crackle Medium and let dry.

This will cause the next layer of acrylic colour to build lovely crackles, which we will cover with some DecoArt Metallic Lustre afterwards (the texture of the cork looks nice too, but we want to have some areas of interest - so we create different surfaces for the Metallic Lustres and the dry brushing).
6. Paint some DecoArt Traditions "Transparent Red Iron Oxide" to the prepared crackle surfaces and let crackle (you can even speed this up using the heat tool..but be careful not to overheat - you might get bubbles instead of crackles).

7. Prepare a base for your figurine by die cutting two to three gears from heavy card, glueing them together and painting them with DecoArt Traditions "raw umber". I used the Tim Holtz Sizzix Gear die.

8. Rub on some DecoArt Metallic Lustre (I used "iced espresso"):


9. Then give Mrs. Copperbottom a coat of DecoArt Metallic Lustres too with the prepared areas - the crackles will give you a different texture than Metallic Lustres applied to the just painted cork.

10. Mrs. Copperbottom needs a bosom of course - I used two metal embellishments (I got from lovely Candy Colwell :) and rubbed on some DecoArt "copper kettle" Metallic Lustre - which I also used on the body.

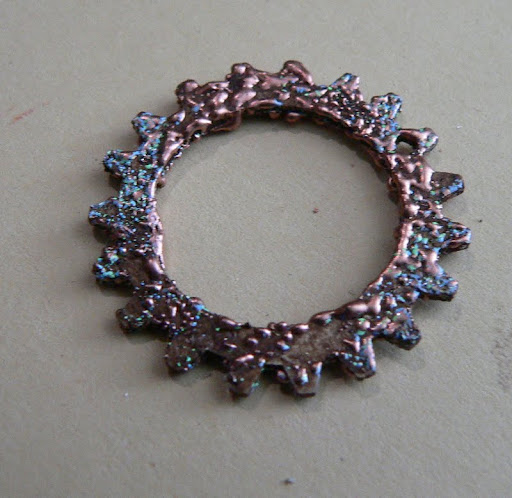
11. Take a cardboard gear and cover it with embossing ink and metallic embossing powder and heat. I used Fran-tage "aged copper" embossing enamel. Put aside for later use.
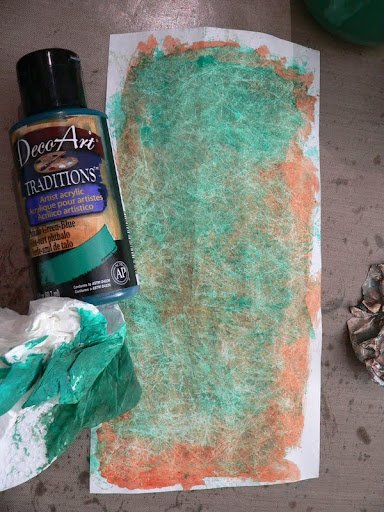
12. If you want to have her some sassy modern fashion boots, you can take a piece of Tyvek and colour it with a mixture of DecoArt Traditions colour washes of your choice. I used "Quinacridone Gold" first and then a wash of "Phtalo Green-Blue" next. (If you decide to just paint her legs, which looks great too, you can skip this part and scroll down to step #17).

13. Take your heat tool and start heating up the Tyvek - but keep moving your tool over the Tyvek and watch it closely as the shrinking and crumpling process will start quite suddenly!

Once the crumpling has begun you move your heat to another area - until you have achieved your desired crumpled look.

Turn the Tyvek over and heat from the other side too. As you can see you have all the soft "hills" or bubble shapes on the backside of the heated fabric. Heating from the other side will give you some softer bubbles on the front too.


14. Measure the size of Mrs. Copperbottom's lower legs and cut the Tyvek to size (keep a small piece for the handbag).
15. Highlight the raised areas of the Tyvek by rubbing on some DecoArt Metallic Lustre ( I used "iced espresso").

See what a difference this makes? I left the left side untreated to show you the effect of the Metallic Lustre.
Your Tyvek should look like this now:

16. Find the exact size for the boots by wrapping the Tyvek around the lower legs and cut to size. Glue your figurine to the prepared (gear) stand and then fix the Tyvek using the hot glue gun (take care of your fingertips).

17. Apply some half pearls to a piece of card building five rows.

18. Cover the card and the pearls with DecoArt Traditions "raw umber" acrylic paint by stippling the colour onto the surface instead of brushing. Let dry.


19. Cut into five strips. Then glue them to Mrs. Copperbottom's skirt.

20. For the face you can use any kinds of tiny embellishments you have to build mouth, eyes and nose.
I used some punched out acetate and card circles from my husband's bureau hole punch.


If you raise your attention (a bit higher, please *lol) to her eyes, you can see that I built them of three layers: a white circle, the acetate circle with the painted on iris and a cut in half circle as the eyelid. I coloured the eyes using a metallic gel pen.
21. Her mouth was made of a piece of card which I glued to her face and put two half pearls on it, symbolizing the rivets that hold the plate in place. Her ears were made from a tiny cardboard gear cut in half and glued in place. I covered those parts with DecoArt Traditions "raw umber" acrylic paint too and let dry.

I glued the prepared heat embossed gear and some pieces of cork to her head, forming her extravagant hat and covered that with the paint too. Afterwards I rubbed on some DecoArt Metallic Lustre and embellished her hat with a tiny gear and a half pearl.
22. I used another cork and a tiny piece of the transformed Tyvek and some wire to form her handbag. I fixed the Tyvek to the cork with two shortened sewing pins.

The metallic ribbon on her skirt is a gift from Candy Colwell too - and it was just perfect for turning Mrs. Copperbottom's skirt into a real designer piece! ;)
23. For a finish Mrs. Copperbottom needed some extensive dry-brushing with acrylic paints. I used DecoArt Traditions Transparent Red Iron Oxide, Phtalo Green-Blue and "Titanium White" and DecoArt Americana multi-surface SATIN "deep turquoise".
Done!

Isn't she a beauty? :D

I thank you so much for staying with me this (very, very) far and I hope you had fun seeing Mrs. Copperbottom come to life and will have a lot of fun creating your own. :)
I look forward to seeing you and your entries with our September challenge "Dolls 'n Robots" soon!!! Sandra and me can't wait to see your creations! ;)
And Mrs. Copperbottom decided to go visit SSS's "Anything Goes" challenge in the meantime.
Hugs,
die amelie xx
More mixed media and altered art tutorials can be found here.
.
WOW Claudia this is a FABULOUS creation!
ReplyDeleteLoved the pics and so many techniques. Just brilliant.
Avril xx
Liebe Claudia, einfach nur geil, ich bin sooooooooooooo begeistert ;o)
ReplyDeleteDurch die Schritt für Schritt Bilder ist alles super erklärt. Danke!
Sorry, das ich so selten kommentiere, aber kucken tue ich immer ;o)
Hoffe es geht Dir gut?
OMG Claudia!! Mrs Copperbottom was a genius idea and so beautifully executed. Love her and love your amazing step by step - she is a total triumph - wow! Hugs, Anne x
ReplyDeleteShe looks fabulous Claudia, with so much detail. Gruesse von Francesca
ReplyDeletegrandios gemacht Claudia.. wow!
ReplyDeleteAmazing! She is fantastic!
ReplyDeleteIch bin schwer beeindruckt und noch mehr begeistert von dieser Dame und Deinem Können. Ganz große Klasse, liebe Claudia. Danke auch für den Workshop
ReplyDeleteWünsche Dir noch einen schönen Restsonntag und eine kreative Woche.
WOW, liebe Claudia,
ReplyDeleteIch bin begeistert von Deiner tollen Arbeit an Frau Roboter ☺☺☺. Was man doch für bezaubernde Sachen aus Flaschenkorken zaubern kann! Deine Anleitung ist Super. Endlich kann ich mal schritt für Schritt sehen wie diese tollen Figuren gemacht werden.
Liebe Grüße, Carmen
Just love your doll. Just fabulous. Glad I found your blog. thanks as always for sharing.
ReplyDeletelove her and her name...thank you for sharing!
ReplyDeleteDonnerwetter, das ist jawohl die obercoolste und genialste Korkenkreation die ich je gesehen habe. Und soooo modisch! (:o)Mrs. Copperbottom ist der Hit!(:o)
ReplyDeleteI saw this on face book and had to tell you how awesome I think this is.
ReplyDeletehugs
susan s
Simply Amazing! Thanks for sharing!
ReplyDeleteOh mein Gott ist das genial- ich bin ja sowas von begeistert. Ich hab mir das Teil viel größer vorgestellt. Hut ab was da für Arbeit drin steckt.Die FArben sind einfach wunderschön!!!
ReplyDeleteIch liebe ja diesen Film sehr, meine Jungs haben den damals hoch und runter geschaut und solche Roboter haben wir auch gewerkelt, allerdings nicht halb so cool. guckst du hier: http://kibastelmamapia.zweipage.de/sommer_58596243.html und hier: http://kibastelmamapia.zweipage.de/spielzeug_basteln_19410837.html
lg
Kati
Soooooooooooo amazing Claudia...I love this gorgeous lady, what a fab creation...you're so talented!!! Wowwww
ReplyDeleteExcellent... lady is stunning :)
ReplyDeleteOhh my! This absolutely amazing! You blew me away with this gorgeous piece! She is a beauty for sure! And so great you made a tutorial as well! Wow a wow!!! Hugs, Sandra
ReplyDeleteWow! This is so fabulous!! Love it!! Very creative!
ReplyDeleteThank you very much for joining us this week at the Simon Says Stamp Wednesday Challenge Blog!
hugs...
Melissa
This is amazing, would never have guessed she started off as a few corks! Thanks for the tut, think I may have to print this one out to keep in my go to folder!! Cindy
ReplyDeleteMy jaw is dropped, my mind is blown and my breath is taken!! This is unbelievable, Claudia - I'm verging on speechless with awe!! She is a complete and utter delight, full of life and personality; and every surface and patina is brilliant. What an amazing step-by-step through the process too. Incredible work... I love her! (So, not quite speechless, then.)
ReplyDeleteAlison xx
Just doing a catch up and what a suprise! You've picked one of my favourite films too! Mrs Copperbottom is fabulous, and your tutorial is a treat. You always give such helpful advice and loads of ideas. Hugs, Jenny x
ReplyDeleteEin wirklich fantastisches Werk!!!! Echt klasse!!!! Da kann man nur noch staunen und den Mund wieder zuklappen!!!! WOW!!!!
ReplyDeleteLG!
Hi Claudia! First, thank you for your birthday wish and for becoming a follower. Next, your blog is fabulous. I have not been able to join in your Steampunk Challenges as of yet, but am so glad you started that challenge. Love Steampunk. Hopefully, soon. Off to become a follower of you fab site. Hugs, Yvonne
ReplyDeleteWhat a fabulous creati
ReplyDeleteon! To think it started out as little cork shapes! Im going to show my sister this, shes a doll artist and would be very interested your wonderful artwork...you clever person!
D
Thanks for the contrapposto info! She sure is a 'goddess'.
ReplyDeleteOh Wow, wow, wow, WOW!!!!! I adore your fabulous steampunk doll make with genius art in every detail... And thank you for this fabulous tutorial Claudia!! xxx
ReplyDeleteShe is a gorgeous and sassy beauty! I love your techniques. Thanks for the figure lesson too! So very creative and truly steampunk in look and spirit! I love her!
ReplyDelete