Showing posts with label playing cards. Show all posts

Saturday, 15 April 2017

"Steampunk City" ATCs for SanDee&amelie's Steampunk Challenges

Servus, hi and welcome to the mid-month projects share over at SanDee&amelie's Steampunk Challenges!


The challenge theme is once more "Anything Goes - Steampunk/Industrial" - so you are free to create whatever makes you happy (as long as it meets our few challenge rules of course).

Team B - which I am part of - have again put a lot of love and labour into creating some awesomely inspiring projects for you! And we already have a lot of amazing entries from our wonderful players (not to forget about the fab makes of Team A)...so there's a lot to find and check out over at our challenge blog (and I am so proud of what the small challenge blog that Sandra and I set up four years ago has become!!!)


This time my April project was done using stuff from my latest Tim Holtz haul. ;)


There's a lot of traffic going on on my "Steampunk City" ATCs! Zeppelins are floating by and shiny metal dust flakes from the many factories cloud the air. Gear shaped drones are monitoring everything that happens down in the narrow streets...these are adventurous times for tough steampunk explorers! 


These are actually altered playing cards but very close to ATCs regarding their size and format...

The playing cards were first covered with old book pages on both sides (so they do not warp!) and then blended with various Distress Oxide inks and spritzed with water to activate the oxidizing process.


The Zeppelins (a flonzcraft design) were stamped onto the cards and partially coloured with a white gel pen. 


The "Cityscape" skyline was die cut from Kraft card that I had used the Distress Oxide inks on as well but then had to darken it with walnut stain to make their silhouette pop from the background.
They were glued to the background and outlined with a white gel pen and a black permanent marker. 

I added some of the fab new Tim Holtz "Aristocrat" design tapes to the bottom. 


Then I stamped on some gears (that are meant to be "drones") and doodled on them with the white gel pen too. Afterwards I sprinkled on whatever metal spray inks and paints I had - from gold and "brushed pewter" to opaque white. 


The cards' edges were darkened using black archival stamping ink and a piece of cut'n dry foam. Done!

After seeing the finished APCs I found that it would also have been a cool effect if I had stamped the Zeppelins across the touching cards so they would float by from card to card...guess I will have to do some more... ;)


Thanks for stopping by and I hope to see you over at our challenge blog soon! Please, visit my teamies' blogs and leave them a little love if you are able to spare a second or two!

Hugs and happy crafting!
Claudia
xxx


Grab our badge for display on your blog!

Saturday, 29 October 2016

Gypsy Fortune Teller Cards

Servus!

Today I just want to share a little somethin' I made for my niece, Rosi, who will have a Halloween party on Monday where she will be wearing a mysterious gypsy woman costume and she still needed some fortune teller's cards - so I promised I'd make some for her.


I had this lovely 7 Dots Studio designer paper with tarot cards on it and cut them out. Then I glued a patterned paper to them for the backside, inked the edges black and ran them through my laminator.

To have something gypsy style looking to tie the cards up in a bundle I twisted some thin wire and various ribbons that I had tinted with some walnut ink solution into a bendable cord. The wire within makes it flexible and all you have to do is wrap it around the cards and it will keep stay in place.


I created a little charm using a 7 Dots Studio rubber stamp and shrink plastic. Then I rummaged my embellies box for some beads and other goodies and found a lovely feather.


The beads were part of a cheap bracelet that I took apart. I threaded them onto an eye pin and attached it to the wire within the gypsy cord.

I hope my niece will have the most wonderful Halloween party!!! I am sure she will look just terrific. And as she is great at putting up a show I am sure she will be a fantastic fortune telling gyspy! (Let's hope I will get to see some pictures of her!)


Thanks for stopping by and Happy Halloween!!!
Claudia
xxx

Sunday, 25 October 2015

52 Card Pickup - Fog-inspired

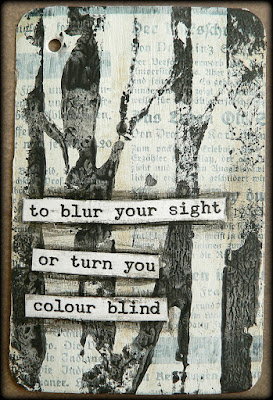
Finally the time of year has come when living on sixth floor and looking out of our flat's windows feels as if the world outside has simply vanished at times.

I love fog!
Well, not exactly when I have to drive a car, but when walking the dog and finding ourselves being somehow "wrapped up" in a blanket that cannot be touched but that reduces sounds and makes me feel as if the existing world was only just within that small bubble around us that somehow "moves along" as we walk on.

Today I tried to capture this feeling in images and (my own) words.
I hope at least some of the meaning gets through to you. ;)

Have a lovely weekend! xxx


Stamp used: Indigo Blu - "Bare Forest I"
Stencil used: Tim Holtz - Sizzix - "Birch Trees"

Wednesday, 23 September 2015

He/She is a ...


We all are several "persons".
I am a mother, then a wife, an artist, a friend, a sister, an aunt, a daugther...not always in the same order.

And there are days for example when I would like to be more of an adventurer than having to do my household stuff or walk the dog along the same old paths. Sometimes this feeling from inside breaks through and I end up for example  having bought a piece of clothing I thought was perfect for feeling and showing my inner adventurer's nature....not daring to wear it, because the feeling from that day has gone.

Do photographs show what we really "are"? And are we aware that we see more than a one-dimensional person when we look at photographs? I'm not so sure. And my series of four altered playing cards is an attempt to make the beholder think about the persons he sees...

 I used Distress stains and Distress marker ("ground espresso"), designer papers, ephemera, washi tape, used and dried tea bags, DecoArt Decou-Page,  DecoArt media black modelling paste and stencils and word stickers for my four cards. For a larger view click on the images.


Thanks for stopping by!

Hugs and happy crafting,
Claudia 
xxx

Thursday, 20 February 2014

3 ATCs inspired by "52 Card Pick Up"

I only recently joined the "52 Card Pick Up" online class from Stephanie Ackerman as I really adore her special design she uses on her 52 cards filled with encouraging sentiments to guide you through a year.

I haven't started my 52 cards yet but gave the technique a first try to create a series of 3 ATCs using Tim Holtz goodness only along with Stephanie's technique.


I loved playing with tissue wrap, tissue tape, alpha parts, journaling tickets, glue, Tim Holtz stamps, distress paints and stains and distress markers!


Hope you like them! Thanks for visiting!
Hugs,
Claudia x

Wednesday, 1 May 2013

Steampunk Challenge Time - "Altered Playing Cards"

Hello, dear readers, Steampunk lovers and followers old and new!

It is time to start a new challenge over at
 SanDee&amelie's Steampunk Challenges!!!


This month's theme:

Altered Playing Cards


Our Guest Designer for this month, Rosie, from "Rosie's Bastelwelt", suggested this theme and I really loved to try it out. 

So here comes my first "altered playing card" - tatttaaaah:


I learned that with altered playing cards you only have to see to it that one corner of the playing card remains visible... everything else is "anything goes". 

For my APC I die cut a gear using the Tim Holtz "tiny gears" Sizzix die from corrugated card and glued it to the playing card. After that I applied glue to the whole card (except the one corner) and glued sandwich paper to it, creating a lot of wrinkles during that step. 


Once dry I treated the surface with alcohol inks and metallic rub ons to
highlight the gear and the creases thus creating awesome yummy texture...

The black gear image was stamped onto some acetate that was cut to size and sanded around the edges. I fixed it to the playing card with three tiny brads. for a finish I added some tiny gears and cogs  and applied some crackle accents and "walnut stain" DI to the corner with the cards symbol. Done!

I hope you like my first take on altered playing cards and have a lot of fun doing your own! I would love to see your APC Steampunk creations over at our challenge blog soon!!!! 


Hop over to SanDee&amelie's Steampunk Challenges to check out the awesome APCs from SanDee and our Guest Designer, Rosie!!! You will find a lot of inspiration over there. Promised!


Hugs,

die amelie xx

Tuesday, 18 September 2012

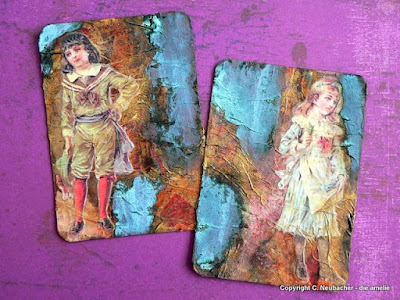
"Hänsel und Gretel" - 2 ATCs


As there were still two images on my copy from the "Oblatenbildchen" left (and some playing cards too), I decided that I wanted to try out my new verdigris patina set and combine this with the altering technique from the "Let's tell off for play"-leporello.

This time I put the crumpled paper tissue layer on top, also covering the images of the two children. And I love, how some parts of the playing cards still are visible, adding colour and detail to the whole in some spots without being too distinct.

I also highlighted the creases by slightly drybrushing them with gold acrylic colour.


Here some more close-ups, which I hope you will enjoy as much as I do:


As these two ATCs are made of recycled playing cards, which I reused that way and reduced in size a litte (*gg), I enter the Smudger Challenge Blog, where they ask for "Reduce Reuse Recycle", with this project.

Saturday, 15 September 2012

Let's tell off for play - Leporello

This project is the result of (at first) totally bored and annoyingly uninspired play with a single set of playing cards my son won at a tombola and which were quite unuseful for play.

I haven't been creative (but wanting to be) for days and suffering from a nasty cold and nothing inspirational seemed to have crossed my mind for ages (sure, you know this feeling too...brrrr!). So I fiddled around with these cards (which on their backs were awfully ugly - some advertisement from a bank was printed there) and decided to give them a treat with AAI, because I hoped the outcome would turn the switch of inspiration.

Well - they looked treated with AAI afterwards.
Still not too inspiring. Hmpf. Then I browsed through my scraps, my stamps, my paper stashes - NADA, NIENTE, NIX! No spark of an idea in range of vision. Then I remembered my collection of wafer pictures or "Oblatenbildchen", as we call them (reprints from sheets that were popular around 1900). I had always wanted to do something special with them, but never had an idea. Till now!

They have been long stored treasures and very precious to me, as I got my first paper doll from my grandma, when I was just a girl. It was a self-drawn and coloured one and came with a large chocolate box full of self designed dresses from almost all periods of historical costume history. I started designing my own dresses then and made a "daughter" for my Grandma's paper doll, which I copied many of her dresses for.

Since then I love and collect paper dolls, construction papers and Oblatenbildchen (not all of them, but the ones with pictures from the second half of the 19th century and untill around 1930), as I love the time-warp they provide, when looking at them and imagining how children played with them in former times. Paper toy theaters are one of my hobbies too because of that.

The sheet with the children in gorgeous dresses and toys from the time around the turn of the centuries  with them finally hit the switch! I also remembered the lovely antique English Lesson Book from Hedwig Knittel, "Little by Little", from 1912, which my great aunt once was taught English with. There were nursery rhymes in it and I was sure, I would find some appropriate rhyme for my project.

I colour-copied the "Oblatenbildchen" and cut out the children's images. Then I treated four more playing cards (as I needed five in whole) with AAI "rust", "sunset" and "juniper", stamped a Tim Holtz stamp with columns and numbers with gold on after the inks had dried and covered this with a layer of paper tissue, using Mod Podge. After that layer had dried too, I mod podged some scraps of a paper napkin onto that and sprayed the cards with Glimmer Mists and Maya Mist. Some more paper napkin scraps - done!

During all the drying time I stamped a lovely hinge from Crafty Secrets' stamp set "Hardware" with archival black ink onto white card, which I had first covered with Glimmer Mist. Then I cut them out and stamped them with sepia on the back with the same hinge image, as I knew these parts would be seen from both sides, when my project would be finished.

I also needed five backgrounds for the inner sides of the leporello booklet, so I cut out five pieces of white card, exactly the same size as the playing cards, inked them with Ranger distress inks "spiced marmalade", "mustard seed", "shabby shutters", "rusty hinge" and "pumice stone" and sprinkled water on them afterwards to get this wonderful stained look. A touch of Glimmer Mist was added to get a bit of bling too, which fits nostalgic projects very well, I think.
The golden arches were also stamped with combined stamps from the "Hardware"-stamp set mentioned above.

I tiped the tell off rhyme at the computer and printed it onto white cardstock. Each line was cut out separately and inked with "broken china" and "vintage photo". Then I glued the backs together with the pre-folded hinges, using a ruler to keep the cards in line.

I collaged the images of the children and the lines onto the backgrounds and glued the dried cards onto their counterparts. Wallaaa!

The whole leporello is held together by a thin leather string, which simply has to be tied around. It kind of looks like a small package, so I enter Fashionable Stamping Challenges ' "Good Things Come in Small Packages" with this project too. I am also entering ABAC's and Craft-room 's challenges with this project, where "Texture" and "Childhood Memories" are the subjects.

Hope, you (and they ;) like it: